
Nel mio libro Spring Boot 3 API Mastery, ho parlato di varie
tecniche di comunicazione asincrona tra client e server, approfondendo il pattern publisher/subscriber.
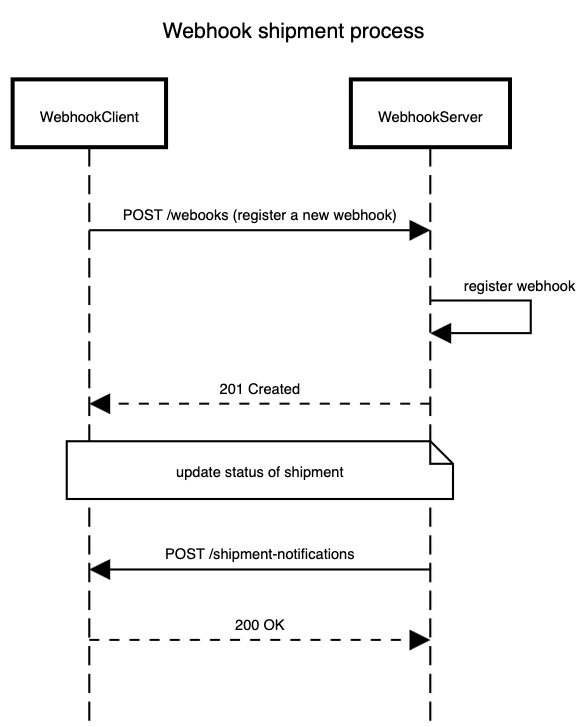
In questo tutorial approfondirò invece l'approccio webhook, mostrandoti come implementarlo con Spring Boot. Scriveremo un esempio di server (webhook-server, che rappresenta un gestore di spedizioni) e di client (webhook-client, che rappresenta un e-commerce interessato agli aggiornamenti delle spedizioni dei prodotti).
Trovi il codice completo sul repo GitHub: spring-webhook.
Cos'è webhook e paragone col polling
Webhook è una tecnica che implementa la comunicazione asincrona tra un server e diversi client.
Rispetto al polling HTTP, dove i client effettuano periodicamente chiamate HTTP al server per verificare se un evento è accaduto o se è cambiato lo stato di una entità, webhook usa un approccio contrario.
Il server (chiamato anche webhook provider) mette a disposizione una API di registrazione verso i client (chiamati anche webhook consumer o webhook listener),
dove questi ultimi devono specificare vari parametri tra cui la URL di callback e i tipi di eventi a cui sono interessati.
Quando sul server si verifica un evento, lui avvisa tutti i client registrati e interessati all'evento, invocando la loro
URL di callback.
Il vantaggio principale dei webhook rispetto al polling sta nell’efficienza e tempestività della comunicazione tra sistemi:
- Il server notifica attivamente il client quando c’è un nuovo evento ("c’è un aggiornamento, ecco i dati").
- Tempo reale: ricevi l’evento immediatamente, senza dover aspettare il prossimo polling.
- Efficienza: niente richieste inutili, riduci traffico e costi.
- Semplicità per i client: non devono più schedulare job o gestire meccanismi di polling in generale.
Il rovescio della medaglia è che con webhook aumenta la complessità di implementazione del server.
Creazione del webhook server
Le uniche dipendenze utilizzate sull'app server sono:
- spring-boot-starter-web, che permette di esporre delle API HTTP utilizzando Tomcat come Servlet Container.
- spring-retry, che permette al server di effettuare nuovi tentativi sulle chiamate di callback andare in KO.
- spring-boot-starter-aop, che permette di utilizzare le annotazioni di Spring Retry.
Puoi scaricare lo scheletro del progetto eseguendo la seguente cURL:
curl https://start.spring.io/starter.zip -d groupId=com.vincenzoracca \
    -d artifactId=webhook-server -d name=webhook-server \
    -d packageName=com.vincenzoracca.webhookserver \
    -d dependencies=web -d javaVersion=21 -d bootVersion=3.5.4 \
    -d type=maven-project -o webhook-server.zip
Di seguito le dipendenze complete:
<dependencies>
    <dependency>
        <groupId>org.springframework.boot</groupId>
        <artifactId>spring-boot-starter-web</artifactId>
    </dependency>
    <dependency>
        <groupId>org.springframework.boot</groupId>
        <artifactId>spring-boot-starter-aop</artifactId>
    </dependency>
    <dependency>
        <groupId>org.springframework.retry</groupId>
        <artifactId>spring-retry</artifactId>
    </dependency>
    <dependency>
        <groupId>org.springframework.boot</groupId>
        <artifactId>spring-boot-starter-test</artifactId>
        <scope>test</scope>
    </dependency>
</dependencies>
Modelli di dominio del server
I model utilizzati sono Webhook e ShipmentEvent, che rappresentano rispettivamente l'entità di webhook e un evento di spedizione:
// com.vincenzoracca.webhookserver.model.Webhook.java
public record Webhook(
        String webhookId,
        String callbackUrl,
        String secret,
        EventFilter eventFilter
) {

    // hide the secret in toString()

    public enum EventFilter {
        ALL,
        COMPLETED,
        CANCELED
    }
}

// com.vincenzoracca.webhookserver.model.ShipmentEvent.java
public record ShipmentEvent(
        String eventId,
        String orderId,
        ShipmentStatus status
) {

    public enum ShipmentStatus {
        COMPLETED,
        CANCELED,
    }
}
Per quanto riguarda l'entità Webhook:
- Il campo
webhookIdè un UUID generato dal server durante la creazione dell'entità e restituito al client. - Il campo
callbackUrlè l'URL di callback fornita dal client. - Il campo
secretè generato dal server e restituito al client. Vedremo successivamente a cosa serve. - Il campo
eventFilterpermette di specificare a quale tipo di evento il client si vuole sottoscrivere. Con"ALL", il client si sottoscrive a tutti gli eventi.
Per quanto riguarda l'entità ShipmentEvent:
- Il campo
eventIdè un ID univoco associato all'evento. Utile se si vuole sfruttare l'idempotenza dei client. - Il campo
orderIdè un ID unico associato ad un ordine.
Business logic del server
La logica del server è molto semplice. Deve mettere a disposizione delle API CRUD per la risorsa webhook, in modo tale che i client possano registrarsi, modificare la sottoscrizione ed eliminarla. Per semplicità creeremo solo l'API di registrazione:
// com.vincenzoracca.webhookserver.service.impl.WebhookService.java
@Service
public class WebhookService {

    private static final Logger log = LoggerFactory.getLogger(WebhookService.class);

    private final WebhookDao webhookDao;

    public WebhookService(WebhookDao webhookDao) {
        this.webhookDao = webhookDao;
    }

    public Webhook registerWebhook(WebhookRegistrationRequest request) {
        String secret = "secret"; // secret mocked
        String webhookId = UUID.randomUUID().toString();
        var registration = new Webhook(
                webhookId,
                request.callbackUrl(),
                secret, request.eventFilter());
        webhookDao.insert(registration);
        log.info("Webhook registration success: {}",
                registration.webhookId());
        return registration;
    }

}
Inoltre il server dovrà notificare ai client interessati (a seconda del campo eventFilter) il cambio di stato degli ordini:
// com.vincenzoracca.webhookserver.service.impl.ShipmentWebhookProducer.java
@Service
public class ShipmentWebhookProducer implements ShipmentProducer {

    private static final Logger log = LoggerFactory.getLogger(ShipmentWebhookProducer.class);

    private final WebhookDao webhookDao;
    private final ClientInvoker clientInvoker;

    public ShipmentWebhookProducer(WebhookDao webhookDao,
                                   ClientInvoker clientInvoker) {
        this.webhookDao = webhookDao;
        this.clientInvoker = clientInvoker;
    }


    @Override
    public void sendEvent(ShipmentEvent event) {
        webhookDao.findAllByEventFilters(Webhook.EventFilter
                        .valueOf(event.status().name()))
                .forEach(webhook -> {
                    invokeClient(webhook.callbackUrl(), event);
                    log.info("Sent {} to webhook {}",
                            event, webhook.webhookId());
                });
    }

    private void invokeClient(String callbackUrl, ShipmentEvent event) {
        try {
            clientInvoker.invoke(callbackUrl, event);
        }
        catch (Exception e) {
            log.error("Error while invoking client {}", event, e);
            // handle with custom logic
        }
    }
}
ClientInvoker ha la responsabilità di invocare via HTTP i client e applicare le policy di retry:
// com.vincenzoracca.webhookserver.util.ClientInvoker
@Component
public class ClientInvoker {

    private final RestClient restClient;

    public ClientInvoker(RestClient.Builder builder) {
        this.restClient = builder.build();
    }

    @Retryable(maxAttempts = 3, backoff = @Backoff(delay = 1000))
    public void invoke(String url, ShipmentEvent event) {
        restClient.post()
                .uri(url)
                .body(event)
                .retrieve().toBodilessEntity();

    }
}
Ricorda che l'annotazione @Retryable funziona solo se il metodo annotato è chiamato direttamente da un bean di Spring. Se ad esempio avessimo
annotato il metodo invokeClient della classe ShipmentWebhookProducer, il meccanismo di retry non avrebbe funzionato (anche se avessimo reso il metodo pubblico).
La classe DAO è poco rilevante in quanto utilizza una ConcurrentHashMap per memorizzare i dati.
API REST messe a disposizione dal server
Come detto in precedenza, il server deve fornire ai client le API CRUD per gestire la registrazione dei webhook:
// com.vincenzoracca.webhookserver.api.WebhookController
@RestController
@RequestMapping("webhooks")
public class WebhookController {

    private final WebhookService webhookService;

    public WebhookController(WebhookService webhookService) {
        this.webhookService = webhookService;
    }

    @PostMapping
    public ResponseEntity<Webhook> registerWebhook(@RequestBody WebhookRegistrationRequest request) {
        var webhook = webhookService.registerWebhook(request);
        return ResponseEntity.status(HttpStatus.CREATED).body(webhook);
    }
}

// com.vincenzoracca.webhookserver.model.WebhookRegistrationRequest
public record WebhookRegistrationRequest(
        String callbackUrl,
        Webhook.EventFilter eventFilter
) {
}
Inoltre, per simulare il cambio di stato degli ordini, creeremo un API REST che triggera questo tipo di evento:
// com.vincenzoracca.webhookserver.api.SimulatorController
@RestController
public class SimulatorController {

    private final ShipmentProducer shipmentProducer;

    public SimulatorController(ShipmentProducer shipmentProducer) {
        this.shipmentProducer = shipmentProducer;
    }

    @PostMapping("simulate")
    public ResponseEntity<Void> simulateEvent(@RequestBody ShipmentEvent event) {
        shipmentProducer.sendEvent(event);
        return ResponseEntity.noContent().build();
    }
}
Abbiamo terminato l'implementazione del server, passiamo al client.
Creazione del webhook client
L'applicazione client ha la sola dipendenza di spring-boot starter-web.
Lo scheletro del progetto può essere scaricato effettuando la seguente cURL:
curl https://start.spring.io/starter.zip -d groupId=com.vincenzoracca \
    -d artifactId=webhook-client -d name=webhook-client \
    -d packageName=com.vincenzoracca.webhookclient \
    -d dependencies=web -d javaVersion=21 -d bootVersion=3.5.4 \
    -d type=maven-project -o webhook-client.zip
Modelli di dominio del client
L'unico modello di dominio utilizzato dal client è la classe ShipmentEvent vista in precedenza.
Business logic del client
La logica del client è piuttosto semplice: si limita a consumare gli eventi inviati dal server. Tuttavia, grazie al campo eventId presente in ogni evento, il client può implementare un meccanismo di idempotenza, che gli consente di evitare la rielaborazione di eventi già ricevuti.
Questo è particolarmente utile nei casi in cui il server ritenti l’invio di una notifica (ad esempio a causa di un timeout o di un errore temporaneo): il client sarà in grado di riconoscere che l’evento è già stato gestito e scartare il duplicato, garantendo così consistenza ed evitando elaborazioni ridondanti.
// com.vincenzoracca.webhookclient.service.impl.ShipmentWebhookConsumer
@Service
public class ShipmentWebhookConsumer implements ShipmentConsumer {

    private static final Logger log = LoggerFactory.getLogger(ShipmentWebhookConsumer.class);

    private final ShipmentEventDao shipmentEventDao;

    public ShipmentWebhookConsumer(ShipmentEventDao shipmentEventDao) {
        this.shipmentEventDao = shipmentEventDao;
    }

    @Override
    public void consumeEvent(ShipmentEvent event) {
        ShipmentEvent oldValue = shipmentEventDao.putIfAbsent(event);
        if(oldValue == null) {
            log.info("Shipment event {} has been saved", event);
        }
        else {
            log.warn("Shipment event {} duplicated", event);
        }
    }
}
API REST messe a disposizione dal client
L'unica API messa a disposizione del client è la API di callback registrata sul server, che permette di consumare gli eventi:
// com.vincenzoracca.webhookclient.api.ShipmentNotificationController
@RestController
@RequestMapping("shipment-notifications")
public class ShipmentNotificationController {

    private static final String SECRET = "secret"; // secret mocked

    private final ShipmentConsumer shipmentConsumer;
    private final ObjectMapper objectMapper;

    public ShipmentNotificationController(ShipmentConsumer shipmentConsumer,
                                          ObjectMapper objectMapper) {
        this.shipmentConsumer = shipmentConsumer;
        this.objectMapper = objectMapper;
    }

    @PostMapping
    public ResponseEntity<Void> consumeEvent(
            @RequestBody String rawBody) throws JsonProcessingException {

        var event = objectMapper.readValue(rawBody, ShipmentEvent.class);
        shipmentConsumer.consumeEvent(event);
        return ResponseEntity.accepted().build();
    }
}
Nota che il tipo della classe del body di richiesta non è ShipmentEvent ma la stringa che rappresenta il body originale per poi de-serializzarlo successivamente. Vedremo nel paragrafo sulla sicurezza perché questa scelta è fondamentale.
Anche l'implementazione del client è terminata. Tuttavia, ci sono delle best practices sulla sicurezza che dovremmo applicare.
Sicurezza in webhook
Poiché i webhook espongono endpoint HTTP accessibili da Internet, è fondamentale permettere al client di verificare l’autenticità e l’integrità delle richieste, per prevenire attacchi come i replay attack e l’iniezione di payload falsi.
Oltre a utilizzare sempre HTTPS per proteggere il canale, un approccio comune consiste nel firmare le richieste seguendo questi passaggi:
- Il server concatena il timestamp della richiesta con il payload del webhook.
- Applica una firma crittografica (ad esempio HMAC-SHA256) usando un secret condiviso tra server e client.
- Invia la richiesta al client includendo sia il timestamp che la firma negli header.
Il client, a sua volta, deve:
- Verificare la finestra temporale: controlla che il timestamp sia recente (es. entro 5 minuti) per evitare replay fuori tempo.
- Verificare la firma: ricalcola l’HMAC con il secret condiviso e confronta con la firma ricevuta; se coincidono, la richiesta proviene davvero dal server e non è stata alterata.
- Rifiutare le richieste non valide: quelle troppo vecchie, con firma errata o mancante.
Applicazione della sicurezza sul server
Il server ha il compito di:
- Generare e comunicare al client un secret quando registra un nuovo webhook.
- Firmare gli eventi di webhook inviati ai client.
// com.vincenzoracca.webhookserver.util.SecurityServerUtil
@Component
public class SecurityServerUtil {

    private static final String HMAC_ALGO = "HmacSHA256";

    private static final int DEFAULT_NUM_BYTES = 32;
    private static final SecureRandom RNG = new SecureRandom();

    private final ObjectMapper mapper;

    public SecurityServerUtil(ObjectMapper mapper) {
        this.mapper = mapper;
    }

    public record SigHeaders(long timestamp, String signature) {}

    public String newSecret() {
//        byte[] buf = new byte[DEFAULT_NUM_BYTES];
//        RNG.nextBytes(buf);
//        return Base64.getUrlEncoder().withoutPadding().encodeToString(buf);
        return "secret"; // secret mocked
    }

    public SigHeaders sign(String secret, Object value) {
        var bodyJson = toJson(value);
        long ts = Instant.now().toEpochMilli();
        String toSign = ts + "\n" + bodyJson;
        String sig = "sha256=" + hmacSha256(secret, toSign);
        return new SigHeaders(ts, sig);
    }

    private String hmacSha256(String secret, String data) {
        try {
            var mac = javax.crypto.Mac.getInstance(HMAC_ALGO);
            mac.init(new SecretKeySpec(secret.getBytes(StandardCharsets.UTF_8), HMAC_ALGO));
            byte[] h = mac.doFinal(data.getBytes(StandardCharsets.UTF_8));
            StringBuilder sb = new StringBuilder(h.length * 2);
            for (byte b : h) sb.append(String.format("%02x", b));
            return sb.toString();
        } catch (Exception e) {
            throw new IllegalStateException("HMAC error", e);
        }
    }

    private String toJson(Object value) {
        try {
            return mapper.writeValueAsString(value);
        } catch (JsonProcessingException e) {
            throw new RuntimeException(e);
        }
    }
}
Questa classe di utility è utilizzata nei due punti elencati sopra:
// WebhookService.java
@Service
public class WebhookService {

    private static final Logger log = LoggerFactory.getLogger(WebhookService.class);

    private final WebhookDao webhookDao;
    private final SecurityServerUtil securityServerUtil;

    public WebhookService(WebhookDao webhookDao, SecurityServerUtil securityServerUtil) {
        this.webhookDao = webhookDao;
        this.securityServerUtil = securityServerUtil;
    }


    public Webhook registerWebhook(WebhookRegistrationRequest request) {
        String secret = securityServerUtil.newSecret();
        String webhookId = UUID.randomUUID().toString();
        var registration = new Webhook(
                webhookId,
                request.callbackUrl(),
                secret, request.eventFilter());
        webhookDao.insert(registration);
        log.info("Webhook registration success: {}",
                registration.webhookId());
        return registration;
    }

}

// ShipmentWebhookProducer.java
@Service
public class ShipmentWebhookProducer implements ShipmentProducer {

    private static final Logger log = LoggerFactory.getLogger(ShipmentWebhookProducer.class);

    private final WebhookDao webhookDao;
    private final ClientInvoker clientInvoker;
    private final SecurityServerUtil securityServerUtil;

    public ShipmentWebhookProducer(WebhookDao webhookDao, ClientInvoker clientInvoker, SecurityServerUtil securityServerUtil) {
        this.webhookDao = webhookDao;
        this.clientInvoker = clientInvoker;
        this.securityServerUtil = securityServerUtil;
    }


    @Override
    public void sendEvent(ShipmentEvent event) {
        webhookDao.findAllByEventFilters(Webhook.EventFilter.valueOf(event.status().name()))
                .forEach(webhook -> {
                    SecurityServerUtil.SigHeaders sign = securityServerUtil.sign(webhook.secret(), event);
                    invokeClient(webhook.callbackUrl(), sign.timestamp(), sign.signature(), event);
                    log.info("Sent {} to webhook {}",
                            event, webhook.webhookId());
                });
    }

    private void invokeClient(String callbackUrl, long timestamp, String signature, ShipmentEvent event) {
        try {
            clientInvoker.invoke(callbackUrl, timestamp,signature, event);
        }
        catch (Exception e) {
            log.error("Error while invoking client {}", event, e);
            // handle with custom logic
        }
    }
}

// ClientInvoker.java
@Component
public class ClientInvoker {

    private final RestClient restClient;

    public ClientInvoker(RestClient.Builder builder) {
        this.restClient = builder.build();
    }

    @Retryable(maxAttempts = 3, backoff = @Backoff(delay = 1000))
    public void invoke(String url, long timestamp, String signature,
                       ShipmentEvent event) {
        restClient.post()
                .uri(url)
                .header("X-Timestamp", String.valueOf(timestamp))
                .header("X-Signature", signature)
                .body(event)
                .retrieve().toBodilessEntity();

    }
}
Applicazione della sicurezza sul client
Il client dovrà:
- Memorizzare il secret generato dal server (per semplicità in questo tutorial, il valore è una stringa fissa, quindi saltiamo questo passaggio).
- Alla ricezione di un evento di webhook:
- Verificare che la finestra temporale sia valida.
- Ricalcolare la firma con il secret condiviso dal server e confrontarla con la firma ricevuta.
// com.vincenzoracca.webhookclient.util.SecurityClientUtil
@Component
public class SecurityClientUtil {

    private static final String HMAC_ALGO = "HmacSHA256";
    private static final Duration TOLETANCE_MINUTES = Duration.ofMinutes(5);


    public boolean isInToleranceTime(long requestTimestamp) {
        long now = Instant.now().toEpochMilli();
//        var delayNow = Instant.ofEpochMilli(now).plus(10, ChronoUnit.MINUTES).toEpochMilli();
//        return delayNow - requestTimestamp <= TOLETANCE_MINUTES.toMillis(); // for testing KO
        return now - requestTimestamp <= TOLETANCE_MINUTES.toMillis();
    }

    public boolean verifySignature(String secret, long requestTimestamp,
                                   String rawBody, String signature) {
        String expected = "sha256=" + hmacSha256(secret, requestTimestamp + "\n" + rawBody);
        return expected.equals(signature);
    }

    private String hmacSha256(String secret, String data) {
        try {
            var mac = Mac.getInstance(HMAC_ALGO);
            mac.init(new SecretKeySpec(secret.getBytes(StandardCharsets.UTF_8), HMAC_ALGO));
            byte[] h = mac.doFinal(data.getBytes(StandardCharsets.UTF_8));
            StringBuilder sb = new StringBuilder(h.length * 2);
            for (byte b : h) sb.append(String.format("%02x", b));
            return sb.toString();
        } catch (Exception e) {
            throw new IllegalStateException("HMAC error", e);
        }
    }
}

// ShipmentNotificationController.java
@RestController
@RequestMapping("shipment-notifications")
public class ShipmentNotificationController {

    private static final String SECRET = "secret"; // secret mocked

    private final ShipmentConsumer shipmentConsumer;
    private final SecurityClientUtil securityClientUtil;
    private final ObjectMapper objectMapper;

    public ShipmentNotificationController(ShipmentConsumer shipmentConsumer,
                                          SecurityClientUtil securityClientUtil, ObjectMapper objectMapper) {
        this.shipmentConsumer = shipmentConsumer;
        this.securityClientUtil = securityClientUtil;
        this.objectMapper = objectMapper;
    }

    @PostMapping
    public ResponseEntity<Void> consumeEvent(
            @RequestHeader("X-Timestamp") long requestTimestamp,
            @RequestHeader("X-Signature") String signature,
            @RequestBody String rawBody)
            throws JsonProcessingException {

        if(! securityClientUtil.isInToleranceTime(requestTimestamp)) {
            return ResponseEntity
                    .status(HttpStatus.FORBIDDEN)
                    .build();
        }

        if(! securityClientUtil.verifySignature(SECRET, requestTimestamp, rawBody, signature)) {
            return ResponseEntity
                    .status(HttpStatus.UNAUTHORIZED)
                    .build();
        }

        var event = objectMapper.readValue(rawBody, ShipmentEvent.class);
        shipmentConsumer.consumeEvent(event);
        return ResponseEntity.accepted().build();
    }
}
timestamp + "\n" + body): per verificarla
devi ricalcolare l’HMAC sugli stessi identici byte che hai ricevuto. Se invece deserializzi l’oggetto e poi lo ri-serializzi,
potresti ottenere byte diversi, anche se il contenuto “logico” è lo stesso (client e server potrebbero applicare metodi diversi di serializzazione).
E la verifica potrebbe fallire.
Proviamo l'applicazione
Avvia sia il client che il server.
Registra il client sul server con la seguente cURL:
curl --location 'localhost:8080/webhooks' \
--header 'Content-Type: application/json' \
--data '{
    "callbackUrl": "http://localhost:8081/shipment-notifications",
    "eventFilter": "COMPLETED"
}'
Riceveremo una risposta 200 OK con un body simile:
{
  "webhookId":"93fa5502-cdb5-4bfb-a528-f7b87d263b24",
  "callbackUrl":"http://localhost:8081/shipment-notifications",
  "secret":"secret",
  "eventFilter":"COMPLETED"
}
E nei log del server vedremo:
Webhook registration success: 93fa5502-cdb5-4bfb-a528-f7b87d263b24
Ora simuliamo il trigger di un evento con la seguente cURL:
curl --location 'localhost:8080/simulate' \
--header 'Content-Type: application/json' \
--data '{
    "eventId": "20250817",
    "orderId": "1",
    "status": "COMPLETED"
}'
La risposta sarà 204 No Content. Nei log del server:
Sent ShipmentEvent[eventId=20250817, orderId=1, status=COMPLETED]
    to webhook 93fa5502-cdb5-4bfb-a528-f7b87d263b24
E nei log del client:
Shipment event ShipmentEvent[eventId=20250817, orderId=1, status=COMPLETED]
    has been saved
Se invece proviamo a triggerare un evento con stato CANCELED (il client si è registrato solo per eventi con stato COMPLETED):
curl --location 'localhost:8080/simulate' \
--header 'Content-Type: application/json' \
--data '{
    "eventId": "20250819",
    "orderId": "1",
    "status": "CANCELED"
}'
Nei log del server non comparirà alcun messaggio "Sent ShipmentEvent", perché l’unico client registrato non è interessato a quel tipo di evento.
Conclusioni
In questo tutorial abbiamo visto come implementare un meccanismo di webhook completo in Spring Boot 3 e Java 21, realizzando sia il server (provider) che il client (consumer).
Rispetto al polling, i webhook garantiscono notifiche in tempo reale ed eliminano traffico inutile. Tuttavia, richiedono alcune attenzioni extra:
- Gestione dei retry sul server, per assicurare che gli eventi arrivino anche in caso di errori temporanei.
- Idempotenza lato client, per evitare duplicazioni in caso di reinvii.
- Sicurezza basata su secret condivisi, timestamp e firme HMAC, indispensabile per prevenire manomissioni o replay attack.
Questo approccio rappresenta una base solida per integrare sistemi eterogenei in modo scalabile, affidabile e sicuro.
Se vuoi approfondire la progettazione di API moderne e asincrone, trovi un capitolo dedicato nel mio libro Spring Boot 3 API Mastery.