
What is Docker Compose
Docker Compose is a tool that allows you to group and start a set of containers with a single command.
A YAML file is used where all the containers to be created and started are listed.
In Docker Compose, each container is defined as a service (not to be confused with the service concept of
Kubernetes).
Docker Compose V2 supports the docker compose command, compared to the V1 version where the command to execute is
docker-compose. This is because Compose V2 has been integrated with the Docker CLI.
Advantages of Docker Compose over Docker
There are several advantages to using Docker Compose to start containers instead of "pure" Docker.
First, you have a manifest where you specify all containers. A file is versionable with respect to executing
of imperative commands, so that is the first advantage. Sure, you could create a script containing the various commands
imperative Docker commands, but it is still a file you wrote and therefore error-prone, as opposed to a manifest from
Docker Compose.
Another advantage is that thanks to Docker Compose, you can easily specify the order in which the containers are started
listed (you will see later in detail how to do this).
Yet another advantage, Docker Compose creates a network for you for the listed containers, so that they can
easily communicate with each other.
Installing Docker Compose
For Windows and Mac, the Docker Compose tool is already included in Docker Desktop. For Linux, an additional package must be installed.
I reproduce here the official doc on how to install Docker Compose: https://docs.docker.com/compose/install/.
Docker Compose in practice
You will write a Docker Compose manifest to containerize a simple Java Spring Boot application, which uses Postgres as the Datasource. You can find the project link here: Spring Docker.
The application contains simple REST CRUD services for a Book entity, using Spring Data REST.
Locally, the application uses H2 as its Datasource. When you containerize the application, it will use Postgres instead.
Write the file docker-compose.yml
Write the manifest file docker-compose.yml:
version: '3.8'
services:
   db:
      container_name: pg_container
      image: postgres:14
      restart: "no"
      environment:
         POSTGRES_USER: user
         POSTGRES_PASSWORD: password
         POSTGRES_DB: spring-docker
      ports:
         - "5432:5432"
      volumes:
         - pgdata:/var/lib/postgresql/data
   pgadmin:
      container_name: pgadmin4_container
      image: dpage/pgadmin4
      restart: "no"
      environment:
         PGADMIN_DEFAULT_EMAIL: admin@admin.com
         PGADMIN_DEFAULT_PASSWORD: user
      ports:
         - "5050:80"
      depends_on:
         - "db"
   spring-docker:
      container_name: spring-docker
      image: vincenzoracca/spring-docker:0.0.1-SNAPSHOT
      #    If you want to build the image from the Dockerfile, uncomment the line below.
      #    build: .
      restart: "no"
      environment:
         - BPL_JVM_THREAD_COUNT=50
         - BPL_DEBUG_ENABLED=true
         - BPL_DEBUG_PORT=9090
         - SPRING_DATASOURCE_URL=jdbc:postgresql://pg_container:5432/spring-docker
         - SPRING_DATASOURCE_USERNAME=user
         - SPRING_DATASOURCE_PASSWORD=password
      ports:
         - "8081:8081"
         - "9090:9090"
      depends_on:
         - "db"
volumes:
   pgdata:
Let's analyze the manifest:
The first line contains the version of the Docker Compose manifest. Different versions of the manifest can have different file structures. Here if you want to learn more about it docs.docker.com/compose/compose-file/compose-versioning.
From the second line, there is the main section, which is the services, where we list all the containers.
Each service is assigned a name (db, pgadmin, spring-docker).
With container_name you indicate the name to be assigned to the created container (corresponds to the --name flag of the docker run command).
With image, you indicate the name of the image. Just as with pure Docker, if the image is not present locally, it is downloaded by default from the Docker Hub.
Optionally, you can add the build field to indicate the path to a Dockerfile. If the Dockefile is located in the same path as the docker-compose.yml, you can write a "." (dot) as the value of build. In that case, the name of the created image will be equal to the value of the image field. If the image field is not specified, Docker Compose will assign a name to the image automatically.
The environment field is used to declare environment variables (it corresponds to the --env flag of the docker run command). If the same variables are also declared in the Dockerfile, priority is given to those in Docker Compose.
The ports field corresponds to the -p flag of the docker run command. It is then used to map the localhost ports to those exposed by the container.
The volumes field inside a service section is used to assign one or more volumes to the container (corresponds to the -v flag of the docker run command).
The volumes field outside the service section (the one in the penultimate line), is used to declare volumes, which will be created by Docker Compose. If the volume already exists because it was created by imperative command, the
external: truefield must be added.
volumes:
 pgdata:
  external: true
- The field depends_on, is used to indicate to Docker Compose that the container to be created should be started after the list of containers listed in depends_on. Since Docker Compose reasons in terms of services, we need to indicate the names of the services related to the containers and not the container names directly. For example, in this case, the Java app and PgAdmin containers will be started after the Postgres container.
Start containers with Docker Compose
First, if you do not want to create the Spring Boot app image via Dockerfile, you can use the command
./mvnw spring-boot:build-image. Otherwise, uncomment the line where the build field is in the docker-compose.yml file.
Located in the path of the docker-compose.yml file and run the command: docker compose up

You can see from the image that a network for the containers and the volume are created first, then the three containers are created and finally the latter are started.
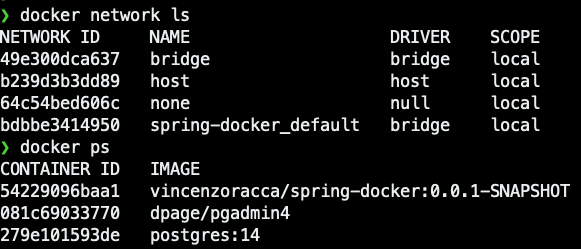
With the commands docker network ls and docker ps you can see that indeed the network has been created and the containers, which
are up & running.
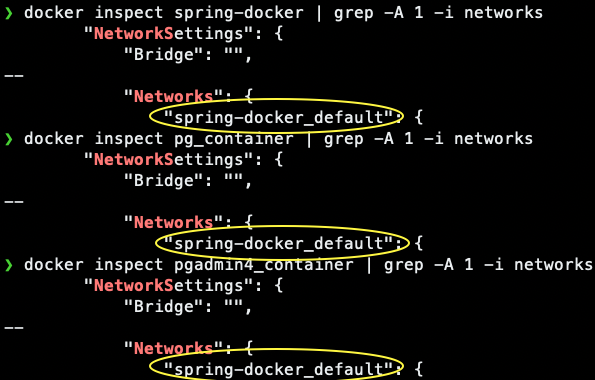
Also, using the docker inspect command on the three containers, you can verify that they are part of the same network, spring-docker_default.
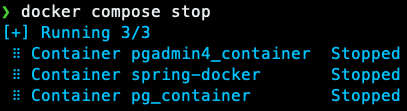
You can turn off containers using the docker compose stop command.
The next time you start with docker compose up, Docker Compose will start the previously created containers, without creating them
again from scratch. This is also true when you add a new service (container) to your manifest.
Docker Compose creates only the new containers, or updates the old ones if there have been changes to the YAML.
To the docker compose up command you can add the -d flag to start containers in the background: docker compose up -d.
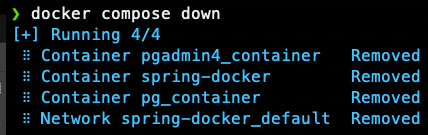
The docker compose down command, on the other hand, not only shuts down the manifest containers, but also destroys them, as well as
destroying the network (but the volume for obvious reasons is retained):
Conclusions
In this article I gave you a general overview of Docker Compose. My advice is to always use Docker Compose
when you need to manage multiple interconnected containers.
With the manifest you have at your fingertips the characteristics of the container, such as which image it uses, its volumes, etc.
Also, editing a container (such as updating its image version) is much easier.
Just edit the manifest and run the usual docker compose up command (with Docker imperative commands,
you should first shut down the container, then destroy it, and finally recreate it with the new image version).
GitHub Docker Compose project for Java Spring Boot app: Spring Docker.
Official doc about Docker Compose: docs.docker.com/compose.
My articles about Docker: Docker