What is Kubernetes
In the section of Docker you saw both what containers are in general, and what Docker is.
Docker is definitely the best known container technology.
However, in a production environment, you need a tool that orchestrates containers, i.e., a tool that allows you to
automatically manage container lifecycle, manage container replicas, resources, etc.
Useful is the description given by the kubernetes.io site:
"Containers are a good way to deploy and run applications. In a production environment, it is necessary to manage containers that run applications and ensure that there are no service interruptions. For example, if a container breaks down, a new instance of it must be started. Wouldn't it be easier if this behavior were handled directly by a system? [...] This is precisely where Kubernetes comes to the rescue!
Kubernetes (also known as K8S) is thus a container orchestrator, that is, a tool that automates deployment, scaling, and other operations on containers. It also automatically manages the lifecycle of containers.
Kubernetes Cluster
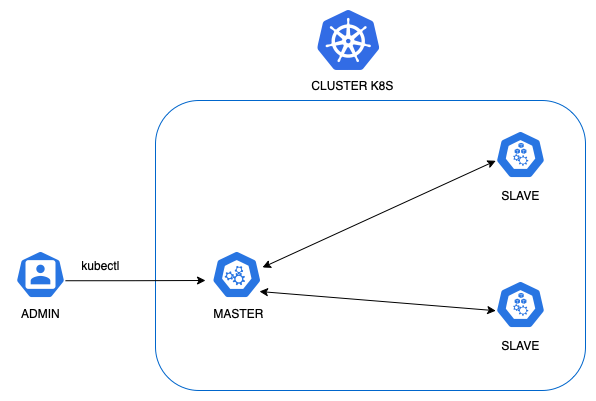
A Kubernetes cluster is a set of nodes where various containers are deployed.
More precisely, a Kubernetes cluster consists of at least one master node, and slave nodes.
The master node (also called the Control Plane) is the one who manages the slave nodes. It takes care of keeping the cluster in a desired state (i.e, it verifies that the cluster respects the settings according to manifest files we create). The user to manage containers and other Kubernetes resources, will use the master machine (e.g., to read the logs of a container, see the state of a container, or in general the state of the cluster).
The slaves are the working nodes, that is, the nodes that actually run our containers.
For testing purposes, it is possible to use only one node to act as both master and slave.
 |
|---|
| Kubernetes cluster example, with one master and two worker nodes |
What is meant by a desired state
The user, through manifests, decides what is the desired state for a particular Deployment.
That is, through a yaml file, the user decides that particular container how many replicas it should have,
how many resources it can consume, which image should be used and other settings.
Below is an example of a Deployment file:
apiVersion: apps/v1
kind: Deployment
metadata:
  name: nginx-deployment
  labels:
    app: nginx
spec:
  replicas: 3
  selector:
    matchLabels:
      app: nginx
  template:
    metadata:
      labels:
        app: nginx
    spec:
      containers:
      - name: nginx
        image: nginx:1.14.2
        ports:
        - containerPort: 80
Here we are telling Kubernetes that we want three Pods (for now we can associate them with the concept of containers, in the next
article, however, we will discuss the detail of the latter), using the NGINX version 1.14.2 image.
By running the command kubectl apply -f <filename_yam>, Kubernetes will create the NGINX containers, deployed on the various
slave machines, and make sure that they will be Up & Running and that you always respect these settings (e.g., that they are up always
three instances).
If for some reason a slave node, where one of the three replicas is running, fails, Kubernetes will create a
third instance in another node, to respect the desired state of the manifest.
The desired state applies not only to Deployments, but also to other Kubernetes objects, which we will see in the forthcoming articles.
Kubernetes objects
The most important objects in Kubernetes are:
- Pod
- ReplicaSet
- Deployment
- StatefulSet
- Service
- PersistentVolume
Each object has its own manifest file structure.
In future articles, we will look at an example of some of these objects.
Components of the Control Plane node
We mentioned that the Control Plane is the master node of Kubernetes. The most important components of the latter are:
- kube-apiserver: is the frontend of the control plane, accessible either via REST API or via command line with kubectl.
- kube-scheduler: it takes care of figuring out whether the cluster can accommodate other Pods by monitoring node resources, and if so, decides on which node to start the Pod.
- kube-controller-manager: takes care of maintaining the desired state of the cluster, such as verifying that the number of Pod replicas is met. To do this, it communicates with the slave nodes via the kube-apiserver, which in turn uses a distributed database, etcd.
- etcd: distributed key-value database, which contains cluster configuration information such as IP addresses of the various us.
- cloud-controller-manager: adds Cloud Provider-specific control logic. Allows you to connect the cluster with the cloud provider's API. In an on premise installation, this component is not present.
Components of a Kubernetes node
Each node contains the following components:
- kube-proxy: a proxy running on each node and responsible for managing the node's network rules for communication within and outside the cluster. It constantly communicates with the control plane through the kube-apiserver, which tells it which Service (a Kubernetes object we will see later) it needs to add or remove.
- container runtime: this is the component that allows containers to run. Kubernetes supports several runtime containers such as containererd, but it has recently deprecated Docker.
- kubelet: agent that communicates with the master and verifies that containers are running properly in the Pod. It also performs various types of checks on containers, such as readinessProbe and livenessProbe.
Installation of K8S
You can run Kubernetes in several ways:
- by physically installing it on master and slave nodes (Linux machines)
- using Docker Desktop
- using tools such as minikube and kind (for testing purposes)
- using a Kubernetes service managed by the various Cloud Providers (EKS from AWS, GKE on Google Cloud, AKS from Azure)
In the next articles we will use kind, which allows you to create a Kubernetes cluster via
Docker containers (creates one container representing the master, creates N containers representing the slaves).
Through a configuration file, you can decide how many masters and how many slaves Kind should create.
In addition, Kind can be installed for both Linux, Windows, and Mac.
Read more here: kind.sigs.k8s.io
Installation of Kind and first Kubernetes Cluster Up & Running locally
First, if you have not already done so, you need to install Docker or Docker Desktop:
docs.docker.com/engine/install/.
Then you need to install the command line tool "kubectl" (kubernetes.io/docs/tasks/tools/)
Finally, we can install kind by following the official guide, available for all operating systems: kind.sigs.k8s.io/docs/user/quick-start.
Once installed, you can create the Kubernetes cluster with the following command: kind create cluster.
This command will create a Cluster consisting of one node, which will act as both master and slave.
If you wanted to have a different configuration, you could create a kind configuration file like this:
# three node (two workers) cluster config - file name kind-example-config.yaml
kind: Cluster
apiVersion: kind.x-k8s.io/v1alpha4
nodes:
- role: control-plane
- role: worker
- role: worker
and perform this configuration with the following command: kind create cluster --config kind-example-config.yaml.
In this case, one master node and two slave nodes will be created.
Once the cluster is created, as Kind suggested, run the command: kubectl cluster-info --context kind-kind.
Finally, verify that the node or nodes in the cluster are up & running by running the command: kubectl get nodes.
You should have a screen like this:
 |
|---|
| Example of creating a Kubernetes cluster using the Kind tool |
To delete the cluster, just run the following command: kind delete cluster.
Conclusions
Congratulations, you created your first Kubernetes cluster in minutes!
In the next article you will see what a Pod is, and we will give examples by putting our cluster to work!
Articles about Docker: Docker
Recommended books:
- Kubernetes TakeAway: Implementa i cluster K8s come un professionista: https://amzn.to/3RXgSXp
- Docker: Sviluppare e rilasciare software tramite container: https://amzn.to/3OxJbc6
- Kubernetes. Guida per gestire e orchestrare i container : https://amzn.to/45RoqBJ