
In this tutorial, we will explore how to develop an event-driven and broker-agnostic application using Spring Cloud Stream, leveraging the same code to interact with both Apache Kafka and RabbitMQ. Subsequently, we will delve into adding Kafka-specific configurations and error handling.
The application we build will simulate the sending and receiving of events generated by a temperature sensor. We will examine how to implement Producers and Consumers in both imperative and reactive styles, utilizing the features provided by Spring Cloud Stream.
A bit of theory
What is Spring Cloud Stream
Spring Cloud Stream is a module of the Spring framework that integrates the capabilities of Spring Integration (focused on implementing integration patterns) with the simplicity and configurability of Spring Boot.
The primary goal of this module is to enable developers to concentrate solely on the business logic of event-driven applications, abstracting away the complexity of managing code specific to various messaging systems.
With Spring Cloud Stream, you can write code to produce and consume messages on Apache Kafka, while maintaining compatibility with other brokers such as RabbitMQ, AWS Kinesis, AWS SQS, Azure Event Hubs, and many more, without requiring code modifications.
Components of Spring Cloud Stream
Spring Cloud Stream has three main components:
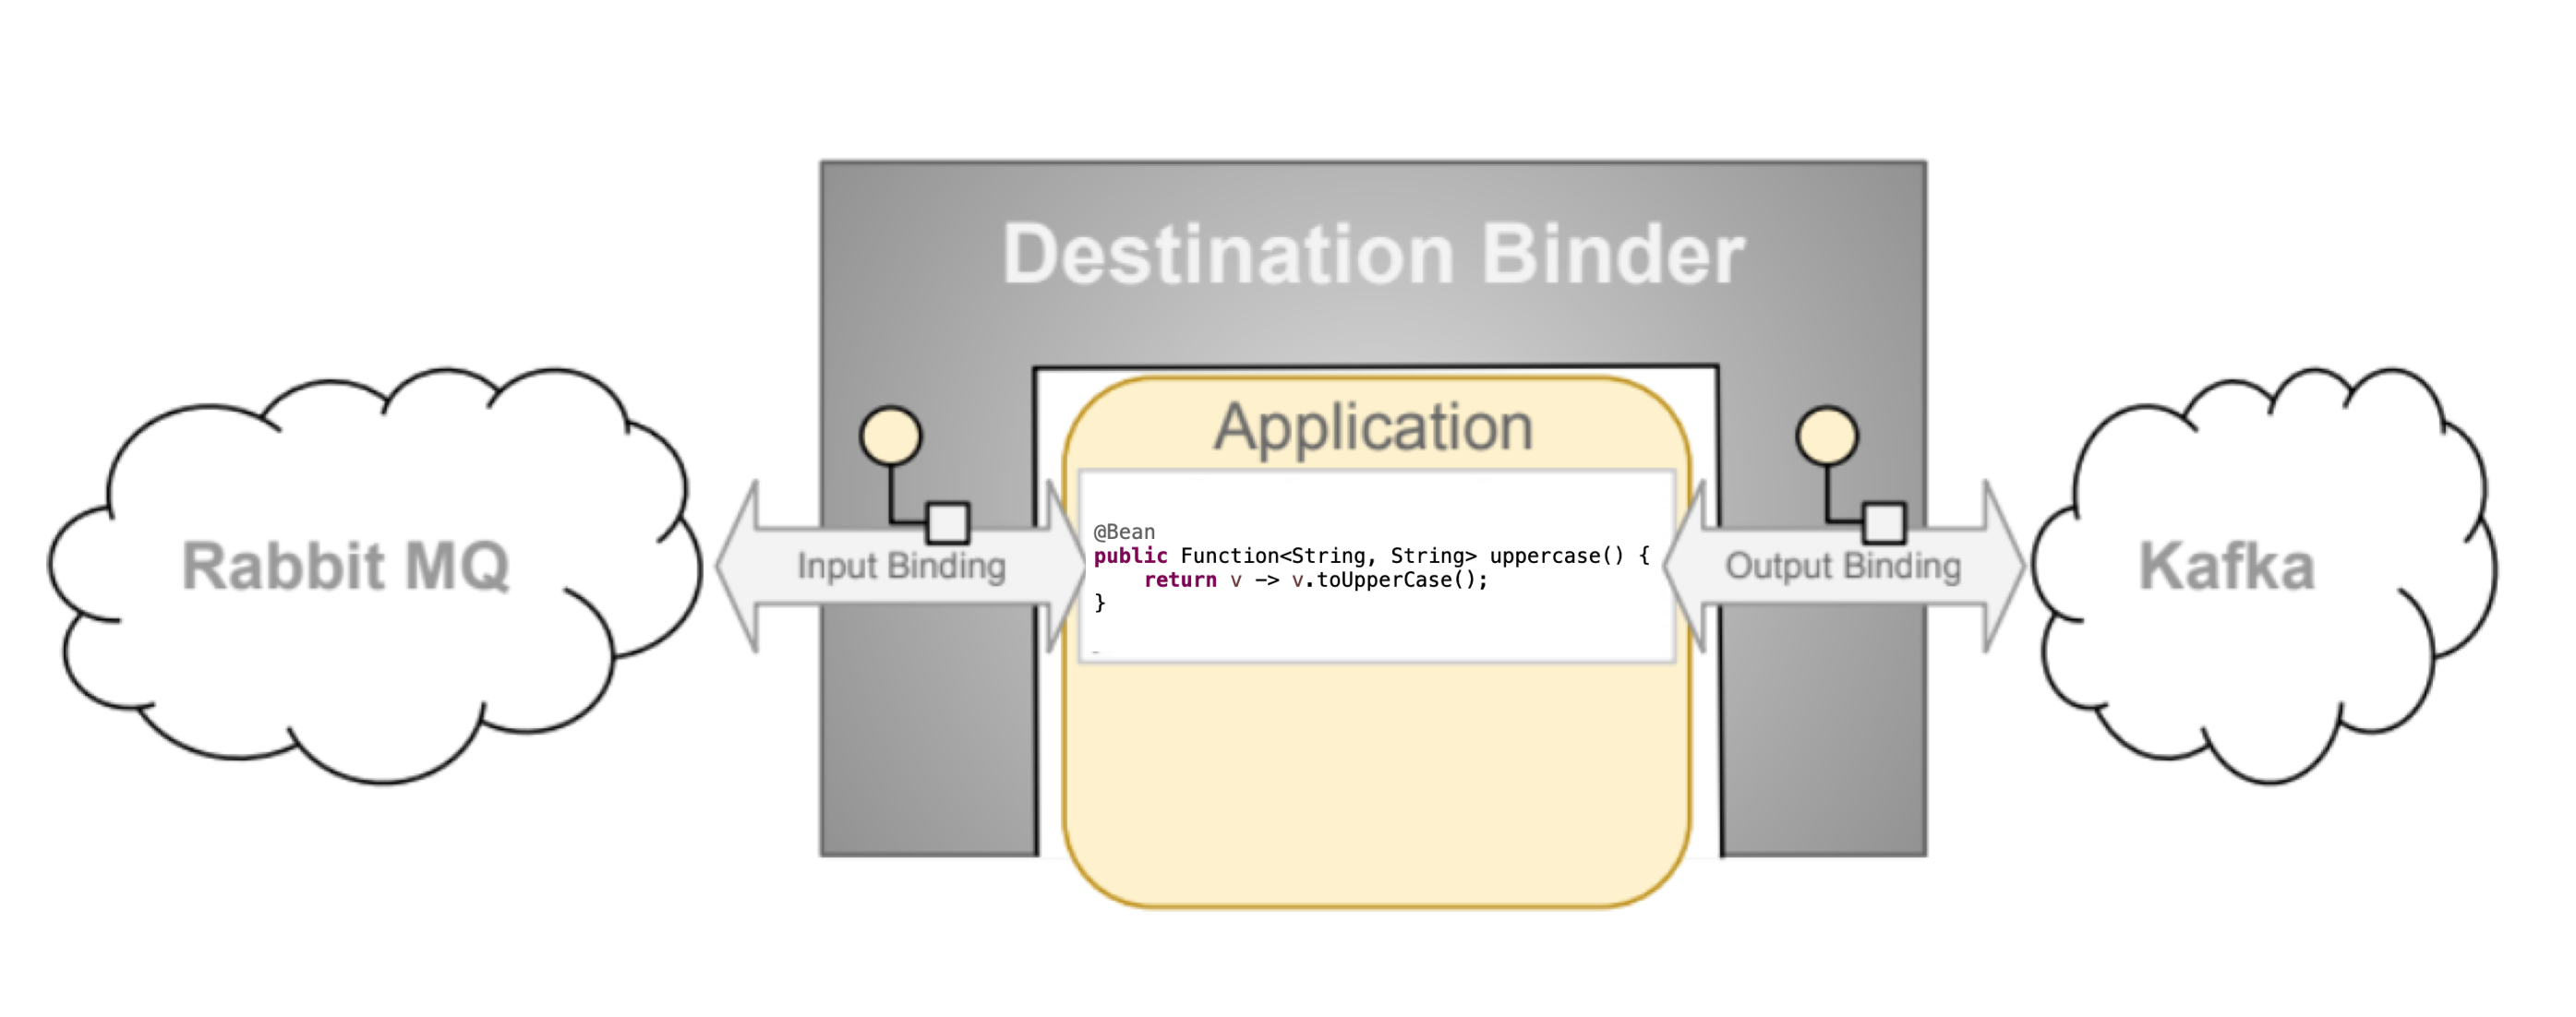
- Destination Binder: The component that provides integration with external message systems such as RabbitMQ or Kafka.
- Binding: A bridge between the external message system and the producers/consumers provided by the application.
- Message: The data structure used by producers/consumers to communicate with Destination Binders.
 |
|---|
| Image by https://docs.spring.io/spring-cloud-stream/docs/current/reference/html/spring-cloud-stream.html#spring-cloud-stream-reference |
From the image above you can see that the bindings are input and output. You can combine multiple binders; for example you could read a message from RabbitMQ and write it to Kafka, creating a simple Java function (we will elaborate on this topic).
The developer will be able to focus solely on Business Logic in the form of functions, after which when choosing the message system to be used, he will have to import the dependency of the chosen binder.
There are binders managed directly by Spring Cloud Stream such as Apache Kafka, RabbitMQ, Amazon Kinesis, and others managed by external maintainers such as Azure EventHubs, Amazon SQS, etc. However, Spring Cloud Stream allows you to create custom binders in an easy way..
Spring Cloud Stream also integrates the functionality of Partition and Message Groups mirroring those of Apache Kafka.
This means that the framework makes these two features available for any message system you choose
(so for example you will have them available even if you use RabbitMQ, despite the fact that this system does not natively support them).
Spring Cloud Stream from Spring Cloud Function
Spring Cloud Stream is built on Spring Cloud Function, allowing business logic to be written using simple functions. The framework leverages the three core Java interfaces:
- Supplier: a function that produces an output without receiving any input; commonly referred to as a producer, publisher, source.
- Consumer: a function that receives an input without producing any output; also known as a subscriber or sink.
- Function: a function that has both input and output, is also called processor.
The previous version of Spring Cloud Stream, by not adopting Spring Cloud Function, made the framework less intuitive and more complex to use.
This is an example of a processor taking a string as input and turning it into upperCase, in the previous version of the module:
@StreamListener(Processor.INPUT)
@SendTo(Processor.OUTPUT)
public String handle(Strign value) {
    return value.toUpperCase();
}
The same example, with the current version:
@Bean
public Function<String, String> uppercase(Strign value) {
    return v -> v.toUpperCase();
}
Now for some practice!
Step 1: Creating the project from Spring Initializr
We create the project skeleton using Spring Initializr, either by accessing the dedicated website or by running the following command directly in the terminal:
curl https://start.spring.io/starter.zip \
    -d groupId=com.vincenzoracca \
    -d artifactId=spring-cloud-stream \
    -d name=spring-cloud-stream \
    -d packageName=com.vincenzoracca.springcloudstream \
    -d dependencies=webflux,kafka,cloud-stream,lombok \
    -d javaVersion=21 \
    -d bootVersion=3.4.1 \
    -d type=maven-project -o spring-cloud-stream.zip
Once the ZIP archive is extracted, let’s analyze the pom.xml file, focusing on the following dependencies:
<dependency>
    <groupId>org.springframework.cloud</groupId>
    <artifactId>spring-cloud-stream</artifactId>
</dependency>
<dependency>
    <groupId>org.springframework.cloud</groupId>
    <artifactId>spring-cloud-stream-binder-kafka</artifactId>
</dependency>
<dependency>
    <groupId>org.springframework.kafka</groupId>
    <artifactId>spring-kafka</artifactId>
</dependency>
The first dependency represents the core Spring Cloud Stream module, which provides the infrastructure for developing event-driven applications. The second dependency adds the Kafka binder, enabling the application to connect to a Kafka broker. Finally, the third dependency includes direct support for the Spring Kafka APIs, essential for more advanced interactions with Kafka.
Step 2: Creating the message model
Create a sub-package called model and define the following record:
public record SensorEvent(
        String sensorId,
        Instant timestampEvent,
        Double degrees
)
{}
This record represents the message generated by a temperature sensor, containing the sensor's ID, the event timestamp, and the recorded temperature.
Step 3: Creating a consumer
Create a sub-package called event and within it, define the following class:
@Configuration
@Slf4j
@RequiredArgsConstructor
public class SensorEventFunctions {

    @Bean
    public Consumer<SensorEvent> logEventReceived() {
        return sensorEvent ->
                log.info("Message received: {}", sensorEvent);
    }
}
Let's analyze the code:
- The class is annotated with
@Configuration, indicating that it contains one or more beans (methods annotated with@Bean). - The
logEventReceivedmethod is the consumer: a simple Java function of typeConsumerthat logs the received message. - In Spring Cloud Function, to activate a function, you need to annotate it with
@Bean.
📢 Note: Did you notice any reference to Kafka? Exactly, none! 🤭 Spring Cloud Stream abstracts away the broker, making the code fully broker-agnostic.
Step 4: Creating a producer
In the same class, we add a method to define a producer:
@Bean
public Supplier<SensorEvent> sensorEventProducer() {
    final RandomGenerator random = RandomGenerator.getDefault();
    return () -> new SensorEvent(
            "2",
            Instant.now(),
            random.nextDouble(1.0, 31.0)
    );
}
Unlike Consumer and Function types, which are triggered whenever a message arrives at the target channel (e.g., a Kafka topic),
Supplier functions do not have an input. Instead, they are activated by a poller configured by Spring Cloud Stream.
By default, the poller invokes the producer method every second. You can customize the polling interval (fixed delay) in two ways:
- Globally, for all pollers in the application, using the property:
spring.integration.poller.fixed-delay. - Specifically for a producer, using the property:
spring.cloud.stream.bindings.<binding-name>.producer.poller.fixed-delay.
In our case, we will configure the poller in the next step to invoke the producer method every five seconds, with an initial delay of one second.
The example producer simulates the periodic sending of a message generated by a sensor with:
sensorIdset to2,- a current timestamp,
- a random temperature between
1.0and31.0.
We have completed the code implementation! There was no need to manually handle serializers or deserializers, as Spring Cloud Stream automatically manages these aspects. This approach allows you to focus entirely on the application logic without worrying about the complexities of the messaging broker.
Step 5: Configuring Spring Cloud Stream
Rename the application.properties file to application.yml and add the following configurations:
spring:
  application:
    name: spring-cloud-stream
  cloud:
    function:
      definition: logEventReceived;sensorEventProducer
    stream:
      bindings:
        logEventReceived-in-0: #a consumer
          destination: sensor_event_topic
          group: ${spring.application.name}
        sensorEventProducer-out-0: #a producer
          destination: sensor_event_topic
          producer:
            poller:
              fixed-delay: 5000
              initial-delay: 1000
Let's analyze the file:
spring.cloud.function.definition: Specifies the application’s functions annotated with @Bean. Functions are separated by a semicolon.spring.cloud.stream.bindings: Maps each producer/consumer to its destination (in this case, the Kafka topic name). It follows a specific naming convention:- For input bindings:
<functionName>-in-<index> - For output bindings:
<functionName>-out-<index> - The
indexfield is typically0when leveraging the concept of message groups. If a function has multiple input or output channels, the index field is used to distinguish between them.
- For input bindings:
- The
logEventReceivedconsumer includes agroupfield, which specifies the Message Group name. This enables consumers in the same group to read messages from different partitions, allowing them to share the load for horizontal scaling. - The
sensorEventProduceris configured to trigger the poller every five seconds with an initial delay of one second.
Step 6: Running Kafka Locally with Docker
Use this Docker Compose file to start Kafka locally via Docker:
---
version: '3'
services:
  broker:
    image: confluentinc/cp-kafka:7.6.1
    hostname: broker
    container_name: broker
    ports:
      - "9092:9092"
      - "9101:9101"
    environment:
      KAFKA_NODE_ID: 1
      KAFKA_LISTENER_SECURITY_PROTOCOL_MAP: |
        CONTROLLER:PLAINTEXT,PLAINTEXT:PLAINTEXT,PLAINTEXT_HOST:PLAINTEXT
      KAFKA_ADVERTISED_LISTENERS: |
        PLAINTEXT://broker:29092,PLAINTEXT_HOST://localhost:9092
      KAFKA_OFFSETS_TOPIC_REPLICATION_FACTOR: 1
      KAFKA_GROUP_INITIAL_REBALANCE_DELAY_MS: 0
      KAFKA_TRANSACTION_STATE_LOG_MIN_ISR: 1
      KAFKA_TRANSACTION_STATE_LOG_REPLICATION_FACTOR: 1
      KAFKA_JMX_PORT: 9101
      KAFKA_JMX_HOSTNAME: localhost
      KAFKA_PROCESS_ROLES: 'broker,controller'
      KAFKA_CONTROLLER_QUORUM_VOTERS: '1@broker:29093'
      KAFKA_LISTENERS: |
        PLAINTEXT://broker:29092,CONTROLLER://broker:29093,PLAINTEXT_HOST://0.0.0.0:9092
      KAFKA_INTER_BROKER_LISTENER_NAME: 'PLAINTEXT'
      KAFKA_CONTROLLER_LISTENER_NAMES: 'CONTROLLER'
      KAFKA_LOG_DIRS: '/tmp/kraft-combined-logs'
      CLUSTER_ID: 'MkU3OEVBNTcwNTJENDM2Qj'
No manual command is required to start Docker Compose. Starting from Spring Boot 3.1, with the spring-boot-docker-compose
dependency, Docker Compose is automatically started when the application launches.
Step 7: Running the Application
Run the application and analyze the logs. You will see a message like this logged every second:
Message received: SensorEvent[sensorId=2,
    timestampEvent=2023-02-27T17:40:08.367719Z, degrees=30.0]
The producer sends a message every five seconds, and the consumer receives and logs them correctly.
Step 8: Programmatic Producer with Spring Cloud Stream
There are scenarios where the data source originates from an external system that is not a binder. For instance, the source could be a traditional REST endpoint.
How can we integrate such a source with the functional programming model provided by Spring Cloud Stream?
Spring Cloud Stream provides a bean of type StreamBridge for this use case!
We create a Producer bean that uses the StreamBridge class to send a message.
This producer will be invoked by a REST API:
@Component
@RequiredArgsConstructor
public class ProducerSensorEvent {

    private final StreamBridge streamBridge;


    public boolean publishMessage(SensorEvent message) {
        return streamBridge.send(
                "sensorEventAnotherProducer-out-0",
                message
        );
    }

}
//REST API
@RestController
@RequestMapping("sensor-event")
@RequiredArgsConstructor
public class SensorEventApi {

    private final ProducerSensorEvent producerSensorEvent;


    @PostMapping
    public Mono<ResponseEntity<Boolean>> sendDate(
            @RequestBody Mono<SensorEvent> sensorEvent) {

        return sensorEvent
                .map(producerSensorEvent::publishMessage)
                .map(ResponseEntity::ok);

    }

}
Nothing could be simpler. The send method of the StreamBridge class takes as input the name of the binding and the message to be sent.
Of course, we have to add this new binding in the application.yml file only in the bindings section
(we do not have to add it in the function section because trivially it is not a function):
sensorEventAnotherProducer-out-0: #another producer
  destination: sensor_event_topic
To send the message, we can make a REST call like this: http POST :8080/sensor-event sensorId=1 timestampEvent=2023-02-26T15:15:00Z degrees=26.0
Replacing Kafka with RabbitMQ
To use RabbitMQ instead of Apache Kafka, we simply replace the dependencies related to Kafka's API and binder, with those dedicated to RabbitMQ:
<dependency>
    <groupId>org.springframework.boot</groupId>
    <artifactId>spring-boot-starter-amqp</artifactId>
</dependency>
<dependency>
    <groupId>org.springframework.cloud</groupId>
    <artifactId>spring-cloud-stream-binder-rabbit</artifactId>
</dependency>
To run RabbitMQ locally, replace the Kafka service in the docker-compose.yml file with the RabbitMQ service:
rabbitmq:
    image: rabbitmq:3-management
    container_name: rabbitmq
    ports:
      - 5672:5672
      - 15672:15672
Start the application and take a look at the logs:
Created new connection: rabbitConnectionFactory.publisher ...
Message received: SensorEvent[sensorId=2, timestampEvent=2025-01-01T17:30:18.237359Z, degrees=22.275162304088724]
Message saving: SensorEvent[sensorId=2, timestampEvent=2025-01-01T17:30:18.237359Z, degrees=22.275162304088724]
Message saved with id: 2
The application is correctly sending and receiving messages using RabbitMQ instead of Kafka, without the need to modify the code!
Customize properties for Kafka
To customize Kafka's configurations, simply use properties prefixed with spring.cloud.stream.kafka.binder properties. We can add configurations
global, configurations restricted to all producers (spring.cloud.stream.kafka.binder.producerProperties) or
specific to a single producer (spring.cloud.stream.kafka.bindings.<channelName>.producer..).
The same for consumers.
For example:
spring:
  application:
    name: spring-cloud-stream
  cloud:
    function:
      definition: logEventReceived|saveInDBEventReceived;sensorEventProducer
    stream:
      kafka:
        binder:
          brokers: localhost:9092
#          kafka-properties: global props
#            boootstrap.server: localhost:9092 Global props
          consumerProperties: #consumer props
            max.poll.records: 250
#          producerProperties: producer props
      bindings:
        logEventReceivedSaveInDBEventReceived-in-0: #a consumer
          destination: sensor_event_topic
          group: ${spring.application.name}
        sensorEventProducer-out-0: #a producer
          destination: sensor_event_topic
        sensorEventAnotherProducer-out-0: #another producer
          destination: sensor_event_topic
Spring Cloud Stream Reactive
With the new version of Spring Cloud Stream, there is no need to import a new of dependency.
The reactive version becomes:
@Bean
public Function<Flux<SensorEvent>, Mono<Void>> logEventReceived() {
    return fluxEvent -> fluxEvent
            .doOnNext(sensorEvent ->
                    log.info("Message received: {}", sensorEvent))
            .then();
}

@PollableBean
public Supplier<Flux<SensorEvent>> sensorEventProducer() {
    final RandomGenerator random = RandomGenerator.getDefault();
    return () -> Flux.just(new SensorEvent(
            "2",
            Instant.now(),
            random.nextDouble(1.0, 31.0))
    );
}
Note that the consumer is now a Function that takes as input a Flux of messages and returns a Mono<Void>.
However, it can also be written this way:
@Bean
public Consumer<Flux<SensorEvent>> logEventReceived() {
    return fluxEvent -> {
        fluxEvent
                .doOnNext(sensorEvent ->
                        log.info("Message received: {}", sensorEvent))
                .subscribe();

    };
}
Since in WebFlux "nothing happens if the stream is unsubscribed," here we are forced to make subscribe explicit.
In the Reactive mode then, to create a consumer, we can use either the Function or the Consumer interface.
As far as the producer is concerned, Spring Cloud Stream in Reactive mode does not automatically trigger one-second polling,
because the stream of a Flux could potentially be infinite. However, you can trigger a reactive Supplier by annotating the function
with @PollableBean. This enables a poller every second on the function. You can change the timing using the same properties seen in the imperative version.
Composition of Functions in Spring Cloud Function
In Spring Cloud Function, we can concatenate multiple functions. For example, in addition to logging the received message, we also want to save it to DB. To do that is, we write another function that takes the message as input and saves it to DB:
@Bean
public Function<Flux<SensorEvent>, Mono<Void>> saveInDBEventReceived() {
    return fluxEvent -> fluxEvent
            .doOnNext(sensorEvent ->
                    log.info("Message saving: {}", sensorEvent))
            .flatMap(sensorEvent ->
                    sensorEventDao.save(Mono.just(sensorEvent)))
            .then();
}
at that point, we modify the log function so that it returns the message again, after logging. The output of the logEventReceived function will be the input of the saveInDBEventReceived function:
 @Bean
public Function<Flux<SensorEvent>, Flux<SensorEvent>> logEventReceived() {
    return fluxEvent -> fluxEvent
            .doOnNext(sensorEvent ->
                    log.info("Message received: {}", sensorEvent));
}
To concatenate the two functions, you can use the | (pipe) operator in the application.yml:
spring:
  application:
    name: spring-cloud-stream
  cloud:
    function:
      definition: logEventReceived|saveInDBEventReceived;sensorEventProducer
    stream:
      bindings:
        logEventReceivedSaveInDBEventReceived-in-0: #a consumer
          destination: sensor_event_topic
          group: ${spring.application.name}
        sensorEventProducer-out-0: #a producer
          destination: sensor_event_topic
        sensorEventAnotherProducer-out-0: #another producer
          destination: sensor_event_topic
Note two things:
- The two functions
logEventReceivedandsaveInDBEventReceivedare concatenated with the pipe. The output of the first function becomes the input of the second one. - The name of the binding becomes
logEventReceivedSaveInDBEventReceived, which is the concatenation of the names of the two functions.
Error Handling: retries and DLQ
We can customize error handling by configuring a retry policy for specific exceptions and implementing redirection to a Dead Letter Queue (DLQ) for discarded messages. This includes messages that do not meet the retry policy criteria or those that have exhausted the maximum number of retry attempts.
To test Error Handling in Spring Cloud Stream, we simulate an error when the received event reports a temperature of 10 degrees. We modify the code of the DAO class like this:
public Mono<SensorEvent> save(Mono<SensorEvent> sensorEvent) {
    return sensorEvent
            .doOnNext(sensorEvent ->
                    log.info("Message saving: {}", sensorEvent))
            .map(sensorEvent -> {
                if (sensorEvent.degrees() == 10.0)
                    throw new RuntimeException("Error in saveMessage");
                return sensorEvent;
            })
            .doOnNext(sensorEvent ->
                    memoryDB.put(sensorEvent.sensorId(), sensorEvent))
            .doOnNext(sensorEvent ->
                    log.info("Message saved with id: {}", sensorEvent.sensorId()));
}
Also, for both imperative and reactive versions, DLQ handling does not work with the composition of the Spring Cloud Functions. As for the imperative version, we can manually compose the two functions in this way:
@Bean
public Function<SensorEvent, Void> logEventReceivedSaveInDBEventReceived() {
    return logEventReceived().andThen(sensorEvent -> {
        saveInDBEventReceived().accept(sensorEvent);
        return null;
    });
}
Remember to remove the @Bean annotation on individual functions and replace the value of the spring.cloud.function.definition property
with the new logEventReceivedSaveInDBEventReceived function.
As for the reactive version, we will elaborate on it in the dedicated subsection.
Imperative version
A consumer in Spring Cloud Stream, in the imperative version, will attempt to process the message three times in total,
in case the latter raises an exception.
The default value of maxAttempts can be overridden in this way:
bindings:
  logEventReceivedSaveInDBEventReceived-in-0: #a consumer
    destination: sensor_event_topic
    group: ${spring.application.name}
    consumer:
      max-attempts: 3 #default is 3
You can also decide which exceptions to make retries on by populating the retryable-exceptions property like this:
bindings:
  logEventReceivedSaveInDBEventReceived-in-0: #a consumer
    destination: sensor_event_topic
    group: ${spring.application.name}
    consumer:
      max-attempts: 3 #default is 3
      retryable-exceptions:
        java.lang.RuntimeException: true #retryable
        java.lang.IllegalArgumentException: false #not retryable
If the exception is not made explicit in retryable-exceptions, it will be handled with retry.
As for DLQs, this functionality is also handled out-of-box by Spring Cloud Stream, in the imperative. Just add the following properties:
cloud:
  function:
    definition: logEventReceivedSaveInDBEventReceived;sensorEventProducer
  stream:
    kafka:
      binder:
        brokers: localhost:9092
        consumerProperties: #consumer props
          max.poll.records: 250
      bindings:
        logEventReceivedSaveInDBEventReceived-in-0:
          consumer:
            enable-dlq: true
            dlq-name: sensor_event_topic_dlq
With enable-dlq we indicate to Spring that we want the consumer to have a DLQ.
With dlq-name we give the name of the topic DLQ.
To test Error Handling, we can send a message from the Kafka CLI.
With Docker and the project running, run the command
docker exec -it broker bash.Run the command
/bin/kafka-console-consumer --bootstrap-server broker:9092 --topic sensor_event_topic_dlq.
This way you will see the contents of the DLQ queue.Open another shell and run the same command as in step 1.
Run the command
/bin/kafka-console-producer --bootstrap-server broker:9092 --topic sensor_event_topic.Now you can send the following message:
{ "sensorId": "test-id", "timestampEvent": "2023-06-09T18:40:00Z", "degrees": 10.0 }
We will see the following log message:
Message received: SensorEvent[sensorId=prova-id, timestampEvent=2023-06-09T18:40:00Z, degrees=10.0]
Message saving: SensorEvent[sensorId=prova-id, timestampEvent=2023-06-09T18:40:00Z, degrees=10.0]
Message received: SensorEvent[sensorId=prova-id, timestampEvent=2023-06-09T18:40:00Z, degrees=10.0]
Message saving: SensorEvent[sensorId=prova-id, timestampEvent=2023-06-09T18:40:00Z, degrees=10.0]
Message received: SensorEvent[sensorId=prova-id, timestampEvent=2023-06-09T18:40:00Z, degrees=10.0]
Message saving: SensorEvent[sensorId=prova-id, timestampEvent=2023-06-09T18:40:00Z, degrees=10.0]
org.springframework.messaging.MessageHandlingException: error occurred in message handler
[org.springframework.cloud.stream.function.FunctionConfiguration$FunctionToDestinationBinder$1@5c81d158],
failedMessage=GenericMessage [payload=byte[85], headers={kafka_offset=99,
kafka_consumer=org.apache.kafka.clients.consumer.KafkaConsumer@306f6122, deliveryAttempt=3,
kafka_timestampType=CREATE_TIME, kafka_receivedPartitionId=0, kafka_receivedTopic=sensor_event_topic,
kafka_receivedTimestamp=1686585227257, contentType=application/json, kafka_groupId=spring-cloud-stream}]
...
Caused by: java.lang.RuntimeException: Error in saveMessage
	at com.vincenzoracca.springcloudstream.dao.SensorEventInMemoryDao.lambda$save$1(SensorEventInMemoryDao.java:26)
	at com.vincenzoracca.springcloudstream.event.SensorEventImperativeFunctions.lambda$saveInDBEventReceived$2(SensorEventImperativeFunctions.java:45)
...
o.a.k.clients.producer.ProducerConfig    : ProducerConfig values: ...
As can be seen from the logs, the message is processed three times in total before finally going to error and be sent to DLQ (you can also check the DLQ queue).
Reactive version
With the reactive version of Spring Cloud Stream, those previously set properties don't work!
One way to handle retries and DLQ could be:
- Have the consumer with only one function (no chaining).
- Wrapping the business logic of the consumer in a flatMap function, to have the message available to send in DLQ.
- Manage retries with the retry function of Reactor.
- Create a channel for the DLQ and send the message in error to it.
Here is the consumer reactive modified to handle retries and DLQs:
private static final String DLQ_CHANNEL = "sensorEventDlqProducer-out-0";

@Bean
public Function<Flux<SensorEvent>, Mono<Void>> logEventReceivedSaveInDBEventReceived() {
    return fluxEvent -> fluxEvent
            .flatMap(this::consumeMessage)
            .then();
}

private Mono<Void> consumeMessage(SensorEvent message) {
    return logEventReceived().andThen(saveInDBEventReceived())
            .apply(Flux.just(message))
            .retry(2)
            .onErrorResume(throwable -> dlqEventUtil.handleDLQ(message, throwable, DLQ_CHANNEL));
}
DlqEventUtil is a utility class that simply sends messages in a DLQ:
@Component
@Slf4j
@RequiredArgsConstructor
public class DlqEventUtil {

    private final StreamBridge streamBridge;

    public  <T> Mono<Void> handleDLQ(T message, Throwable throwable, String channel) {
        log.error("Error for message: {}", message, throwable);
        streamBridge.send(channel, message);
        return Mono.empty();
    }
}
The application.yml file becomes:
spring:
  application:
    name: spring-cloud-stream
  cloud:
    function:
      definition: logEventReceivedSaveInDBEventReceived;sensorEventProducer
    stream:
      kafka:
        binder:
          brokers: localhost:9092
          consumerProperties: #consumer props
            max.poll.records: 250
      bindings:
        logEventReceivedSaveInDBEventReceived-in-0: #a consumer
          destination: sensor_event_topic
          group: ${spring.application.name}
        sensorEventProducer-out-0: #a producer
          destination: sensor_event_topic
        sensorEventAnotherProducer-out-0: #another producer
          destination: sensor_event_topic
        sensorEventDlqProducer-out-0: #DLQ producer
          destination: sensor_event_topic_dlq
Testing Spring Cloud Stream applications
When you imported the project from Spring Initializr, the following dependency was also added to the pom:
<dependency>
    <groupId>org.springframework.cloud</groupId>
    <artifactId>spring-cloud-stream-test-binder</artifactId>
    <scope>test</scope>
</dependency>
Through it, we can easily test our consumers and producers. Let's see how:
@SpringBootTest
@ActiveProfiles("reactive")
@Import(TestChannelBinderConfiguration.class)
class SensorEventTestsIT {

    @Autowired
    private InputDestination input;

    @Autowired
    private OutputDestination output;

    @Autowired
    private ObjectMapper objectMapper;

    @Autowired
    private ProducerSensorEvent producerSensorEvent;

    @Autowired
    private SensorEventDao sensorEventDao;


    @Test
    public void produceSyncMessageTest() throws IOException {
        SensorEvent sensorEvent = new SensorEvent("3", Instant.now(), 15.0);
        producerSensorEvent.publishMessage(sensorEvent);
        byte[] payloadBytesReceived = output.receive(100L, "sensor_event_topic").getPayload();
        assertThat(objectMapper.readValue(payloadBytesReceived, SensorEvent.class)).isEqualTo(sensorEvent);
    }

    @Test
    public void producePollableMessageTest() throws IOException {
        byte[] payloadBytesReceived = output.receive(5000L, "sensor_event_topic").getPayload();
        SensorEvent sensorEventMessageReceived = objectMapper.readValue(payloadBytesReceived, SensorEvent.class);
        assertThat(sensorEventMessageReceived.sensorId()).isEqualTo("2");
        assertThat(sensorEventMessageReceived.degrees()).isEqualTo(30.0);
    }

    @DirtiesContext(methodMode = DirtiesContext.MethodMode.BEFORE_METHOD)
    @Test
    public void consumeMessageTest() throws IOException {
        SensorEvent sensorEvent = new SensorEvent("3", Instant.now(), 15.0);
        byte[] payloadBytesSend = objectMapper.writeValueAsBytes(sensorEvent);
        input.send(new GenericMessage<>(payloadBytesSend), "sensor_event_topic");
        StepVerifier
                .create(sensorEventDao.findAll())
                .expectNext(sensorEvent)
                .expectComplete()
                .verify();
    }

}
By importing the TestChannelBinderConfiguration class, Spring provides us with InputDestination and OutputDestination beans,
which we can use to test consumer and producer respectively.
We don't need the actual binder; the framework provides us with a test binder.
Let us analyze the tests one by one:
- In the
produceSyncMessageTest, we use our synchronous producer to send a message.
We verify with the OutputDestination that the message was actually sent on the destination (Kafka topic). - In the
producePollableMessageTest, we do not send any message explicitly, since the producer is of type pollable. We wait five seconds to verify that the message was sent correctly (since polling is five seconds). - In the
consumeMessageTest, we send with the OutputDestination a message on the topic Kafka and later verify that the same message has been saved to DB.
In addition, the method is annotated with@DirtiesContext(methodMode = DirtiesContext.MethodMode.BEFORE_METHOD), to clean up the context (and thus the DB), before the method is invoked.
Conclusions
In this article, we explored how to use Spring Cloud Stream to develop event-driven applications. The ability to focus exclusively on business logic by writing simple Java functions that are independent of the underlying broker makes this framework highly compelling. We demonstrated how you can switch seamlessly between Kafka and RabbitMQ without modifying the code—a remarkable flexibility. Additionally, it's possible to integrate multiple binders within the same application, further expanding its potential use cases.
Find the full code on my GitHub repo at the following link: GitHub.
More articles about Spring: Spring.
Articles about Docker: Docker.
Recommended books on Spring, Docker, and Kubernetes:
- Cloud Native Spring in Action: https://amzn.to/3xZFg1S
- Pro Spring 5 (Spring from zero to hero): https://amzn.to/3KvfWWO
- Pivotal Certified Professional Core Spring 5 Developer Exam: A Study Guide Using Spring Framework 5 (per certificazione Spring): https://amzn.to/3KxbJSC
- Pro Spring Boot 2: An Authoritative Guide to Building Microservices, Web and Enterprise Applications, and Best Practices (Spring Boot del dettaglio): https://amzn.to/3TrIZic
- Docker: Sviluppare e rilasciare software tramite container: https://amzn.to/3AZEGDI
- Kubernetes TakeAway: Implementa i cluster K8s come un professionista: https://amzn.to/3dVxxuP
References
- Cloud Native Spring in Action, capitolo 10
- https://docs.spring.io/spring-cloud-stream/docs/current/reference/html/
- https://cloud.spring.io/spring-cloud-stream-binder-kafka/spring-cloud-stream-binder-kafka.html#_configuration_options
- https://cloud.spring.io/spring-cloud-stream/multi/multi_spring-cloud-stream-overview-binders.html