
Security is one of the most fundamental aspects of IT; Spring Security is an excellent choice for securing an application if you already use the Spring framework. In addition to the framework, you especially need to choose the protocol or standard to use to secure the REST API.
In this article we will use JWT for the authentication and authorization steps.
In addition, I will show you both the Spring Security configuration for versions equal to or later than Spring Boot 2.7
(including version 3), and that for versions prior to 2.7.
Authentication and Authorization
The authentication is the process that determines who the user is and what privileges he has; the login phase is part of the authentication process.
The authorization is the process that verifies whether or not the user can consume of the API, based on policies, such as role.
In the example we'll give, a user with role USER will be able to consume the API in read but not write mode, while users with role ADMIN will be able to both see the list of users and create new ones.
What is JWT
JWT (JSON Web Token) is a standard that allows the transmission of information between parts in a base64Url.\ encoded JSON. The token encodes three basic (JSON) parts, with this order:
- the header, which usually consists of a alg field indicating the type of algorithm used to encrypt the signature and a typ field indicating the type of token used to encrypt the signature.
{
  "alg": "HS256",
  "typ": "JWT"
}
- the payload which contains information regarding the user, such as username, roles, but also information about the token, such as expiration. These attributes are called claims.
{
  "sub": "1234567890",
  "name": "John Doe",
  "admin": true
}
- the third part is the signature (signature) which is created using the encoded header, the encoded payload and a secret key. For example, if you want to use the HMAC SHA256 algorithm, the signature would be created in this way:
HMACSHA256(
base64UrlEncode(header) + "." +
base64UrlEncode(payload),
secret)
The JWT token then consists of these three tokens in base64-URL, separated by a dot. Here is an example of a JWT token with the values of the three fields shown in the example:
eyJhbGciOiJIUzI1NiIsInR5cCI6IkpXVCJ9.
eyJzdWIiOiIxMjM0NTY3ODkwIiwibmFtZSI6IkpvaG4gRG9lIiwiaWF0IjoxNTE2MjM5MDIyfQ.
SflKxwRJSMeKKF2QT4fwpMeJf36POk6yJV_adQssw5c
For more information on JWT I report at https://jwt.io/introduction.
JWT Flow
- The client authenticates, through e.g. a login API, with username and password.
- The server checks that the user exists (e.g. on db) and the password is correct. If everything is ok, it creates a JWT token with a signature using a secret key. Then it sends in the login response (body or header) the token.
- The client acquires the token, and for each REST call it makes to the server, it sends the token in the header, usually in the header with key Authorization header using the Bearer patterns, since this header avoids problems with CORS (Cross-Origin Resource Sharing).
- The server, when it receives a request from the client, decodes the token, first examines the signature to understand if it is valid, then it analyzes other payload fields such as the token's expiration date, the user's role (maybe the invoked API can be consumed only by users with a certain role), etc. If the checks are passed, the server will show the API response, otherwise it will send a 403 HTTP Status Response.
Actually, JWT is divided into two types: JWS and JWE..
The JWS (JSON Web Signature) is the type of JWT we've talked about so far, where the check happens on the signature.
The JWE (JSON Web Encryption) is a type of JWT that is used to exchange encrypted data in JSON, so even if it were to be
intercepted, the data would not be in clear text. It is useful to use it when client and server need to exchange sensitive data.
Obviously, the client needs to know how it can decrypt the data in order to read it.
It's finally time to write code!
We'll create a Spring Boot app with Java classes that will map USERS and ROLES tables using JPA.
Only registered users in the USERS table will be able to consume the REST API.
As DB would use H2 in memory.
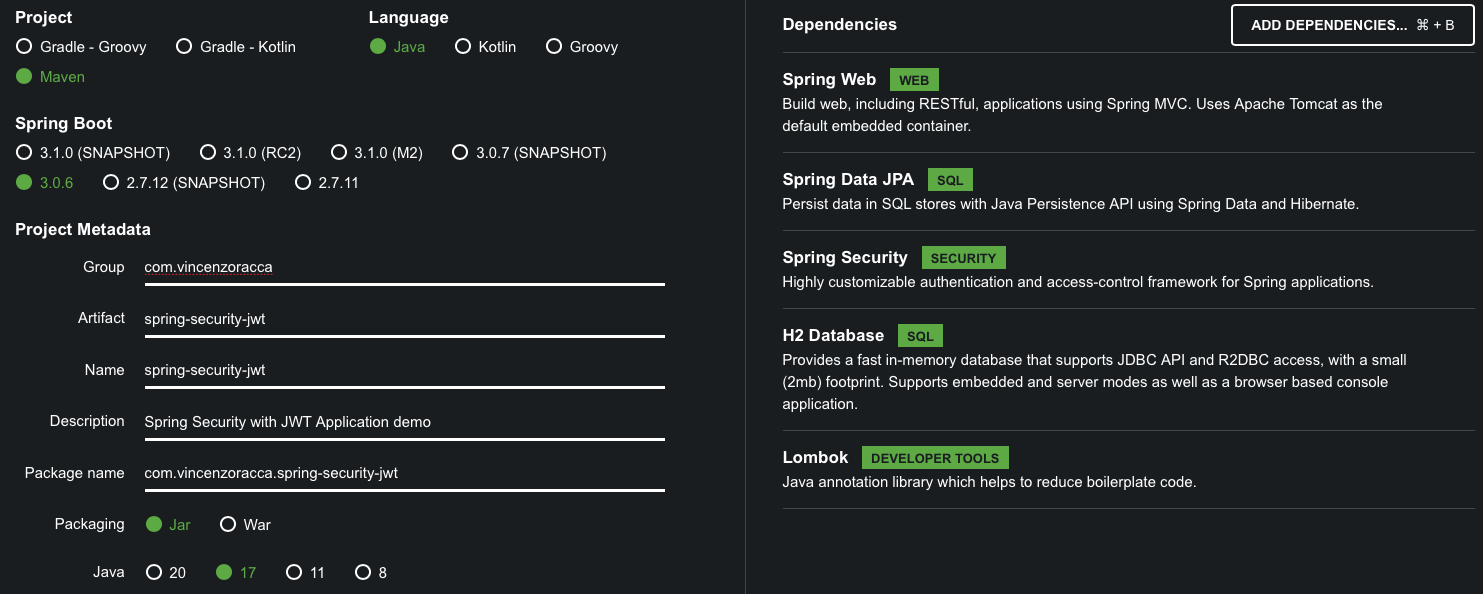
First step: go to the site Spring Initializr
This site will create for us a skeleton of a Spring Boot app with everything we need (just search for the dependencies that we need in the section 'Dependencies'). Let's click on 'ADD DEPENDENCIES' and add the dependencies shown in the image.
Click on the Generate button to download the zipper of the project.
In the pom we also add the following dependency to use JWT:
<dependency>
   <groupId>com.nimbusds</groupId>
   <artifactId>nimbus-jose-jwt</artifactId>
   <version>9.31</version>
</dependency>
We use this library and not JJWT, which is easier to use because Spring Security OAuth2 uses it by default and because it is more complete, for example you can create JWTs of both JWS and JWE types.
Second step: create User and Role entities
In the model/entity subpackage we create the Java classes that will map the USERS and ROLES tables:
@Entity
@Table(name = "USERS")
@Data
@NoArgsConstructor
@AllArgsConstructor
public class UserEntity implements Serializable {

   @Id
   @GeneratedValue(strategy = AUTO)
   private Long id;

   @Column(unique = true, nullable = false)
   private String username;

   @Column(nullable = false)
   private String password;

    @ManyToMany(fetch = EAGER)
    private Collection<RoleEntity> roles = new ArrayList<>();
}
@Entity
@Table(name = "ROLES")
@Data
@NoArgsConstructor
@AllArgsConstructor
public class RoleEntity {

   @Id
   @GeneratedValue(strategy = AUTO)
   private Long id;

   @Column(unique = true, nullable = false)
   private String name;
}
- With @Entity, we indicate to JPA that this Java class maps a table to DB.
- With @Table, we indicate to JPA the name of the table.
- With @Id and @GeneratedValue, we indicate to JPA that the annotated attribute is a primary key, which must be auto-generated.
- With @Column(unique = true, nullable = false) we tell JPA that, when it generates the tables in DB, it must also create the unique and not null constraints for the annotated field.
- With @ManyToMany we indicate to JPA that USERS is in a N:N relationship with ROLES (a one-way relationship, with EAGER fetch, i.e. every time we request a user from the USERS table, we will also fetch all his roles from the ROLES table).
- The other annotations are from the Lombok library, which allows for cleaner code writing.
Third step: let's create repositories for User and Role
Within the repo subpackage, we create the interfaces:
public interface UserJpaRepository extends JpaRepository<UserEntity, Long> {

   UserEntity findByUsername(String username);
}
public interface RoleJpaRepository extends JpaRepository<RoleEntity, Long> {

   RoleEntity findByName(String name);
}
Spring will create implementations of these two interfaces for us, with the DAO methods findAll, findById, etc.
Fourth step: let's create the services for User and Role
Within the service subpackage, we create the class:
@Service
@Transactional
@RequiredArgsConstructor
@Slf4j
public class UserServiceImpl implements UserService {

    private static final String USER_NOT_FOUND_MESSAGE = "User with username %s not found";

    private final UserJpaRepository userJpaRepository;
    private final RoleJpaRepository roleJpaRepository;
    private final PasswordEncoder passwordEncoder;

    @Override
    public UserEntity save(UserEntity user) {
        log.info("Saving user {} to the database", user.getUsername());
        user.setPassword(passwordEncoder.encode(user.getPassword()));
        return userJpaRepository.save(user);
    }


    @Override
    public UserEntity addRoleToUser(String username, String roleName) {
        log.info("Adding role {} to user {}", roleName, username);
        UserEntity userEntity = userJpaRepository.findByUsername(username);
        RoleEntity roleEntity = roleJpaRepository.findByName(roleName);
        userEntity.getRoles().add(roleEntity);
        return userEntity;
    }

    //findAll, findByUsername...
}
- With @Service we indicate to Spring that the class is a bean with business logic.
- With @Transactional we indicate to Spring that all methods of the class are transactional.
- @RequiredArgsConstructor and @Slf4j are two annotations from the Lombok library, which allow us to autogenerate a constructor based on final fields, and create a logger, respectively.
- The save method, in addition to trivially calling the save method of the repository, encodes the password before saving to db. We will next create a bean of type PasswordEncoder.
- The addRoleToUser method allows you to add an existing role to an existing user. The save method of UserJpaRepository is not invoked as userEntity is already a managed entity, being in transaction, and therefore all its modifications after the findByUsername are saved.
We omit the methods findAll, findByUsername and the RoleServiceImpl class because they trivially call the methods of the repository (but you can find the full code on GitHub).
Fifth step: let's create REST services for User
Within the api subpackage, we create the UserResource class:
@RestController
@RequestMapping("/users")
@RequiredArgsConstructor
@Slf4j
public class UserResource {


   private final UserService userService;

   @GetMapping
   public ResponseEntity<List<UserEntity>> findAll() {
      return ResponseEntity.ok().body(userService.findAll());
   }

   @GetMapping("/{username}")
   public ResponseEntity<UserEntity> findByUsername(@PathVariable String username) {
      return ResponseEntity.ok().body(userService.findByUsername(username));
   }

   @PostMapping
   public ResponseEntity<UserEntity> save(@RequestBody UserEntity user) {
      UserEntity userEntity = userService.save(user);
      URI uri = URI.create(ServletUriComponentsBuilder.fromCurrentRequest().path("/{username}")
              .buildAndExpand(userEntity.getUsername()).toUriString());
      return ResponseEntity.created(uri).build();
   }


   @PostMapping("/{username}/addRoleToUser")
   public ResponseEntity<?> addRoleToUser(@PathVariable String username, @RequestBody RoleDTO request) {
      UserEntity userEntity = userService.addRoleToUser(username, request.getRoleName());
      return ResponseEntity.ok(userEntity);
   }
}
Trivially, the methods of the class don't have business logic, but they simply recall the methods of the service.
Sixth step: we create the PasswordEncoder bean and initialize the DB tables with some rows
Within the main SpringSecurityJwtApplication class, we add:
@SpringBootApplication
public class SpringSecurityJwtApplication {

   public static void main(String[] args) {
      SpringApplication.run(SpringSecurityJwtApplication.class, args);
   }

   @Bean
   PasswordEncoder passwordEncoder() {
      return new BCryptPasswordEncoder();
   }

   @Bean
   CommandLineRunner run(UserService userService, RoleService roleService) {
      return args -> {
         roleService.save(new RoleEntity(null, "ROLE_USER"));
         roleService.save(new RoleEntity(null, "ROLE_ADMIN"));

         userService.save(new UserEntity(null, "rossi", "1234", new ArrayList<>()));
         userService.save(new UserEntity(null, "bianchi", "1234", new ArrayList<>()));

         userService.addRoleToUser("rossi", "ROLE_USER");
         userService.addRoleToUser("bianchi", "ROLE_ADMIN");
         userService.addRoleToUser("bianchi", "ROLE_USER");
      };
   }

}
Now we're ready to secure our APIs!
Seventh step a: let's create a class that extends WebSecurityConfigurerAdapter (versions prior to Spring Boot 2.7.0)
The first step in customizing Spring Security is to create a class that extends WebSecurityConfigurerAdapter, so that it overrides the default behavior.
@EnableWebSecurity
@RequiredArgsConstructor
public class SecurityConfig extends WebSecurityConfigurerAdapter {


   private final UserDetailsService userDetailsService;
   private final BCryptPasswordEncoder bCryptPasswordEncoder;

   //we want to check users from db
   @Override
   protected void configure(AuthenticationManagerBuilder auth) throws Exception {
      auth.userDetailsService(userDetailsService).passwordEncoder(bCryptPasswordEncoder);
   }

   @Override
   protected void configure(HttpSecurity http) throws Exception {
      http.csrf().disable()
              .sessionManagement().sessionCreationPolicy(SessionCreationPolicy.STATELESS)
              .and()
              .authorizeRequests().antMatchers(HttpMethod.POST, "/login/**").permitAll()
              .and()
              .authorizeRequests().antMatchers(HttpMethod.POST, "/users/**").hasAuthority("ROLE_ADMIN")
              .and()
              .authorizeRequests().anyRequest().authenticated()
              .and()
              .addFilter(new CustomAuthenticationFilter(super.authenticationManagerBean()))
              .addFilterBefore(new CustomAuthorizationFilter(), UsernamePasswordAuthenticationFilter.class);

      http.headers().cacheControl();
   }
}
Let's analyze the configure(AuthenticationManagerBuilder auth) method:
- here we indicate to Spring that as UserDetailService, which contains the loadUserByUsername method, a bean created by us must be used. In particular the bean created by us will search the user from db. Moreover to encode/decode the password must be used the PasswordEncoder bean we created earlier.
Let's analyze the void configure(HttpSecurity http) method:
- With the first two lines, we disable the default check on CSRF attacks and tell Spring Security that it must not create a session for users who authenticate themselves (policy STATELESS).
- With authorizeRequests().antMatchers(HttpMethod.POST, "/login/**").permitAll() we indicate to Spring Security that anyone can consume the /login API with a POST verb.
- With authorizeRequests().antMatchers(HttpMethod.POST, "/users/**").hasAuthority("ROLE_ADMIN") we indicate to Spring Security that only users with role ADMIN can consume the /users/.. API with verb POST.
- With authorizeRequests().anyRequest().authenticated() we indicate that all other requests can be consumed if the user is authenticated.
- With addFilter(new CustomAuthenticationFilter(super.authenticationManagerBean())) we add a custom filter for the authentication phase; the custom class extends the UsernamePasswordAuthenticationFilter class of Spring Security, therefore, it is used only in the login phase.
- With addFilterBefore(new CustomAuthorizationFilter(), UsernamePasswordAuthenticationFilter.class) we create a filter which is used for each HTTP request, before the UsernamePasswordAuthenticationFilter type, i.e. it is called before the CustomAuthenticationFilter class.
Seventh step b: let's create a class that configures Spring Security (versions the same or later than Spring Boot 2.7.0, including Spring Boot 3)
As of Spring Boot version 2.7.0, the WebSecurityConfigurerAdapter class has been deprecated, so the configuration of Spring Security must be slightly adapted in this way:
@Configuration
@RequiredArgsConstructor
public class SecurityConfig {


    @Bean
    public AuthenticationManager authenticationManager(AuthenticationConfiguration authConfig) throws Exception {
        return authConfig.getAuthenticationManager();
    }

    @Bean
    public SecurityFilterChain filterChain(HttpSecurity http, AuthenticationManager authenticationManager) throws Exception {
        http
                .csrf().disable()
                .sessionManagement().sessionCreationPolicy(SessionCreationPolicy.STATELESS)
                .and()
                .authorizeHttpRequests((authz) -> authz
                        .requestMatchers(HttpMethod.POST, "/login/**").permitAll()
                        .requestMatchers(HttpMethod.POST, "/users/**").hasAuthority("ROLE_ADMIN")
                        .anyRequest().authenticated()
                )
                .addFilter(new CustomAuthenticationFilter(authenticationManager))
                .addFilterBefore(new CustomAuthorizationFilter(), UsernamePasswordAuthenticationFilter.class)
                .headers().cacheControl();

        return http.build();
    }
}
As you can see, compared to the previous version, you do not need to associate the beans of UserDetailService and PasswordEncoder
to the AuthenticationManagerBuilder as this is done automatically by Spring.
We no longer even need to annotate the class with @EnableWebSecurity. We just annotate it with a simple
@Configuration.
We do not analyze in detail the various methods used (such as sessionManagement) since the concepts are the same as in the previous paragraph.
However, if you want to know more about how to replace the old Spring configuration with the new one according to your
needs, I refer you to the official doc:
spring.io/blog/2022/02/21/spring-security-without-the-websecurityconfigureradapter.
Eighth step: let's create the bean of type UserDetailService
Instead of creating a new class that implements the UserDetailService interface, we make implement this last one directly to the UserServiceImpl class:
public class UserServiceImpl implements UserService, UserDetailsService {
...
@Transactional(readOnly = true)
    @Override
    public UserDetails loadUserByUsername(String username) throws UsernameNotFoundException {
        UserEntity user = userJpaRepository.findByUsername(username);
        if(user == null) {
            String message = String.format(USER_NOT_FOUND_MESSAGE, username);
            log.error(message);
            throw new UsernameNotFoundException(message);
        } else {
            log.debug("User found in the database: {}", username);
            Collection<SimpleGrantedAuthority> authorities = new ArrayList<>();
            user.getRoles().forEach(role -> {
                authorities.add(new SimpleGrantedAuthority(role.getName()));
            });
            return new User(user.getUsername(), user.getPassword(), authorities);
        }
    }
    ...
The loadUserByUsername method simply looks up the user with username in input, on the DB.
If it exists, it transforms RoleEntity roles into SimpleGrantedAuthority, which is the default Spring Security class
for managing roles and finally returns an instance of type User, which is a Spring Security class that implements UserDetails.
If the user does not exist, an exception of type UsernameNotFoundException is thrown.
Ninth step: we create the filter for the authentication phase
This filter is used in the login phase. It automatically calls UserDetailsService.loadUserByUsername, and if the user exists, it creates and returns two JWT tokens: one is the access token, used to authorize the user, the other is the refresh token, used by the client to acquire a new access token without having to login again.
@Slf4j
@RequiredArgsConstructor
public class CustomAuthenticationFilter extends UsernamePasswordAuthenticationFilter {

    private static final String BAD_CREDENTIAL_MESSAGE = "Authentication failed for username: %s and password: %s";

    private final AuthenticationManager authenticationManager;

    @SneakyThrows
    @Override
    public Authentication attemptAuthentication(HttpServletRequest request, HttpServletResponse response)
            throws AuthenticationException {

        String username = null;
        String password = null;
        try {
            ObjectMapper objectMapper = new ObjectMapper();
            Map<String, String> map = objectMapper.readValue(request.getInputStream(), Map.class);
            username = map.get("username");
            password = map.get("password");
            log.debug("Login with username: {}", username);
            return authenticationManager.authenticate(new UsernamePasswordAuthenticationToken(username, password));
        }
        catch (AuthenticationException e) {
            log.error(String.format(BAD_CREDENTIAL_MESSAGE, username, password), e);
            throw e;
        }
        catch (Exception e) {
            response.setStatus(INTERNAL_SERVER_ERROR.value());
            Map<String, String> error = new HashMap<>();
            error.put("errorMessage", e.getMessage());
            response.setContentType(APPLICATION_JSON_VALUE);
            new ObjectMapper().writeValue(response.getOutputStream(), error);
            throw new RuntimeException(String.format("Error in attemptAuthentication with username %s and password %s", username, password), e);
        }
    }

    @Override
    protected void successfulAuthentication(HttpServletRequest request, HttpServletResponse response, FilterChain chain,
                                            Authentication authentication) throws IOException, ServletException {
        User user = (User)authentication.getPrincipal();
        String accessToken = JwtUtil.createAccessToken(user.getUsername(), request.getRequestURL().toString(),
                user.getAuthorities().stream().map(GrantedAuthority::getAuthority).collect(Collectors.toList()));
        String refreshToken = JwtUtil.createRefreshToken(user.getUsername());
        response.addHeader("access_token", accessToken);
        response.addHeader("refresh_token", refreshToken);
    }

    @Override
    protected void unsuccessfulAuthentication(HttpServletRequest request, HttpServletResponse response, AuthenticationException failed) throws IOException, ServletException {
        response.setStatus(HttpServletResponse.SC_UNAUTHORIZED);
        ObjectMapper mapper = new ObjectMapper();
        Map<String, String> error = new HashMap<>();
        error.put("errorMessage", "Bad credentials");
        response.setContentType(APPLICATION_JSON_VALUE);
        mapper.writeValue(response.getOutputStream(), error);
    }
}
Let's analyze the code:
- the attemptAuthentication method is invoked in the login phase, takes username and password from the RequestBody and calls authenticationManager.authenticate, which in turn calls UserDetailService to check that the user is present in the database, and then it checks that the decoded password of the User instance (created by UserDetailService) corresponds to the one given as input. If the checks are passed, the successfulAuthentication method is called, otherwise unsuccessfulAuthentication.
- The successfulAuthentication method creates the access token and the refresh token and adds them to the response header of the /login call.
- The unsuccessfulAuthentication method is invoked when attemptAuthentication throws an AuthenticationException type exception. Overriding this method, for our purposes, is optional. We use it to return 401 and an error message in the Response Body.
The JwtUtil class is a utility class that we will create to create and validate the JWT token.
Tenth step: create the filter for the authorization phase
This filter will read and validate the token given as input by the client in the header with key Authorization.. More specifically, if the token is valid, it will value the logged-in user's information, such as username and roles, within the context of the SecurityContextHolder.
@Slf4j
public class CustomAuthorizationFilter extends OncePerRequestFilter {
    @Override
    protected void doFilterInternal(HttpServletRequest request, HttpServletResponse response, FilterChain filterChain)
            throws ServletException, IOException {

        String token = null;
        if(request.getServletPath().equals("/login") || request.getServletPath().equals("/refreshToken")) {
            filterChain.doFilter(request, response);
        } else {
            String authorizationHeader = request.getHeader(AUTHORIZATION);
            if(authorizationHeader != null && authorizationHeader.startsWith("Bearer ")) {
                try {
                    token = authorizationHeader.substring("Bearer ".length());
                    UsernamePasswordAuthenticationToken authenticationToken = JwtUtil.parseToken(token);
                    SecurityContextHolder.getContext().setAuthentication(authenticationToken);
                    filterChain.doFilter(request, response);
                }
                catch (Exception e) {
                    log.error(String.format("Error auth token: %s", token), e);
                    response.setStatus(FORBIDDEN.value());
                    Map<String, String> error = new HashMap<>();
                    error.put("errorMessage", e.getMessage());
                    response.setContentType(APPLICATION_JSON_VALUE);
                    new ObjectMapper().writeValue(response.getOutputStream(), error);
                }
            } else {
                filterChain.doFilter(request, response);
            }
        }
    }
}
Eleventh step: let's create the JwtUtil class
public abstract class JwtUtil {

    private static final int expireHourToken = 24;
    private static final int expireHourRefreshToken = 72;

    private static final String SECRET = "FBA898697394CDBC534E7ED86A97AA59F627FE6B309E0A21EEC6C9B130E0369C";


    public static String createAccessToken(String username, String issuer, List<String> roles) {
        try {
            JWTClaimsSet claims = new JWTClaimsSet.Builder()
                    .subject(username)
                    .issuer(issuer)
                    .claim("roles", roles)
                    .expirationTime(Date.from(Instant.now().plusSeconds(expireHourToken * 3600)))
                    .issueTime(new Date())
                    .build();

            Payload payload = new Payload(claims.toJSONObject());

            JWSObject jwsObject = new JWSObject(new JWSHeader(JWSAlgorithm.HS256),
                    payload);

            jwsObject.sign(new MACSigner(SECRET));
            return jwsObject.serialize();
        }
        catch (JOSEException e) {
            throw new RuntimeException("Error to create JWT", e);
        }
    }

    public static String createRefreshToken(String username) {
        //like createAccessToken method, but without issuer, roles...
    }

    public static UsernamePasswordAuthenticationToken parseToken(String token) throws JOSEException, ParseException,
            BadJOSEException {

        byte[] secretKey = SECRET.getBytes();
        SignedJWT signedJWT = SignedJWT.parse(token);
        signedJWT.verify(new MACVerifier(secretKey));
        ConfigurableJWTProcessor<SecurityContext> jwtProcessor = new DefaultJWTProcessor<>();

        JWSKeySelector<SecurityContext> keySelector = new JWSVerificationKeySelector<>(JWSAlgorithm.HS256,
                new ImmutableSecret<>(secretKey));
        jwtProcessor.setJWSKeySelector(keySelector);
        jwtProcessor.process(signedJWT, null);
        JWTClaimsSet claims = signedJWT.getJWTClaimsSet();
        String username = claims.getSubject();
        var roles = (List<String>) claims.getClaim("roles");
        var authorities = roles == null ? null : roles.stream()
                .map(SimpleGrantedAuthority::new)
                .collect(Collectors.toList());
        return new UsernamePasswordAuthenticationToken(username, null, authorities);
    }
}
- The createAccessToken method creates a token with payload containing: subject (username), roles, issuer (who has
requested the JWT), expirationTime set to 24 hours and issueTime, which is when the token was created.
The signature is encrypted with the HS256 algorithm and a secretKey aes-256-cfb, generated by https://asecuritysite.com/encryption/keygen. - The parseToken method is responsible for verifying the token signature and performing any checks on the payload, such as the token's expiration date. If the checks are successful, an instance of UsernamePasswordAuthenticationToken is returned that contains the username and roles associated with the user. This instance will then be added to the Spring Security context, with SecurityContextHolder.getContext().setAuthentication(authenticationToken).
Finished! Let's try the application
In the application.properties file we add these 2 properties:
server.servlet.context-path=/api
spring.jpa.show-sql=true
so that we have /api as context-root and hibernate sql logs.
We run the main class from an IDE or we run from terminal the command
mvnw spring-boot:run
from the project root.
From a REST client like Postaman or cURL we make a REST call with POST verb to:
http://localhost:8080/api/login
and with Request Body:
{
  "username": "rossi",
  "password": "1111"
}
We'll get a 401 status as a response and a body:
{
    "errorMessage": "Bad credentials"
}
because the password is wrong: the correct one is 1234.. If we make the same request with the correct password, we'll get a 200 OK response, with an empty response body and as response header, the values of access_token and refresh_token, in addition to the other default headers.
Now we make the call in GET:
http://localhost:8080/api/users/
we'll have a 403 response as status and body:
{
    "timestamp": "2021-08-22T13:38:22.166+00:00",
    "status": 403,
    "error": "Forbidden",
    "path": "/api/users/"
}
because we have made the request without inserting the JWT.\ token. We make the same request by inserting in the header of the request, the key Authorization and with value the access_token received from the login request, preceded by the Bearer word and a space:
cURL:
curl 'http://localhost:8080/api/users/' -H \
'Authorization: Bearer eyJhbGciOiJIUzI1NiJ9.eyJpc3MiOiJodHRwOlwvXC9sb2NhbGhvc3Q6ODA4MFwvYXBpXC9sb2dpbiIsInN1YiI6InJvc3NpIiwiZXhwIjoxNjI5NzI1Nzc2LCJpYXQiOjE2Mjk2MzkzNzYsInJvbGVzIjpbIlJPTEVfVVNFUiJdfQ.odGsLpcQwiYkQPT9XxoyzveaSUx3Qcp4p-VheapqsbU'
we will get a 200 OK with the list of users.
Now let's try to make a POST call
http://localhost:8080/api/users/rossi/addRoleToUser
with the same access token and request body:
{
    "roleName": "ROLE_ADMIN"
}
we basically want the user rossi acquires the role of ADMIN. But since the request is made by the same user rossi, who has role USER, the request fails because only an ADMIN has the permission to make POST requests to the resource /user; in fact we will have as answer:
{
    "timestamp": "2021-08-22T13:51:55.291+00:00",
    "status": 403,
    "error": "Forbidden",
    "path": "/api/users/rossi/addRoleToUser"
}
To add the ADMIN role to the user rossi, we need to log in with the white user, which has the ADMIN role, and acquire the access token:
curl -i -X POST 'http://localhost:8080/api/login' -H 'Content-Type: application/json' -d '{
    "username": "bianchi",
    "password": "1234"
}'
HTTP/1.1 200
access_token: eyJhbGciOiJIUzI1NiJ9.eyJpc3MiOiJodHRwOlwvXC9sb2NhbGhvc3Q6ODA4MFwvYXBpXC9sb2dpbiIsInN1YiI6ImJpYW5jaGkiLCJleHAiOjE2Mjk3MjczODAsImlhdCI6MTYyOTY0MDk4MCwicm9sZXMiOlsiUk9MRV9BRE1JTiIsIlJPTEVfVVNFUiJdfQ.F1S3sYRDcVUst90ggsY7Dwsc1FkjLZTve8fwgrmc0Zo
refresh_token: eyJhbGciOiJIUzI1NiJ9.eyJleHAiOjE2Mjk5MDAxODAsInN1YiI6ImJpYW5jaGkifQ.LIY-RzzdAIyYSLfWkkVhDPJuazGcwDiEMyXu_hRQO0s
...
Now we perform the precedence request with the new token:
curl -i -X POST 'http://localhost:8080/api/users/rossi/addRoleToUser' \
> -H 'Authorization: Bearer eyJhbGciOiJIUzI1NiJ9.eyJpc3MiOiJodHRwOlwvXC9sb2NhbGhvc3Q6ODA4MFwvYXBpXC9sb2dpbiIsInN1YiI6ImJpYW5jaGkiLCJleHAiOjE2Mjk3MjcwMjksImlhdCI6MTYyOTY0MDYyOSwicm9sZXMiOlsiUk9MRV9BRE1JTiIsIlJPTEVfVVNFUiJdfQ.jtarIuzC5WPF0TlwTT0DFcQlRoPaDILiOiEES2HTnTU' \
> -H 'Content-Type: application/json' \
> -d '{
>     "roleName": "ROLE_ADMIN"
> }'
HTTP/1.1 200
...

{"id":3,"username":"rossi","password":"$2a$10$mXCq0fVafTlSihho7ZSA0ugWQ.F1h8bEijFgbIB4YJEb1IsuaErmC","roles":[{"id":1,"name":"ROLE_USER"},{"id":2,"name":"ROLE_ADMIN"},{"id":2,"name":"ROLE_ADMIN"}]}
We have now managed to add the ADMIN role to user rossi!
Conclusions
We gave a quick overview to JWT and easily integrated this standard into Spring Security.
Of course, like any technology, JWT has positive aspects, such as being able to create a stateless security policy, but also negative aspects, such as not being able to keep track of logged in users (which involves, for example, the inability to manage the server-side logout), as they are not stored anywhere. But to get into the details of these aspects, we recommend reading other articles on the web.
You can find the full project, including the method to create the refresh token, on my GitHub: Spring Security JWT.
Articles about Spring: Spring
Recommended books about Spring:
- Pro Spring 5 (Spring from scratch a hero): https://amzn.to/3KvfWWO
- Pivotal Certified Professional Core Spring 5 Developer Exam: A Study Guide Using Spring Framework 5 (for Spring certification): https://amzn.to/3KxbJSC
- Pro Spring Boot 2: An Authoritative Guide to Building Microservices, Web and Enterprise Applications, and Best Practices (Spring Boot of the detail): https://amzn.to/3TrIZic