
Spring Batch is a powerful Spring module who be used to run jobs.
A common problem is to manage multiple instances of a same job because
Spring Batch don't have a default lock management.
There are several ways to manage this situation, but all of these do more or less the same thing:
the multiple instances share the same database who manages the synchronization between the nodes/instances.
To be more exact, when a job has to be run
(maybe with a trigger of a cron), the instance check in the database if that job was already
"blocked" from another instance; if so, then the instance will not run the job.
There are many libraries that solve the problem of the managing multiple instances of a job:
if you already use the Quarz scheduler in the project, then you can use this library;
else, Shedlock, that do purely job locking, could to be the right choice.
This tutorial will make reference to a batch who will read a csv file and will write the content to a USER table of a MySQL database.
Prerequisites
- Set up a jdk (we will use the version 8, but you can use successive versions).
- Installing maven (https://maven.apache.org/install.html).
- Installing a DB that will synchronize 2 instances of the same app (we'll use a docker image of MySQL).
- The nodes must ping this DB (in this tutorial we'll run 2 instances in localhost).
First step: Create the USER e SHEDLOCK tables in the database:
CREATE TABLE USER (
  id BIGINT AUTO_INCREMENT  PRIMARY KEY,
  name VARCHAR(250) NOT NULL,
  surname VARCHAR(250) NOT NULL,
  address VARCHAR(250) DEFAULT NULL
);

CREATE TABLE SHEDLOCK (
  name VARCHAR(64),
  lock_until TIMESTAMP(3) NULL,
  locked_at TIMESTAMP(3) NULL,
  locked_by VARCHAR(255),
  PRIMARY KEY (name)
)
Second step: go to Spring Initializr
This site will build for us a Spring Boot app structure with everything we need (it is sufficient to search the dependencies that we need in the section 'Dependencies'). Let's click on 'ADD DEPENDENCIES' and add the dependencies displayed in the image.
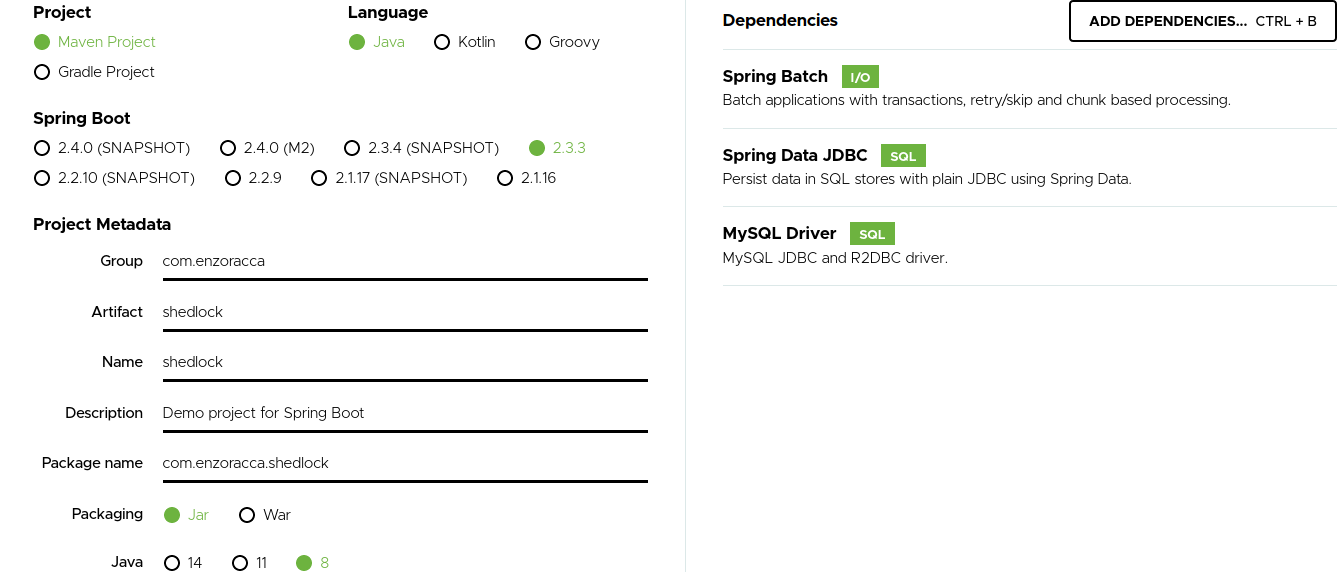
Let's click on 'Generate' and unzip the project.
Third step: let's import the Shedlock dependencies
<dependency>
    <groupId>net.javacrumbs.shedlock</groupId>
    <artifactId>shedlock-spring</artifactId>
    <version>4.14.0</version>
</dependency>
<dependency>
    <groupId>net.javacrumbs.shedlock</groupId>
    <artifactId>shedlock-provider-jdbc-template</artifactId>
    <version>4.14.0</version>
</dependency>
Fourth step: let's create a model who will map a table in the Database
Let's create a "models" subpackage and there we create a Java class who will map a USER table:
public class User implements Serializable {

    private Long id;
    private String name;
    private String surname;
    private String address;

    //getter, setter, equals and hashcode
}
Fifth step: let's create the Spring Batch configuration
We said that the batch will read from a csv file and will write every row in a USER table of the DB.
Let's code a very banal job inside the config subpackage:
@Configuration
@EnableBatchProcessing
@EnableScheduling
public class BatchConfig {

    private StepBuilderFactory stepBuilderFactory;

    private JobBuilderFactory jobBuilderFactory;

    private DataSource dataSource;

    public BatchConfig(StepBuilderFactory stepBuilderFactory, JobBuilderFactory jobBuilderFactory, DataSource dataSource) {
        this.stepBuilderFactory = stepBuilderFactory;
        this.jobBuilderFactory = jobBuilderFactory;
        this.dataSource = dataSource;
    }


    @Bean
    FlatFileItemReader<User> itemReader() {

        return new FlatFileItemReaderBuilder<User>()
                .name("userItemReader")
                .resource(new ClassPathResource("test-data.csv"))
                .delimited()
                .delimiter(";")
                .names("name", "surname", "address")
                .fieldSetMapper(new BeanWrapperFieldSetMapper<User>(){{
                    setTargetType(User.class);
                }})
                .build();
    }

    @Bean
    JdbcBatchItemWriter<User> itemWriter() {
        return new JdbcBatchItemWriterBuilder<User>()
                .dataSource(dataSource)
                .itemSqlParameterSourceProvider(new BeanPropertyItemSqlParameterSourceProvider<>())
                .sql("INSERT INTO USER (name, surname, address) VALUES (:name, :surname, :address)")
                .build();
    }

    @Bean
    Step step() {
        return stepBuilderFactory.get("step")
                .<User, User>chunk(10)
                .reader(itemReader())
                .writer(itemWriter())
                .build();
    }

    @Bean
    Job job() {
        return jobBuilderFactory.get("job")
                .start(step())
                .build();
    }
}
Let's analyze the code:
- @EnableBatchProcessing allows to import some already ready configurations of Spring Batch (like the JobBuilderFactory and JobBuilderFactory beans).
- @EnableScheduling allows to use the @Scheduler annotation where we will give a cron.
- As ItemReader implementation, we use FlatFileItemReader to read the csv file.
- As ItemWriter implementation, we use JdbcBatchItemWriter to write in the table of DB.
For now, it's nothing new; let's configure Shedlock.
Sixth step: let's configure Shedlock
Let's create the Shedlock's configuration class in the config subpackage:
@Configuration
@EnableSchedulerLock(defaultLockAtMostFor = "1m")
public class ShedLockConfig {


    @Bean
    public LockProvider lockProvider(DataSource dataSource) {
        return new JdbcTemplateLockProvider(
                JdbcTemplateLockProvider.Configuration.builder()
                        .withJdbcTemplate(new JdbcTemplate(dataSource))
                        .withTableName("SHEDLOCK") //for mysql linux case-sensitive
                        .usingDbTime() // Works on Postgres, MySQL, MariaDb, MS SQL, Oracle, DB2, HSQL and H2
                        .build()
        );
    }
}
The configuration showed is very simple; the class has to be to configure is LockProvider:
- @EnableSchedulerLock(defaultLockAtMostFor = "1m") enables the scanning of the Shedlock's @SchedulerLock annotations (we will illustrate after the feature of defaultLockAtMostFor).
- we supply the datasource where Shedlock looks for the table dedicate for the locking of the Jobs.
- .withTableName("SHEDLOCK") specifies the Shedlock's table name where the library will insert the job data (default it looks for a table called "shedlock", in uppercase).
- .usingDbTime() Shedlock will use the time of DB, without this option of default it will use the time of the client app. This is dangerous because the clients could have different times.
Seventh step: let's create a Runner class that will run the Job every 2 minutes
@Component
public class BatchRunner {

    private Job job;

    private JobLauncher jobLauncher;

    public BatchRunner(Job job, JobLauncher jobLauncher) {
        this.job = job;
        this.jobLauncher = jobLauncher;
    }


    @Scheduled(cron = "0 */2 * * * *")
    @SchedulerLock(name = "TaskScheduler_scheduledTask",
            lockAtLeastFor = "1m", lockAtMostFor = "1m")
    public void run() throws Exception {
        jobLauncher.run(job, new JobParametersBuilder().addDate("date", new Date()).toJobParameters());
    }
}
Let's annotate the run method with @SchedulerLock. Then Shedlock will check the lock of this method for every instance.
Let's analyze the lockAtMostFor e lockAtLeastFor parameters:
- lockAtMostFor specifies the max time for that must keep the lock. This is just a fallback, so it is useful when a node dead, because the default when the job finished, Shedlock releases the lock. If we don't specify this parameter in the @SchedulerLock annotation, then it's use the default parameter (defaultLockAtMostFor = "1m" inside the @EnableSchedulerLock).
- lockAtLeastFor specifies the min time for that must keep the lock. It has the purpose to prevent the execution of the jobs from different nodes in parallel.
Eighth step: let's update the application.properties and create a csv file
spring.datasource.url=jdbc:mysql://localhost:3306/shedlock_DB?useSSL=false&serverTimezone=Europe/Rome
spring.datasource.username=root
spring.datasource.password=root
spring.datasource.platform=mysql

spring.batch.job.enabled=false
spring.batch.initialize-schema=always
Let's create test-data.csv file inside resources with this content:
Vincenzo;Racca;via Napoli
Pippo;Pluto;via Roma
Finished! Let's run the app with 2 different instances
Let's build the project and copy the jar in a folder named "batch1" out of the project.
Let's copy then the jar also in a second folder named "batch2". Inside the batch2 folder let's copy also
the application.properties and edit the property:
spring.batch.initialize-schema=never
Let's start the batch1 e batch2 jars and read the logs:
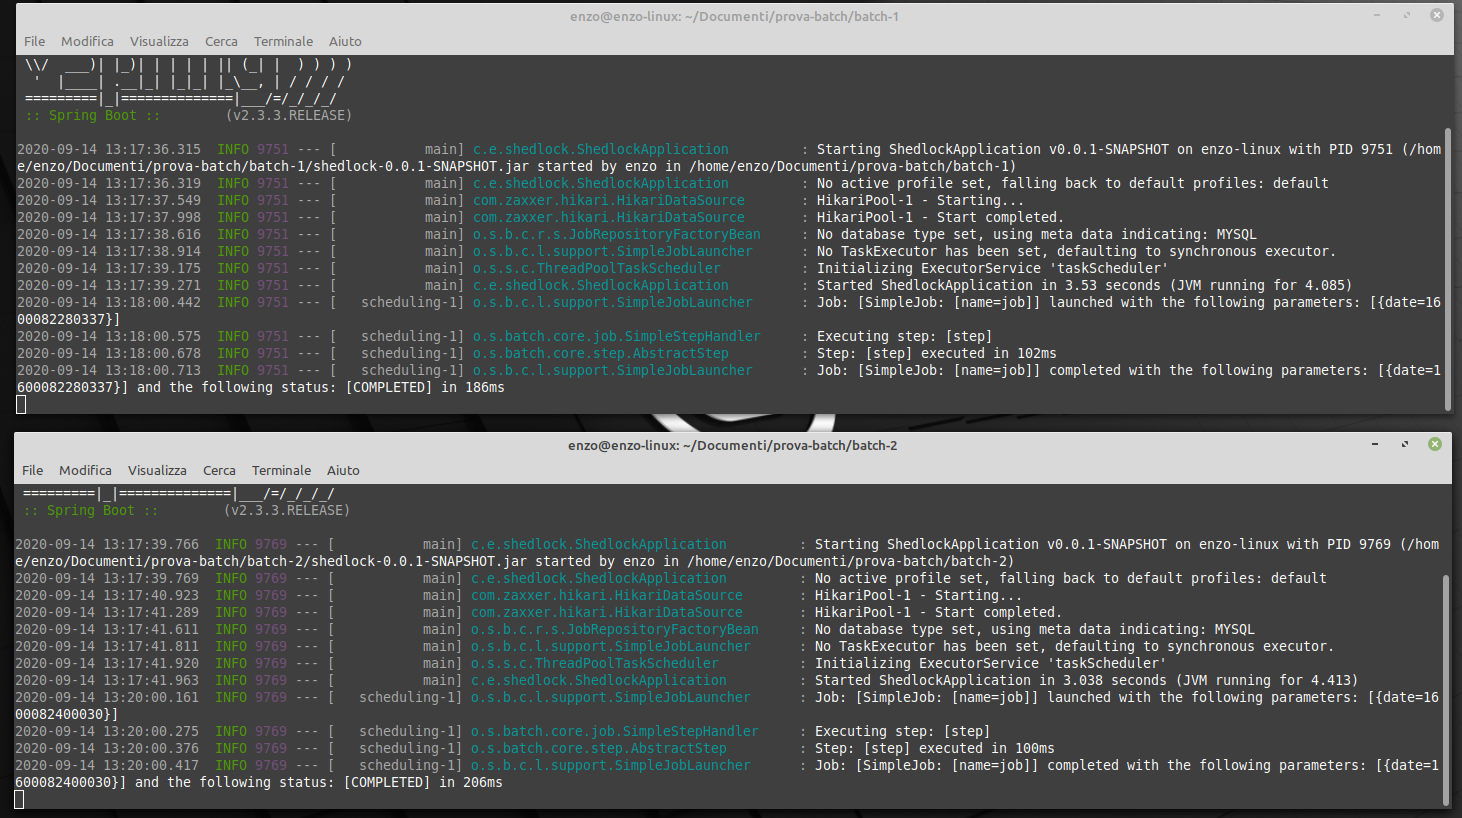
Conclusions
As proved from the image, the jobs doesn't run in parallel. In fact in the firsts 2 minutes, it ran only the instance 1 instead in the next 2 minutes, from instance 2. If we try to stop an instance, the job would continue to work because there is the second instance.
You can download the full project from my github in this link: Shedlock
Moreover in the README.md of the github project, I explain how to create a MySQL container from a Docker image.
Shedlock's documentation: Shedlock Documentation
Posts of Spring Framework: Spring
Recommended books about Spring:
- Pro Spring 5 (Spring from scratch a hero): https://amzn.to/3KvfWWO
- Pivotal Certified Professional Core Spring 5 Developer Exam: A Study Guide Using Spring Framework 5 (for Spring certification): https://amzn.to/3KxbJSC
- Pro Spring Boot 2: An Authoritative Guide to Building Microservices, Web and Enterprise Applications, and Best Practices (Spring Boot of the detail): https://amzn.to/3TrIZic