
In high-volume batch scenarios, it's common to work with records that can be grouped by a logical partitioning criterion (e.g., by user, geographical area, category, etc.). Organizing processing by partitions can bring several benefits, especially in terms of performance and concurrency control.
With a partitioned batch approach, it's possible to:
- Group records within the same partition to perform shared operations only once (such as updates on aggregated tables or external API calls).
- Parallelize processing across independent partitions, improving overall throughput.
In this article, I’ll show you how to use Spring Batch to build a partitioned job that processes each partition in parallel while maintaining sequential processing of records within each partition.
The Problem
Recently, I had to implement a job that reads records from a DynamoDB table containing information about shipments. These shipments are managed by delivery drivers distributed across different provinces: a single driver can operate in multiple provinces.
As a result, each shipment is logically identified by a driver-province pair, as shown below:
| paper_delivery_id | created_at | delivery_driver_id | province |
|---|---|---|---|
| delivery-1 | 2025-04-14T00:00:00Z | 1 | NA |
| delivery-2 | 2025-04-14T01:00:00Z | 1 | NA |
| delivery-3 | 2025-04-15T02:00:00Z | 1 | RM |
| delivery-4 | 2025-04-15T00:00:00Z | 2 | MI |
At the same time, another data store contains a table that keeps track of the weekly delivery capacity for each driver-province pair, along with the currently used capacity:
| delivery_driver_id | province | capacity | used_capacity |
|---|---|---|---|
| 1 | NA | 70 | 0 |
| 1 | RM | 60 | 0 |
| 2 | MI | 80 | 0 |
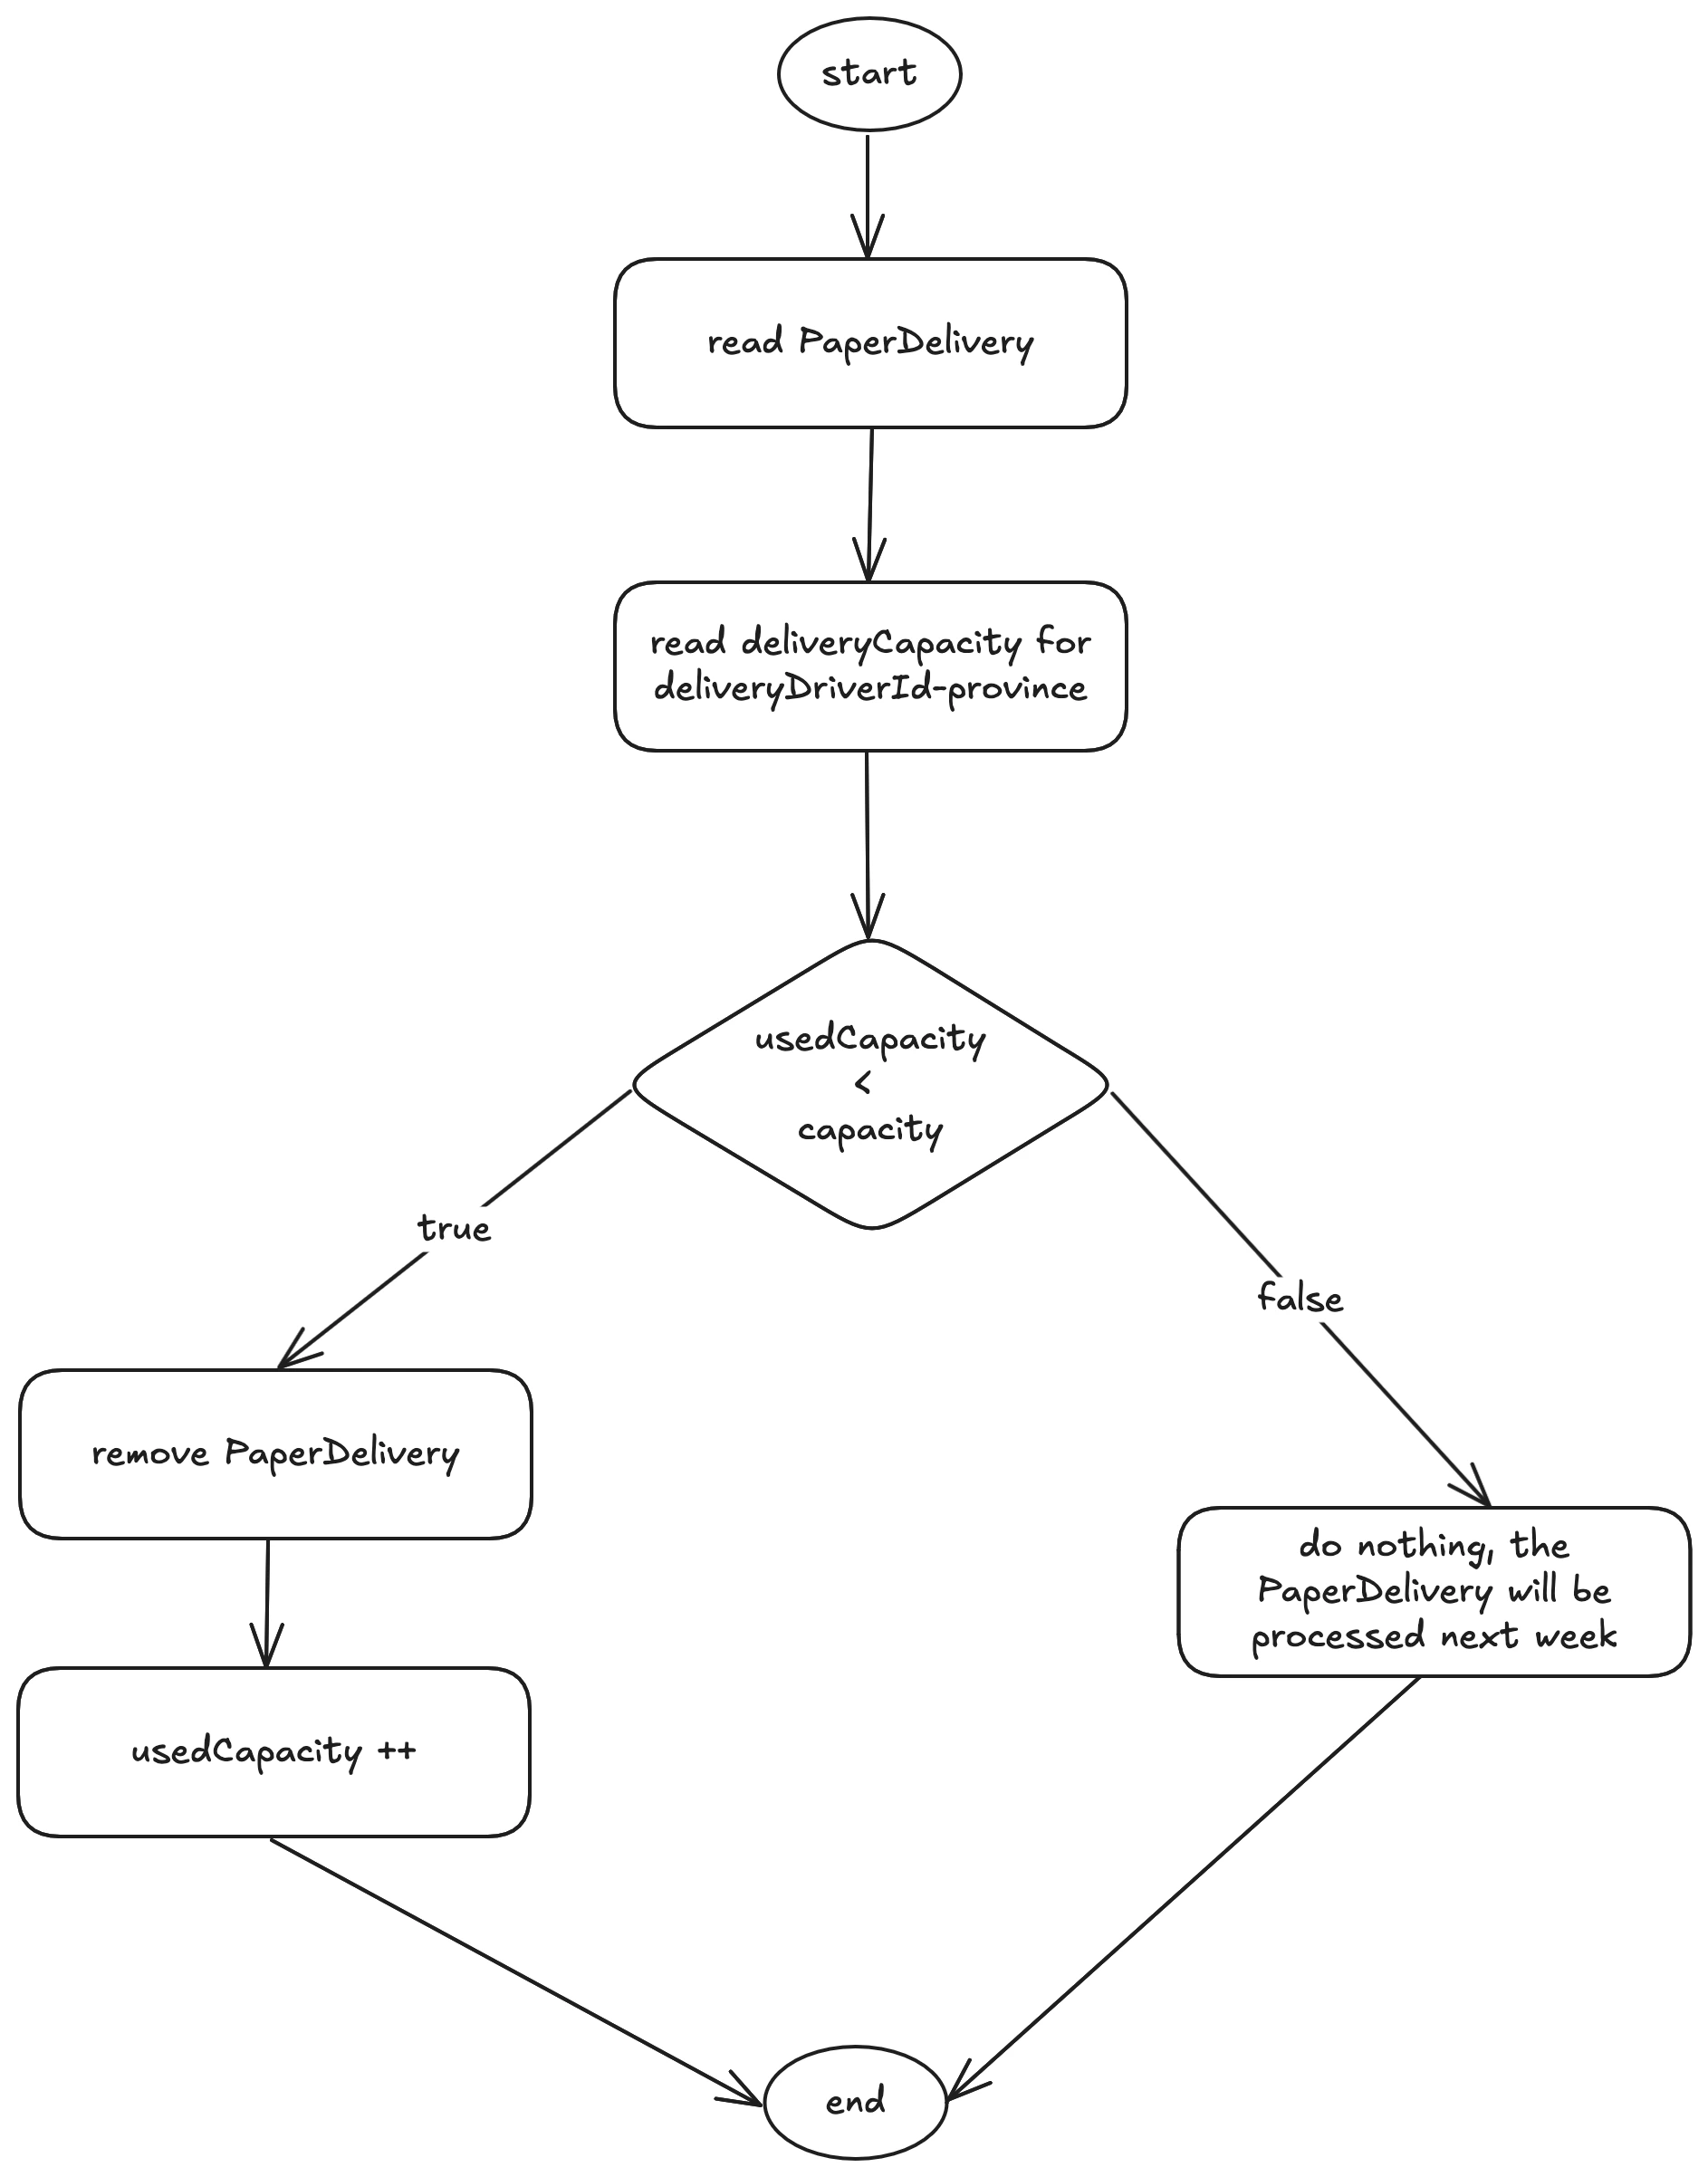
The batch works as follows: when a shipment record is read, the job checks whether the driver-province combination still has available capacity. If so:
- The shipment is processed (in our example, just logged) and deleted from the table.
- The used capacity for that partition is incremented.
If the capacity is exhausted, the shipment is not processed and remains in the database to be evaluated in a future execution (e.g., the following week).
The diagram below illustrates the processing logic:
Analyzing the business requirements, two key concurrency constraints emerge:
- Shipment records belonging to the same partition (
driver-province) must not be processed in parallel to avoid concurrency issues. - Records from different partitions can be processed in parallel since they are independent.
So I thought: “Time to bring back Spring Batch!”
Spring Batch and Partitioning
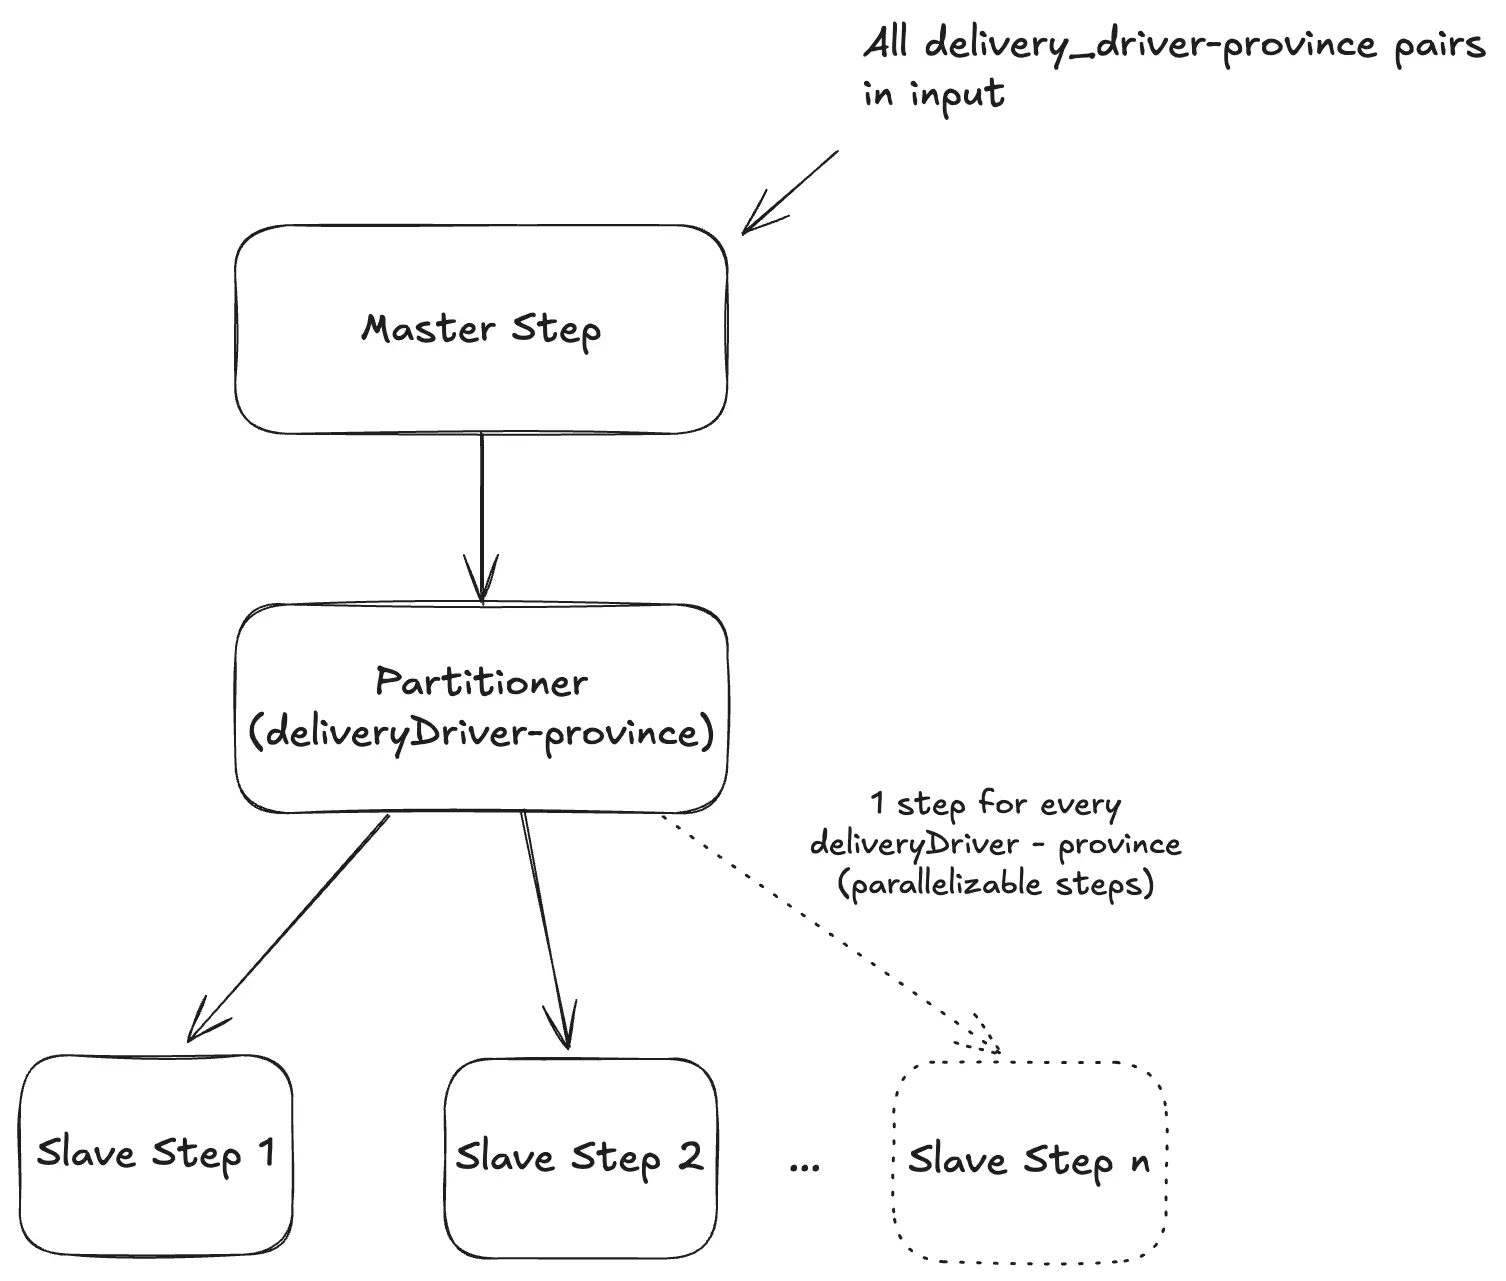
Spring Batch allows you to define a Master Step whose job is to divide the workload into multiple partitions and assign each one to a Slave Step that runs in parallel.
Details:
- A
Partitionercomputes the partitions (in our case, thedeliveryDriverId##provincekeys). - Each partition is passed to a Slave Step via
ExecutionContext. - Steps are executed in parallel using a
TaskExecutor. - In each Slave Step, we define:
- an
ItemReaderthat reads from DynamoDB using thepk - an
ItemWriterthat processes records sequentially (chunk-based)
- an
The diagram below illustrates how the Master Step works:
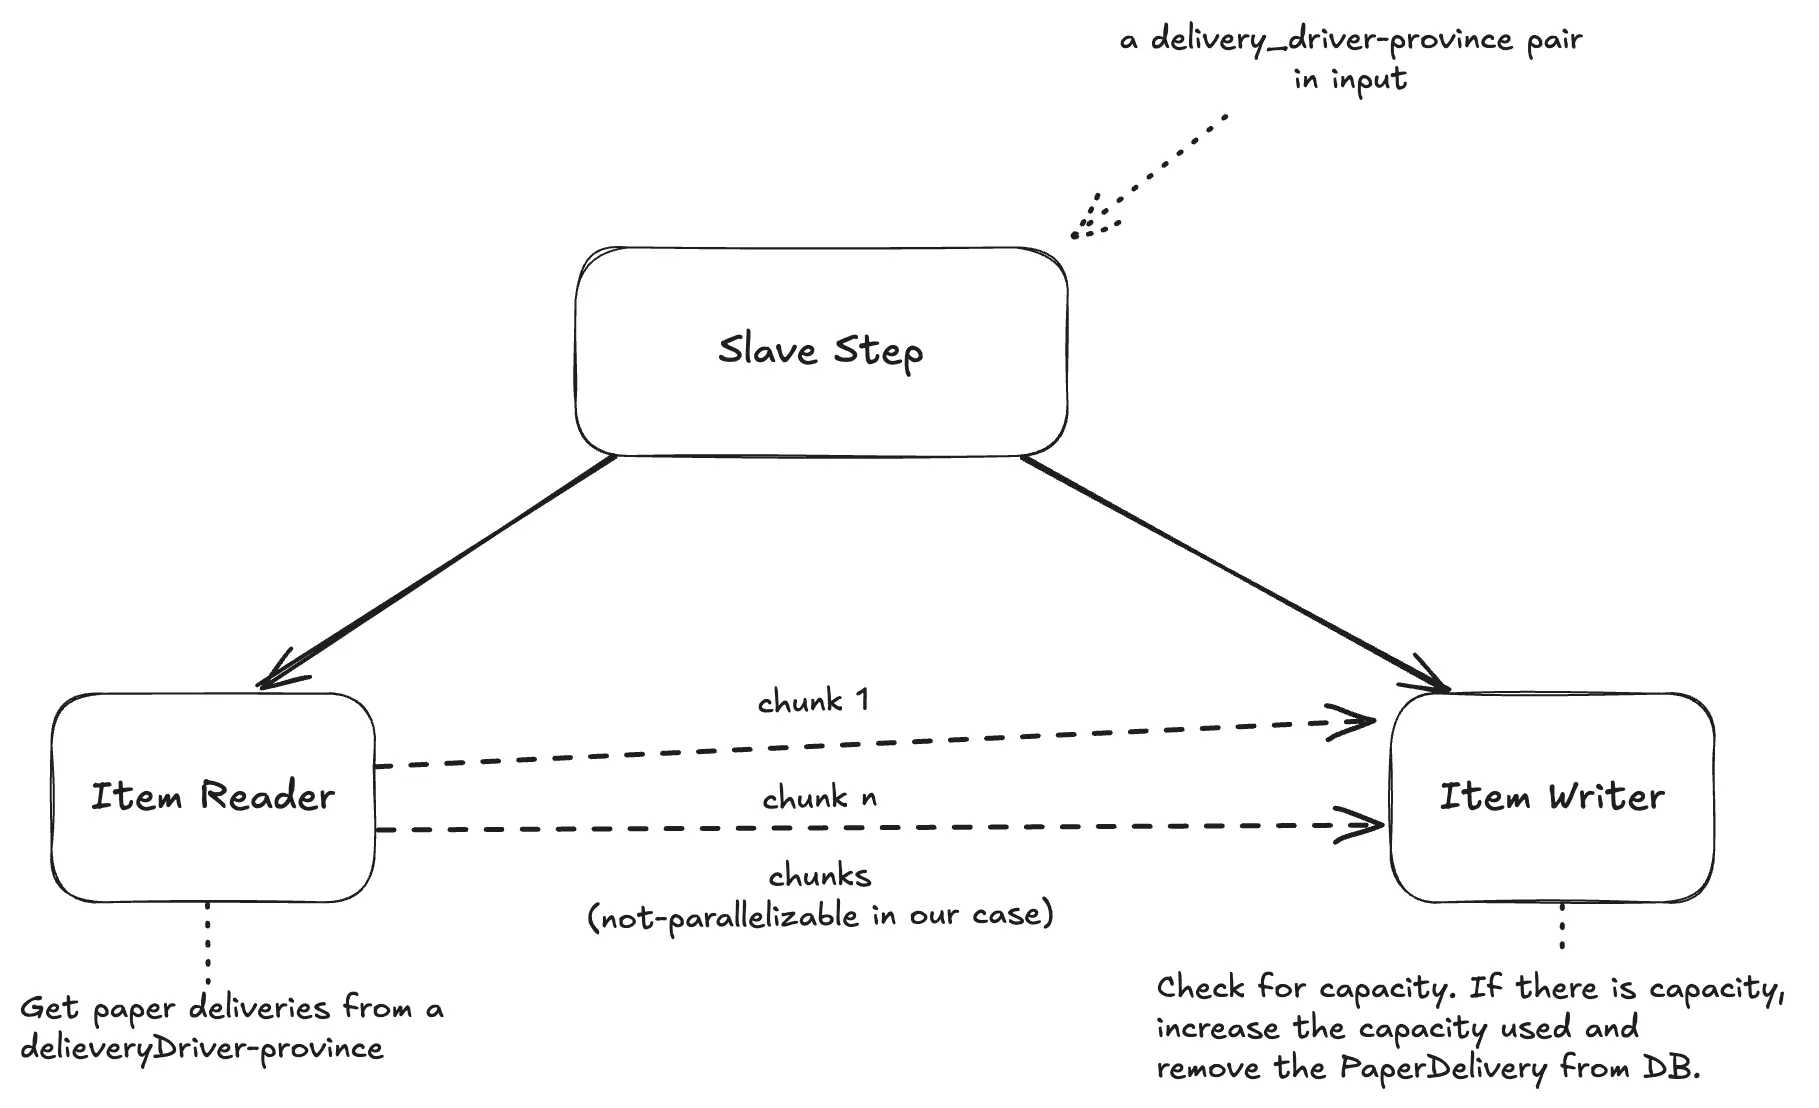
And here’s the diagram for the Slave Step:
Prerequisites
- Java 21 or higher.
- Podman or Docker installed on your machine to run the LocalStack container, which allows you to use DynamoDB locally.
The Spring Batch Application
You can find the full source code of the application in my GitHub repository.
The application uses Java 21 and Spring Boot 3 with Spring Batch. You can generate the project skeleton by executing the following curl command:
curl https://start.spring.io/starter.zip -d groupId=com.vincenzoracca \
      -d artifactId=spring-batch-partitioner \
      -d name=spring-batch-partitioner \
      -d packageName=com.vincenzoracca.springbatchpartitioner \
      -d dependencies=batch,actuator,web,distributed-tracing,lombok,postgresql \
      -d javaVersion=21 -d bootVersion=3.4.4 -d type=maven-project -o spring-batch-partitioner.zip
We also use dependencies for Spring MVC (Web), Spring Boot Actuator, and Micrometer Tracing (Distributed Tracing) to monitor batch execution and include traceId and spanId in job logs. All Slave Steps belonging to the same Master Step will share the same TraceID but will have different SpanIDs.
We also add the JDBC dependency for PostgreSQL since we use it to store Spring Batch job execution metadata.
To centralize Spring Cloud AWS dependency versions (used to interact with DynamoDB), add the following block to your pom.xml:
<dependencyManagement>
    <dependencies>
        <dependency>
            <groupId>io.awspring.cloud</groupId>
            <artifactId>spring-cloud-aws-dependencies</artifactId>
            <version>3.3.0</version>
            <type>pom</type>
            <scope>import</scope>
        </dependency>
    </dependencies>
</dependencyManagement>
Lastly, add the Spring Cloud AWS DynamoDB starter dependency:
<dependency>
    <groupId>io.awspring.cloud</groupId>
    <artifactId>spring-cloud-aws-starter-dynamodb</artifactId>
</dependency>
Step 1: Create the Entities
Create the package middleware.db.entity and define the classes that represent the entities described earlier:
// DeliveryDriverCapacity.java
@DynamoDbBean
@Data
public class DeliveryDriverCapacity {
    private String pk; // deliveryDriverId##province
    private String deliveryDriverId;
    private String province;
    private long capacity;
    private long usedCapacity;

    @DynamoDbPartitionKey
    public String getPk() {
        return pk;
    }
}

// PaperDelivery.java
@DynamoDbBean
@Data
public class PaperDelivery {
    private String pk; // deliveryDriverId##province
    private Instant createdAt;
    private String deliveryDriverId;
    private String province;
    private String requestId;

    @DynamoDbPartitionKey
    public String getPk() {
        return pk;
    }

    @DynamoDbSortKey
    public Instant getCreatedAt() {
        return createdAt;
    }
}
Step 2: Create the Job Runner
Create the class that triggers the batch job. Inside the job.runner package, create the following class:
@Component
@RequiredArgsConstructor
public class PaperDeliveryJobRunner {

    private final Job job;
    private final JobLauncher jobLauncher;

    @Scheduled(cron = "${paper-delivery-cron}")
    public void run() throws Exception {
        var pks = ExternalService.buildPks();
        JobParameters jobParameters = new JobParametersBuilder()
                .addJobParameter("pks", pks, String.class)
                .addJobParameter("createAt", Instant.now().toString(), String.class)
                .toJobParameters();

        jobLauncher.run(job, jobParameters);
    }
}
The run method is executed periodically based on the cron expression in the @Scheduled annotation. This method calls an external service that returns a string of all deliveryDriverId##province pairs, such as:
delivery-driver-1##province1,delivery-driver-2##province2...
Once this string is retrieved, it is passed as a Job Parameter and the job is launched.
Step 3: Creating the Partitioner Used by the Master Step
We create the partitioner class used by the Master Step. It takes as input all the keys in the format deliveryDriverId##province and creates one partition per key.
public class PaperDeliveryPartitioner implements Partitioner {

    private final List<String> pks;

    public PaperDeliveryPartitioner(List<String> pks) {
        this.pks = pks;
    }

    @Override
    public Map<String, ExecutionContext> partition(int gridSize) {
        Map<String, ExecutionContext> partitions = HashMap.newHashMap(pks.size());

        for (int i = 0; i < pks.size(); i++) {
            ExecutionContext context = new ExecutionContext();
            context.putString("pk", pks.get(i));
            partitions.put("partition" + i, context);
        }

        return partitions;
    }
}
The gridSize parameter is equal to the size of the pks list, so we can use either gridSize or pks.size() interchangeably.
Step 4: Creating the ItemReader Used by the Slave Step
Create the package job.reader and define the ItemReader class. Given a pk input (a string like deliveryDriverId##province), it retrieves from DynamoDB all shipments associated with that pair:
@RequiredArgsConstructor
@Slf4j
public class PaperDeliveryReader implements ItemReader<PaperDelivery>, StepExecutionListener {

    private final DynamoDbTemplate dynamoDbTemplate;
    private Iterator<PaperDelivery> iterator;

    @Override
    public void beforeStep(StepExecution stepExecution) {
        ExecutionContext context = stepExecution.getExecutionContext();
        var pk = context.getString("pk");
        this.iterator = loadData(pk).iterator();
        log.info("Reading paper deliveries with pk {}", pk);
    }

    private List<PaperDelivery> loadData(String pk) {
        QueryEnhancedRequest query = QueryEnhancedRequest.builder()
                .queryConditional(QueryConditional.keyEqualTo(k -> k.partitionValue(pk))).build();
        PageIterable<PaperDelivery> pageIterable = dynamoDbTemplate.query(query, PaperDelivery.class);
        return StreamSupport.stream(pageIterable.items().spliterator(), false).toList();
    }

    @Override
    public PaperDelivery read() {
        return (iterator != null && iterator.hasNext()) ? iterator.next() : null;
    }
}
Step 5: Creating the ItemWriter Used by the Slave Step
The ItemWriter processes all shipments associated with a single deliveryDriverId##province partition and applies the capacity logic. Create the job.writer package and define the following class:
@Slf4j
@RequiredArgsConstructor
public class LogWriter implements ItemWriter<PaperDelivery> {

    private final DynamoDbTemplate dynamoDbTemplate;

    @Override
    public void write(Chunk<? extends PaperDelivery> chunk) {
        String pk = chunk.getItems().get(0).getPk();
        DeliveryDriverCapacity deliveryDriverCapacity = dynamoDbTemplate.load(Key.builder()
                .partitionValue(pk)
                .build(), DeliveryDriverCapacity.class);

        chunk.forEach(paper -> {
            if (deliveryDriverCapacity != null &&
                    deliveryDriverCapacity.getUsedCapacity() < deliveryDriverCapacity.getCapacity()) {

                deliveryDriverCapacity.setUsedCapacity(deliveryDriverCapacity.getUsedCapacity() + 1);
                log.info("Paper Delivery DONE: {}", paper);
                dynamoDbTemplate.delete(paper);
            } else {
                log.warn("PaperDelivery DISCARDED because there is no delivery driver capacity: {}, {}",
                        paper.getRequestId(), paper.getPk());
            }
        });

        dynamoDbTemplate.save(deliveryDriverCapacity);
    }
}
Note that the write method takes a Chunk of shipments as input. This means we can choose to split the shipments of the same partition into multiple chunks, to reduce processing load. However, in our use case, it's important that chunks are not executed in parallel, to avoid inconsistency in evaluating capacity.
Step 6: Creating the Complete Job
Finally, let's define the complete job, composed of two steps: the Master Step and the Slave Step. Create the package job.config and implement the following class:
@Configuration
@EnableBatchProcessing
@Slf4j
@RequiredArgsConstructor
public class PaperDeliveryJobConfig {

    private final DynamoDbTemplate dynamoDbTemplate;
    private final PlatformTransactionManager transactionManager;
    private final JobRepository jobRepository;

    // Used to run Slave Steps in parallel
    private TaskExecutor taskExecutor() {
        ThreadPoolTaskExecutor executor = new ThreadPoolTaskExecutor();
        executor.setCorePoolSize(4);
        executor.setMaxPoolSize(8);
        executor.setQueueCapacity(10);
        executor.setThreadNamePrefix("part-thread-");
        executor.initialize();
        return executor;
    }

    @Bean
    @StepScope
    public PaperDeliveryReader reader() {
        return new PaperDeliveryReader(dynamoDbTemplate);
    }

    @Bean
    public ItemWriter<PaperDelivery> writer() {
        return new LogWriter(dynamoDbTemplate);
    }

    @Bean
    public Step slaveStep() {
        return new StepBuilder("slaveStep", jobRepository)
                .<PaperDelivery, PaperDelivery>chunk(10, transactionManager)
                .reader(reader())
                .writer(writer())
                .build();
    }

    @Bean
    @JobScope
    public Step masterStep(@Value("#{jobParameters[pks]}") String pkParam) {
        List<String> pks = Arrays.asList(pkParam.split(","));

        return new StepBuilder("masterStep", jobRepository)
                .partitioner("slaveStep", new PaperDeliveryPartitioner(pks))
                .step(slaveStep())
                .taskExecutor(taskExecutor())
                .gridSize(pks.size())
                .build();
    }

    @Bean
    public Job paperDeliveryJob(Step masterStep) {
        return new JobBuilder("paperDeliveryJob", jobRepository)
                .start(masterStep)
                .build();
    }
}
The important configuration here is in the Master Step. It takes as input the pks job parameter passed by the runner, splits it to extract the deliveryDriverId##province pairs, and then passes them to the partitioner. Notice how gridSize is set to pks.size(). A taskExecutor is assigned to this step to enable parallel execution of the Slave Steps.
Step 7: Initializing the Database
At application startup, we insert two shipments for every deliveryDriverId##province pair. We also initialize all capacities to 2, except for the pairs 1##RM and 2##NA, which are initialized with a capacity of 1. This allows us to simulate the case of exhausted capacity:
@SpringBootApplication
@EnableScheduling
@Slf4j
public class SpringBatchAwsApplication {

    public static void main(String[] args) {
        SpringApplication.run(SpringBatchAwsApplication.class, args);
    }

    @Bean
    CommandLineRunner commandLineRunner(DynamoDbTemplate dynamoDbTemplate) {
        return args -> {
            cleanDb(dynamoDbTemplate, PaperDelivery.class);
            cleanDb(dynamoDbTemplate, DeliveryDriverCapacity.class);

            String[] pks = ExternalService.buildPks().split(",");
            int numberOfRequest = 2;
            log.info("Initialization {} requestId for every {} pair deliveryDriverId##Province", numberOfRequest, pks.length);
            Stream.of(pks).parallel().forEach(pk -> {
                String[] deliveryDriverProvince = pk.split("##");
                var deliveryDriverId = deliveryDriverProvince[0];
                var province = deliveryDriverProvince[1];
                DeliveryDriverCapacity deliveryDriverCapacity = buildDeliveryDriverCapacity(pk, deliveryDriverId, province);
                dynamoDbTemplate.save(deliveryDriverCapacity);
                for (int i = 0; i < numberOfRequest; i++) {
                    PaperDelivery paperDelivery = buildPaperDelivery(pk, deliveryDriverId, province);
                    dynamoDbTemplate.save(paperDelivery);
                }
            });
        };
    }

    private static PaperDelivery buildPaperDelivery(String pk, String deliveryDriverId, String province) {
        PaperDelivery paperDelivery = new PaperDelivery();
        paperDelivery.setPk(pk);
        paperDelivery.setCreatedAt(Instant.now());
        paperDelivery.setRequestId(UUID.randomUUID().toString());
        paperDelivery.setDeliveryDriverId(deliveryDriverId);
        paperDelivery.setProvince(province);
        return paperDelivery;
    }

    private static DeliveryDriverCapacity buildDeliveryDriverCapacity(String pk, String deliveryDriverId, String province) {
        DeliveryDriverCapacity deliveryDriverCapacity = new DeliveryDriverCapacity();
        deliveryDriverCapacity.setPk(pk);
        deliveryDriverCapacity.setDeliveryDriverId(deliveryDriverId);
        deliveryDriverCapacity.setProvince(province);
        if (pk.equals("1##RM") || pk.equals("2##NA")) {
            deliveryDriverCapacity.setCapacity(1L);
        } else {
            deliveryDriverCapacity.setCapacity(2L);
        }
        deliveryDriverCapacity.setUsedCapacity(0L);
        return deliveryDriverCapacity;
    }

    private <T> void cleanDb(DynamoDbTemplate dynamoDbTemplate, Class<T> clazz) {
        PageIterable<T> pages = dynamoDbTemplate.scanAll(clazz);
        StreamSupport.stream(pages.items().spliterator(), false)
                .forEach(dynamoDbTemplate::delete);
    }
}
Step 8: Running the Application
In the project, you’ll find a compose.yml file to run PostgreSQL and DynamoDB locally. Make sure Docker or Podman is running, then from the project root, execute:
docker compose up -d # Docker
Then run:
./mvnw clean spring-boot:run
The job will trigger at second 0 of each minute, since in application.properties we have:
paper-delivery-cron=0 */1 * * * *
Checking the logs, you’ll see that the Slave Steps are launched in parallel. Additionally, all shipments belonging to the same Slave Step (i.e., the same partition) will share the same thread, the same TraceID, and the same SpanID:
[  part-thread-4] [67fbd9a4bc4011ed462226cf7d5187fb-462226cf7d5187fb]...:
         Reading paper deliveries with pk 2##NA

[  part-thread-4] [67fbd9a4bc4011ed462226cf7d5187fb-462226cf7d5187fb]...:
         Paper Delivery DONE: PaperDelivery(pk=2##NA, createdAt=2025-04-13T15:34:45.630071Z, deliveryDriverId=2, province=NA, requestId=8779789a-7e5e-4c84-ad33-4a152d0c4e4c)

[  part-thread-4] [67fbd9a4bc4011ed462226cf7d5187fb-462226cf7d5187fb]...:
         PaperDelivery DISCARDED because there is no delivery driver capacity: 1e188367-4800-4144-86a6-a2477cc4c4fc, 2##NA
Conclusion
In this article, we've seen how to solve a common problem — implementing partitioned batch execution. Using Spring Batch, it’s possible to create a Master Step that delegates processing to multiple Slave Steps, in a clean and easily parallelizable way.
Other articles on Spring: Spring.
If you want to build secure and scalable APIs with Spring Boot, check out my book Spring Boot 3 API Mastery on Amazon!
Other recommended books on Spring, Docker, and Kubernetes:
- Cloud Native Spring in Action: https://amzn.to/3xZFg1S
- Pro Spring 6: An In-Depth Guide to the Spring Framework: https://amzn.to/4g8VPff
- Pro Spring Boot 3: An Authoritative Guide With Best Practices: https://amzn.to/4hxdjDp
- Docker: Sviluppare e rilasciare software tramite container: https://amzn.to/3AZEGDI
- Kubernetes. Guida per gestire e orchestrare i container: https://amzn.to/3EdA94v