
Lately at work I happened to have to implement OpenID Connect and OAuth2 with Spring and use WSO2 Identity Server as Authorization Server. I have thought therefore to write an article about it, hoping it can be useful to someone!
In this article you will see how to centralize security in a microservice architecture with the help of Spring Cloud Gateway that will have the role of OAuth2 Client and will act as a Gateway to a simple microservice that will have the role of the role of Resource Server.
You'll manage sessions with Hazelcast, a distributed cache, so that sessions are shared between multiple instances of the Spring Cloud Gateway application.
In addition, you will use an Identity Server, WSO2IS as Authorization Server. I will show you how to configure it using a Docker image of WSO2IS 11.
OAuth2 in brief and roles
In this article I will not explain in detail what OIDC and OAuth2 are, but I will give a brief introduction.
OAuth2 is an authorization protocol that allows one application to access another application's resources
without providing credentials.
We often use this protocol, for example when from an application we use the Social login, such as
example on Spotify.
In that case, Spotify makes a redirect to a social like Google. Google asks us to confirm the
sharing information such as first name, last name, email (resource sharing) to Spotify. Spotify will then simply
take this information from Google.
The flow of OAuth2 varies depending on the grant type used. In this article we will see an example of flow with authorization code.
In OAuth2 there are several roles that come into play in the authorization flow:
- Resource Owner: whoever accesses the client app and gives consent to access a resource. It can be for example a physical person.
- OAuth2 Client: the app that requests access to protected resources, such as Spotify.
- Authorization Server: server that issues the access token to the OAuth2 Client after authenticating the Resource Owner.
- Resource Server: an application that provides secure resources accessible via access tokens, such as Google or Facebook.
As for OIDC, it's a standard that sits on top of OAuth2, it deals with the authentication phase.
It issues a JWT token called ID Token, which shows that the user has been authenticated: this can contain information about
who the user is, such as first and last name.
However, the Resource Server checks the access token to figure out whether or not the OAuth2 Client is authorized to access
a resource. The access token could be a JWT, but it is not required to be one.
Project Overview
An overview of the project you will build is shown below:
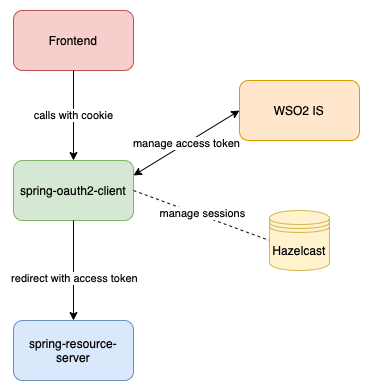
In detail:
- A frontend (which you won't create in this article) will call the spring-oauth2-client application both to make the login, and to make calls to the spring-resource-server REST services.
- In the login phase, spring-oauth2-client will perform a redirect to the WSO2IS login page.
- Once the user is successfully authenticated, spring-oauth2-client will receive the access token from WSO2IS.
The spring-oauth2-client app will then create a session, which it will map to the access token. A session cookie will be returned to the frontend. - The frontend will then communicate with spring-oauth2-client via session cookies.
- When the frontend makes a REST request to spring-oauth2-client, the spring-oauth2-client checks the session, and makes a redirect to spring-resource-server sending it the access token associated with the session.
- The spring-resource-server app validates the token signature with a public key obtained from the jws_url endpoint (this url is requested by the Resource Server at startup, from the Authorization Server, so it is necessary that WSO2IS is up & running when we start the Resource Server).
Installation of WSO2IS
Create a container from the official wso2is image: docker run -it -p 9443:9443 --name is wso2/wso2is:5.11.0.
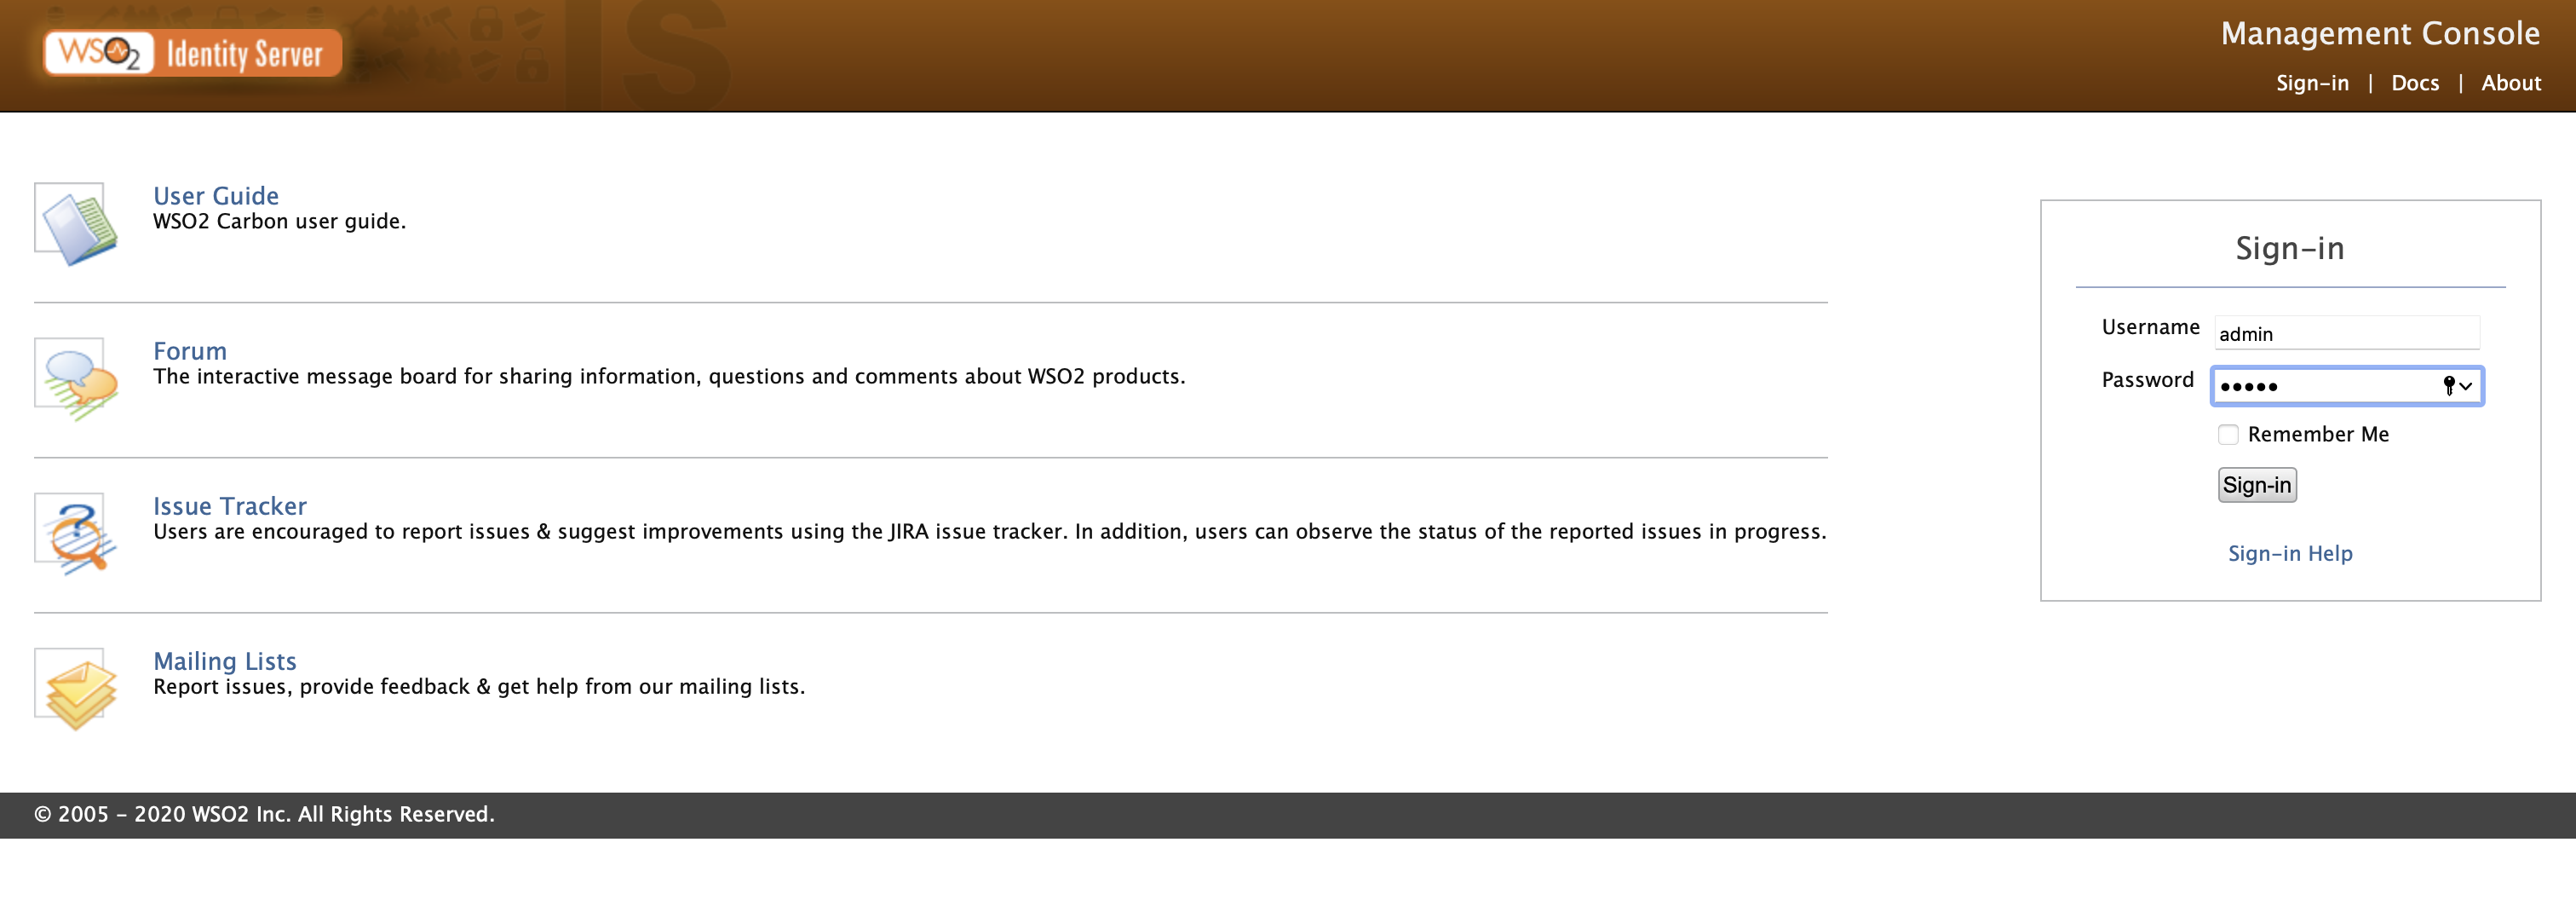
Once WSO2IS is started, access the carbon console at the URL https://localhost:4333/carbon and log on with user admin and password admin:
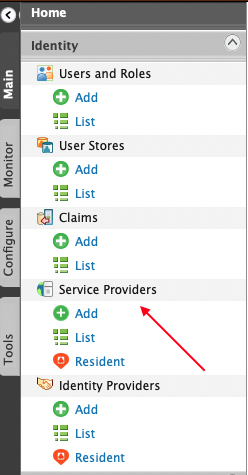
Once you are logged in, you need to add a Service Provider, which would be the OAuth2 Client.
Then click on "Add" in the Service Providers section:
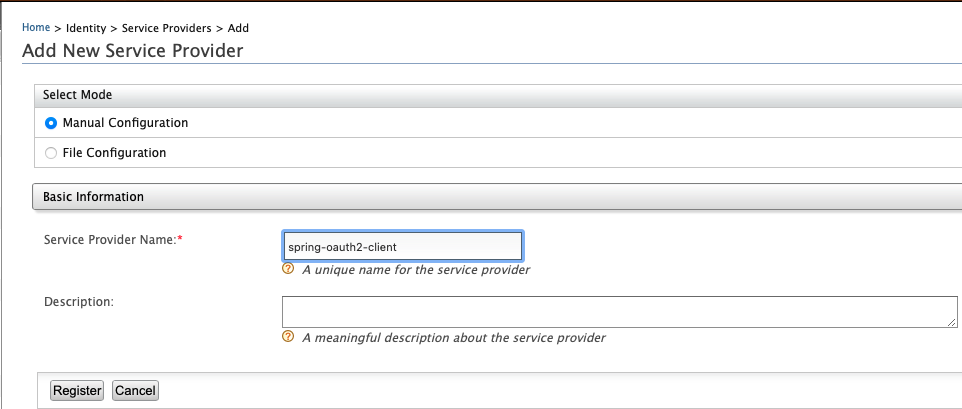
Now enter as Service Provider Name "spring-oauth2-client" and click on "Register":
Once registered, go then to Inbound Authentication Configuration and OAuth OpenID Connect Configuration and click on Configure:
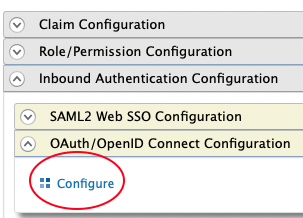
In the "Callback URL" text field, type: regexp=(http://localhost:8082/login/oauth2/code/wso2|http://localhost:8082).
The first URL is the redirect for login, the second is for logout.
Select JWT instead of Default in the "Token Issuer" section, so you will have an access token of type JWT.
At this point, click on the Update button at the bottom.
In the section Inbound Authentication Configuration/OAuth OpenID Connect Configuration you will now have a Client ID and a
Client Secret:

You'll need this information later when using Spring Cloud Gateway as an OAuth2 Client.
Then go to the "Claim Configuration" section, click on "Add Claim URI", and add the claim that indicates the roles of the user:
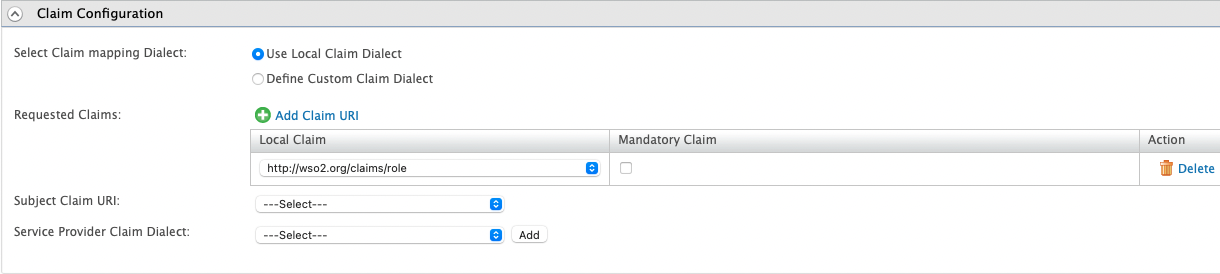
Thus, the JWT will also contain information about user roles.
You're done with WSO2IS, let's move on to Spring Cloud Gateway now!
Spring Cloud Gateway as OAuth2 Client
Go to the Spring Initializr site (https://start.spring.io) to create your Spring Cloud project from scratch. Gateway. Enter the data as in the following figure:
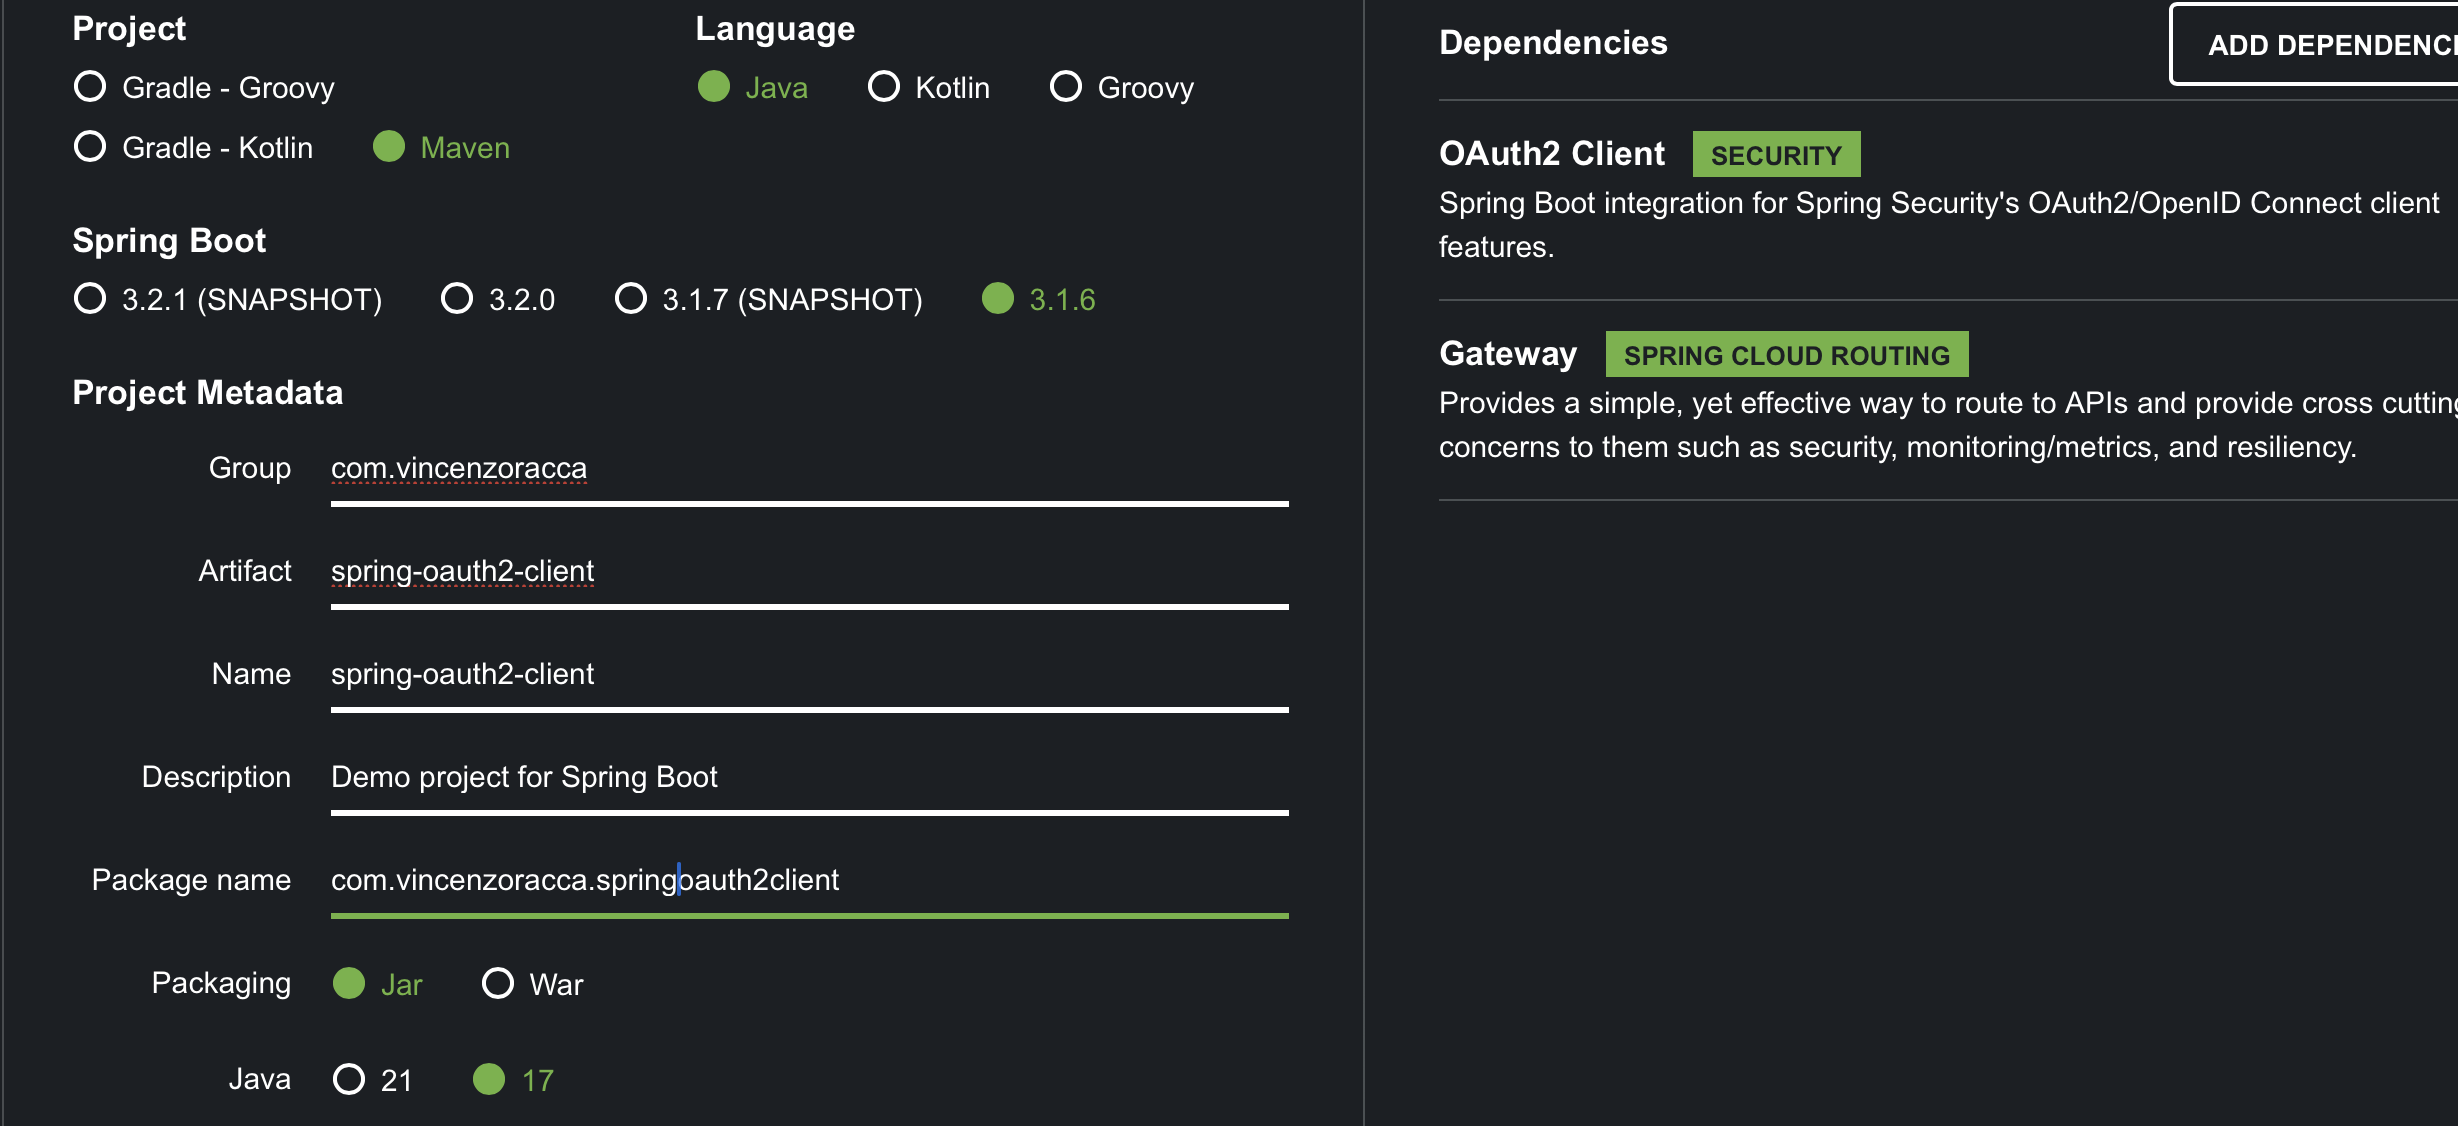
Click on Generate and download the project. Unpack it, and open it with any IDE.
Add Hazelcast to the project
Add the following dependencies to the pom:
<dependency>
    <groupId>com.hazelcast</groupId>
    <artifactId>hazelcast</artifactId>
</dependency>
<dependency>
    <groupId>org.springframework.session</groupId>
    <artifactId>spring-session-core</artifactId>
</dependency>
The first dependency allows you to add Hazelcast to your project. The second one allows you to use Spring Session to manage sessions with Hazelcast.
Add a configuration class for Hazelcast in a config package:
@Configuration
public class HazelcastConfig {

  private static final String HAZELCAST_INSTANCE_NAME = "session-hazelcast-instance";

  private static final String MAP_CONFIG_NAME = "session-config-map";

  @Bean
  Config config() {
    Config config = new Config();
    config.setInstanceName(HAZELCAST_INSTANCE_NAME)
            .addMapConfig(mapConfig()
            );
    return config;
  }

  private MapConfig mapConfig() {
    final MapConfig mapConfig = new MapConfig();
    mapConfig.setName(MAP_CONFIG_NAME)
            .setTimeToLiveSeconds(0)
            .setEvictionConfig(new EvictionConfig().setEvictionPolicy(EvictionPolicy.LRU)
                    .setMaxSizePolicy(MaxSizePolicy.PER_NODE)
            );
    return mapConfig;
  }
}
The "setTimeToLiveSeconds" method allows you to specify an expiration time for Hazelcast entries (i.e. sessions). After that time expires, the entry will be deleted automatically. Setting this parameter to zero, means that the entry will not be deleted automatically (zero is also the default parameter).
Optionally, you can create a Hazelcast MapListener to be notified about insert/update/delete sessions:
public class SessionHazelcastListener implements EntryListener<String, Session> {

    private static final Logger log = LoggerFactory.getLogger(SessionHazelcastListener.class);

    @Override
    public void entryAdded(EntryEvent<String, Session> event) {
        log.info("Added new session, key: {}", event.getKey());
    }

    @Override
    public void entryEvicted(EntryEvent<String, Session> event) {

    }

    @Override
    public void entryExpired(EntryEvent<String, Session> event) {
        log.info("Expired session, key: {}", event.getKey());
    }

    @Override
    public void entryRemoved(EntryEvent<String, Session> event) {
        log.info("Delete session, key: {}", event.getKey());
    }

    @Override
    public void entryUpdated(EntryEvent<String, Session> event) {
        log.info("Update session, key: {}", event.getKey());
    }

    @Override
    public void mapCleared(MapEvent event) {

    }

    @Override
    public void mapEvicted(MapEvent event) {

    }
}
Add security configuration
Create a configuration class to manage security, in the security package:
@Configuration
@EnableWebFluxSecurity
@EnableSpringWebSession
public class SecurityConfig {

    private final HazelcastInstance hazelcastInstance;

    public SecurityConfig(HazelcastInstance hazelcastInstance) {
        this.hazelcastInstance = hazelcastInstance;
    }

    @Bean
    ServerOAuth2AuthorizedClientRepository authorizedClientRepository() {
        return new WebSessionServerOAuth2AuthorizedClientRepository();
    }

    @Bean
    ReactiveSessionRepository reactiveSessionRepository() {
        IMap<String, Session> map = hazelcastInstance.getMap("session-map");
        map.addEntryListener(new SessionHazelcastListener(), false);
        return new ReactiveMapSessionRepository(map);
    }

    @Bean
    SecurityWebFilterChain springSecurityFilterChain(ServerHttpSecurity http, ReactiveClientRegistrationRepository clientRegistrationRepository) {
        return http
                .authorizeExchange(exchange -> exchange
                        .pathMatchers("/", "/*.css", "/*.js", "/favicon.ico").permitAll()
                        .anyExchange().authenticated()
                )
                .exceptionHandling(exceptionHandling -> exceptionHandling
                        .authenticationEntryPoint(new HttpStatusServerEntryPoint(HttpStatus.UNAUTHORIZED)))
                .oauth2Login(Customizer.withDefaults())
                .logout(logout -> logout.logoutSuccessHandler(oidcLogoutSuccessHandler(clientRegistrationRepository)))
                .csrf(csrf -> csrf.csrfTokenRepository(CookieServerCsrfTokenRepository.withHttpOnlyFalse()))
                .build();
    }

    private ServerLogoutSuccessHandler oidcLogoutSuccessHandler(ReactiveClientRegistrationRepository clientRegistrationRepository) {
        var oidcLogoutSuccessHandler = new OidcClientInitiatedServerLogoutSuccessHandler(clientRegistrationRepository);
        oidcLogoutSuccessHandler.setPostLogoutRedirectUri("{baseUrl}");
        return oidcLogoutSuccessHandler;
    }

    @Bean
    WebFilter csrfWebFilter() {
        return (exchange, chain) -> {
            exchange.getResponse().beforeCommit(() -> Mono.defer(() -> {
                Mono<CsrfToken> csrfToken = exchange.getAttribute(CsrfToken.class.getName());
                return csrfToken != null ? csrfToken.then() : Mono.empty();
            }));
            return chain.filter(exchange);
        };
    }

}
Some considerations:
- With ".pathMatchers(...).permitAll() " you are telling Spring Security not to protect API "/", urls ending with js, css and favicon.ico.
- With ".exceptionHandling(exceptionHandling -> ... " you are saying that if you try to access the protected API, without being authenticated, then it will be returned as HTTP Status 401.
- With ".oauth2Login " you enable the login via oauth2, then redirecting to an Authorization Server (in this case WSO2IS).
- With "logout(logout -> logout.logoutSuccessHandler(oidcLogoutSuccessHandler(clientRegistrationRepository)) " you are also managing the logout, deleting the session (Spring logout management), and redirecting to the Authorization Server logout .
- With "csrf(...)" and its filter, you transmit the CSRF token to the browser, in a cookie.
- You finally also creates beans of type ReactiveSessionRepository to have Hazelcast manage the sessions, a bean of type ServerOAuth2AuthorizedClientRepository to associate tokens with sessions and a bean of type bean of type WebFilter to manage the csrf token, otherwise you will get an error during the logout phase (https://github.com/spring-projects/spring-security/issues/5766).
Create a welcome API
Both on WSO2IS and in the Spring Security configuration, you have configured a redirect endpoint for logout, "/". So write a simple REST welcome service, which, if you are also authenticated, returns the username in the message as well:
@RestController
public class WelcomeApi {

    @GetMapping
    public Mono<String> welcome(@AuthenticationPrincipal OidcUser oidcUser, WebSession webSession) {
        System.out.println(webSession.getId());
        String user;
        if(oidcUser == null) {
            user = "";
        }
        else {
            user = oidcUser.getClaimAsString("sub");
        }
        return Mono.just(String.format("Welcome to Spring Cloud Gateway %s", user));
    }
}
Add the properties in the application.yml file
Delete the application.properties file and create an application.yml file. Then write the following properties:
server:
  port: 8082
  shutdown: graceful

spring:
  application:
    name: spring-oauth2-client
  cloud:
    gateway:
      default-filters:
        - SaveSession
        - TokenRelay
      routes:
        - id: spring-resource-server
          uri: ${RESOURCE_SERVER:http://localhost:8080}/spring-resource-server
          predicates:
            - Path=/spring-resource-server/**
  security:
    oauth2:
      client:
        registration:
          wso2:
            provider: wso2
            authorization-grant-type: authorization_code
            client-id: cMEHYsZREl1WMR1CJbzrdv8p6f4a
            client-secret: 3_ZMPh0TjY0Xz5JOhljtEsEGhzoa
            redirect-uri: "{baseUrl}/login/oauth2/code/wso2"
            scope: openid,profile
        provider:
          wso2:
            issuer-uri: ${WSO2IS_URL:https://localhost:9443}/oauth2/token
Let's analyze the properties:
- In the default filters you add Spring filters, one to save the session (SaveSession), the other one to transmit the access token to the Resource Servers (TokenRelay).
- in the registration section, you set the various properties for oauth2. Client ID and Client Secret are taken from
from WSO2IS Service Provider configuration. The redirect url in Spring OAuth2 Client must be:
{baseUrl}/login/oauth2/code/{registrationId}, so it is {baseUrl}/login/oauth2/code/wso2. - Finally, configure the issuer-uri that allows you to retrieve the various endpoints (token endpoint, user info endpoint, etc) of WSO2IS.
Finished! Let's move on to the Resource Server
Write the Resource Server
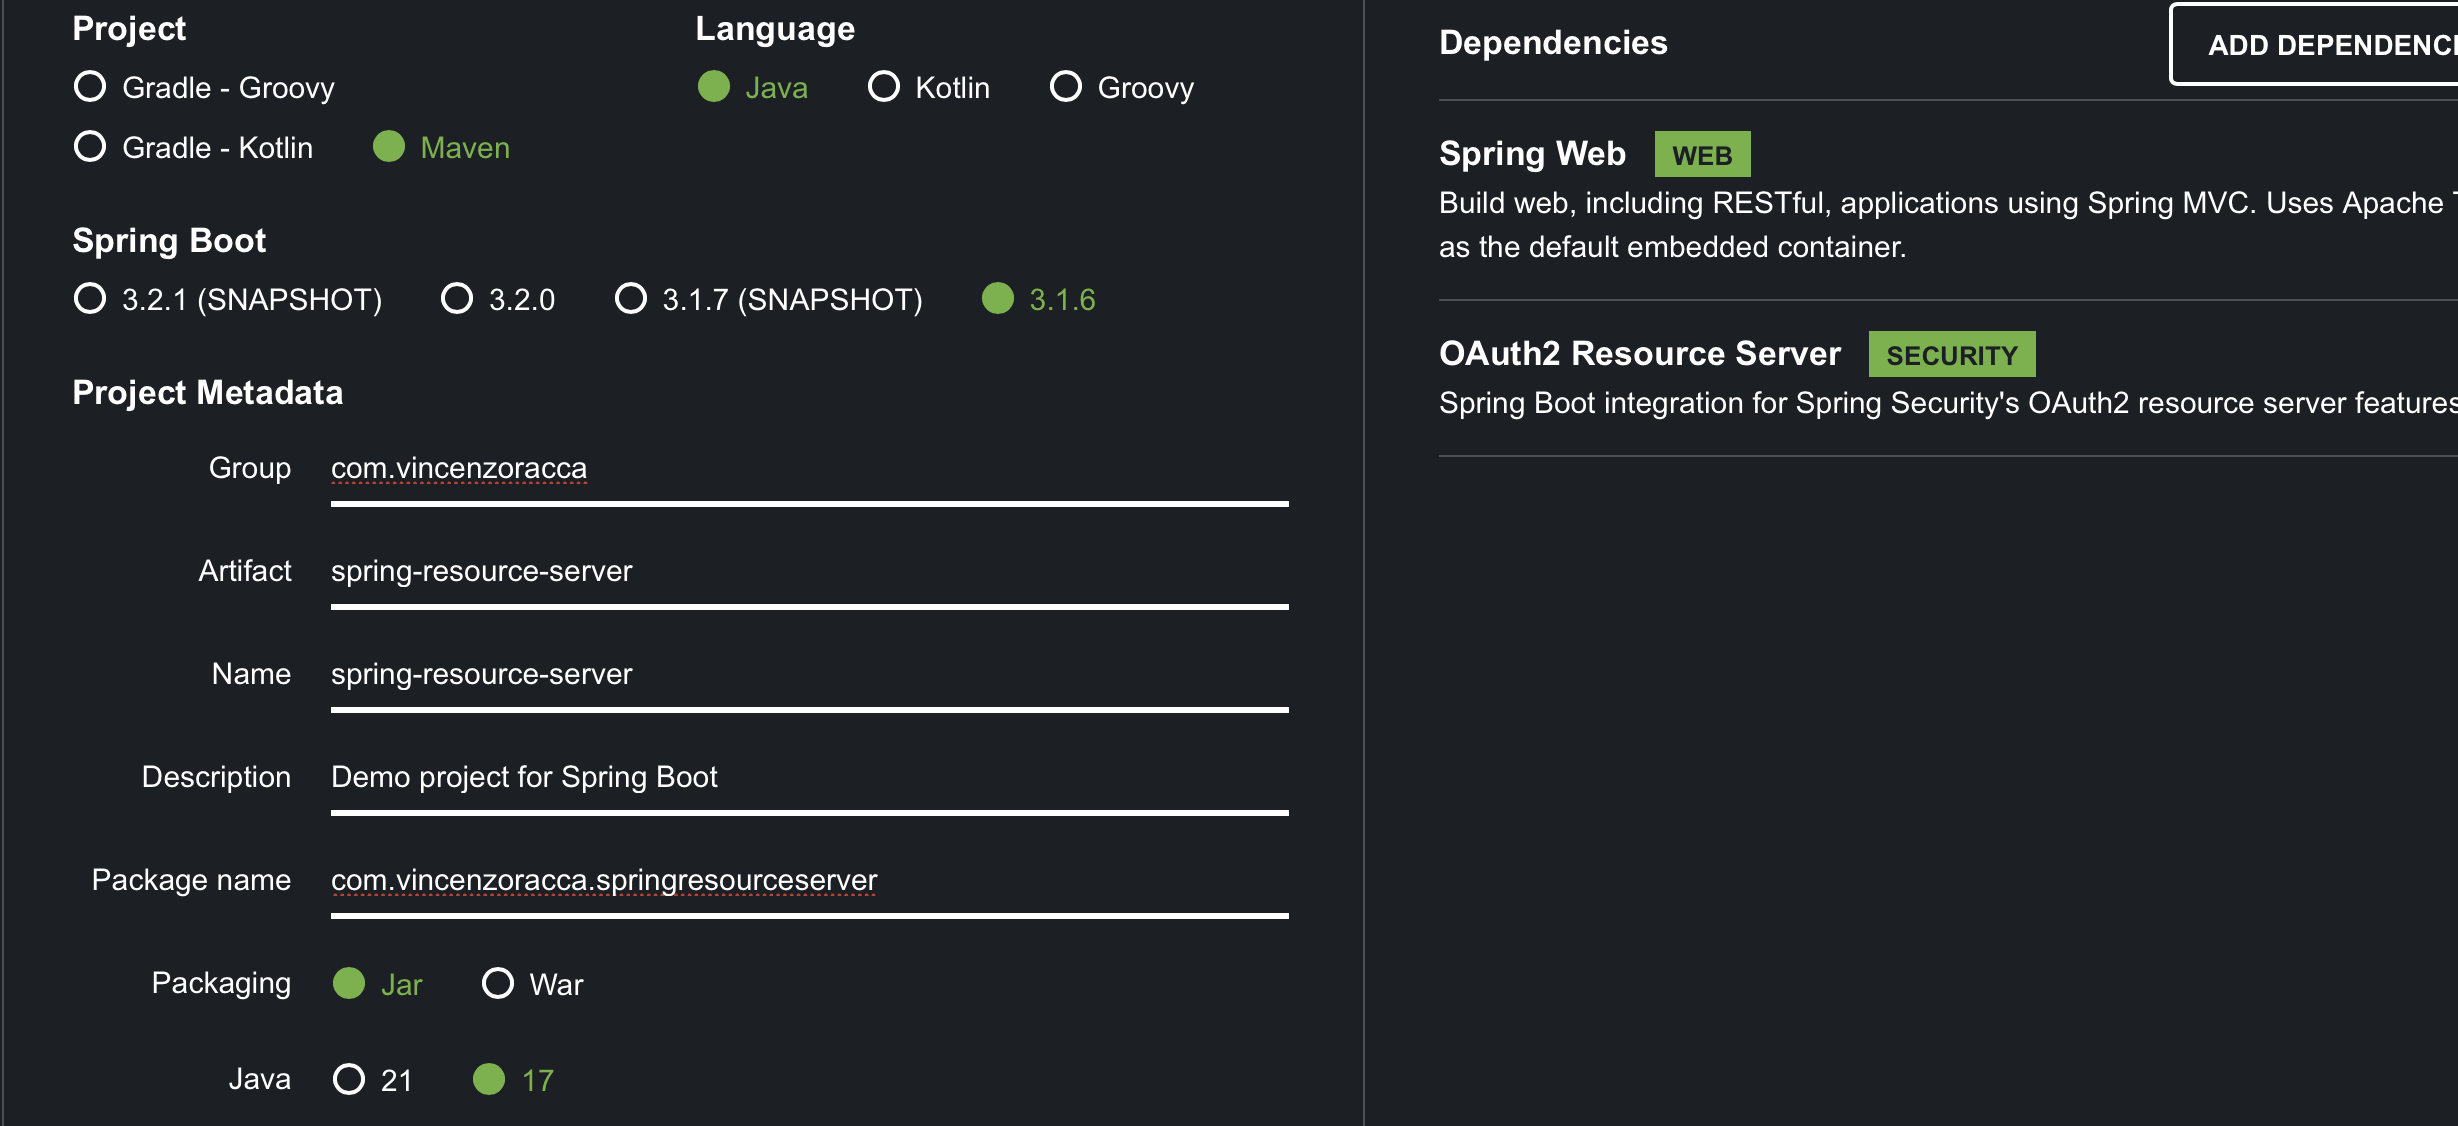
Let's once again go to the Spring Initializr site and add the following dependencies:
Now create the configuration file that handles security:
@Configuration
@EnableWebSecurity
public class SecurityConfig {

    @Bean
    SecurityFilterChain filterChain(HttpSecurity http) throws Exception {
        return http
                .oauth2ResourceServer(oauth2Conf -> oauth2Conf.jwt(Customizer.withDefaults()))
                .sessionManagement(sessionManagement ->
                        sessionManagement.sessionCreationPolicy(SessionCreationPolicy.STATELESS))
                .build();
    }

    @Bean
    JwtAuthenticationConverter jwtAuthenticationConverter() {
        var jwtGrantedAuthoritiesConverter = new JwtGrantedAuthoritiesConverter();
        jwtGrantedAuthoritiesConverter.setAuthorityPrefix("ROLE_");
        jwtGrantedAuthoritiesConverter.setAuthoritiesClaimName("groups");

        var jwtAuthenticationConverter = new JwtAuthenticationConverter();
        jwtAuthenticationConverter.setJwtGrantedAuthoritiesConverter(jwtGrantedAuthoritiesConverter);
        return jwtAuthenticationConverter;
    }

}
Let's analyze the code:
- With ..oauth2ResourceServer(oauth2Conf -> oauth2Conf.jwt(Customizer.withDefaults())) you are indicating to Spring Security that you are configuring a Resource Server and that the type of token is JWT.
- The Resource Server must be STATELESS "(sessionManagement...)".
- We configure a bean of type JwtAuthenticationConverter to automatically transform the JWT into the Authentication object and then create the User Principal for the Spring security context. In setAuthoritiesClaimName you specified "groups" since WSO2IS maps roles to that claim.
Create a simple greeting REST API now:
@RestController
public class HelloWordApi {

    @GetMapping
    public String welcome(@AuthenticationPrincipal Jwt jwt) {
        return "Hello World and " + jwt.getSubject();
    }
}
Finally, add the properties in the application.yml file:
spring:
  application:
    name: spring-resource-server
  security:
    oauth2:
      resourceserver:
        jwt:
          issuer-uri: ${WSO2IS_URL:https://localhost:9443}/oauth2/token
server:
  servlet:
    context-path: /spring-resource-server
Done!
Try running the two applications
Certified management for WSO2IS
To avoid errors on certificates (we are using https for WSO2IS), when you start the two applications Spring Boot, you need to add these two system properties:
-Djavax.net.ssl.trustStore=/Users/vracca/Documents/progetti_java/progetti_miei/spring-oauth2/client-truststore.jks
-Djavax.net.ssl.trustStorePassword=wso2carbon
That is, add the self-signed certificate from WSO2IS. You can find the client-truststore.jks file on my GitHub (link at the end of the page). Replace the certificate path appropriately.
Launch the two applications
Starts, in addition to WSO2IS, the two Spring Boot applications.
From a browser, go to:
http://localhost:8082/spring-resource-server.
You will get a 401 as a response. That's because you haven't authenticated yourself.
Then go to localhost:8082/oauth2/authorization/wso2 (default login URL).
You will be redirected to the WSO2IS login page. Enter the admin/admin credentials:
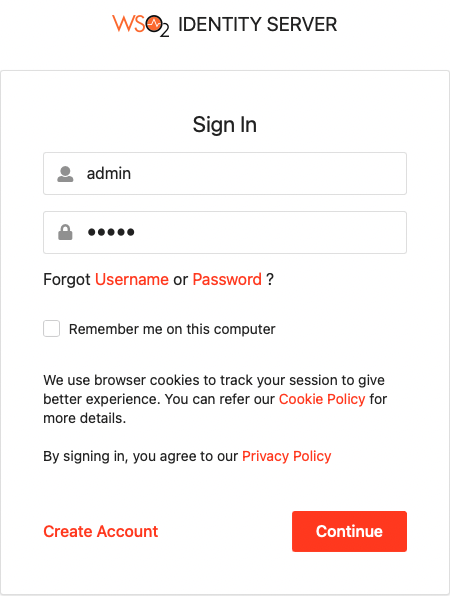
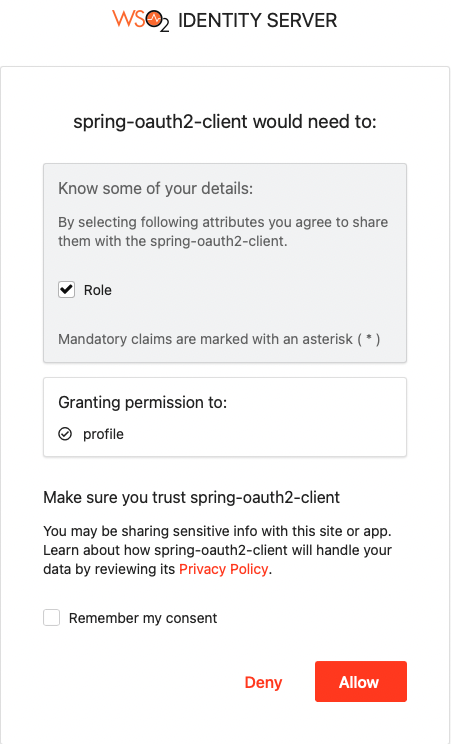
Click "Continue", then confirm permissions and click "Allow":
You will be successfully redirected to the Welcome page of spring-oauth2-client:

Now call the spring-resource-server service, again from spring-oauth2-client with the URL http://localhost:8082/spring-resource-server:

You will be successfully logged into the greeting page!
Conclusions
You have seen how to create with Spring an OAuht2 Client and a Resource Server.
You have exploited the potential of Spring Cloud Gateway to centralize security on multiple downstream services (resource servers).
You have also saved sessions to Hazelcast instead of keeping them in memory, so that you can have multiple instances
of the spring-oauth2-client service that share the same sessions.
You can try on a REST client like Postman directly the Resource Server, retrieving the token from the logs of spring-oauth2-client logs, or, without the need to start the latter, by making a token request directly to WSO2IS, using the grant type "password" flow (https://is.docs.wso2.com/en/latest/learn/try-password-grant/).
GitHub link of the complete project: https://github.com/vincenzo-racca/spring-oauth2
Other articles about Spring: Spring
Recommended books about Spring:
- Pro Spring 6 (Spring from scratch a hero): https://amzn.to/3N9TtkE
- Pro Spring Boot 2: An Authoritative Guide to Building Microservices, Web and Enterprise Applications, and Best Practices (Spring Boot of the detail): https://amzn.to/3TrIZic
References
- Resource Server: https://docs.spring.io/spring-security/reference/6.0/servlet/oauth2/resource-server/jwt.html
- CSRF logout: https://docs.spring.io/spring-security/reference/servlet/exploits/csrf.html#servlet-considerations-csrf-logout
- Spring Boot with WSO2IS: https://is.docs.wso2.com/en/latest/develop/spring-boot/
- Flow management on Spring: https://www.manning.com/books/cloud-native-spring-in-action (I highly recommend buying this book).