Containers are ephemeral
As seen in the first article on Docker (Get Started with Docker), containers are lightweight and isolated processes. They are also ephemeral: they are created, deleted, restarted, change IP addresses, etc.
When you delete a container and then recreate it, you lose all the changes you made previously.
This is because by default, Docker does not maintain container persistence.
Ideally, your containerized applications should be stateless. However, they should take advantage of a tool for data
persistence tool, like a database, a messaging system like Kafka.
Well, what if you wanted to containerize these persistence tools as well? It would be pointless to create a postgres container
if you couldn't then maintain persistence on its filesystem right?
Bind Mount & Volumi
Docker offers two options to enable persistence of container filesystems: bind mount and volumes.
The bind mount allows you to mount a directory of the Docker host inside a container.
Volumes instead are created and managed by Docker. They can be created explicitly executing the command docker volume create <volume_name>
or they can be created by Docker when creating a container. The data inside the volume
are stored in a directory on the Docker host.
A volume can be shared by multiple containers.
Whenever possible, it is preferable to use the technique of volumes rather than bind mount, as the latter is not very portable (it depends on the operating system of the Docker host, for example the Windows filesystem is different from the Linux filesystem, so you can't use exactly the same path, and therefore the same command, on the two different operating systems).
Let's look at these two techniques in detail.
Bind Mount
As mentioned earlier, with the bind mount technique, we can mount a folder of the host machine's filesystem
on the container's filesystem.
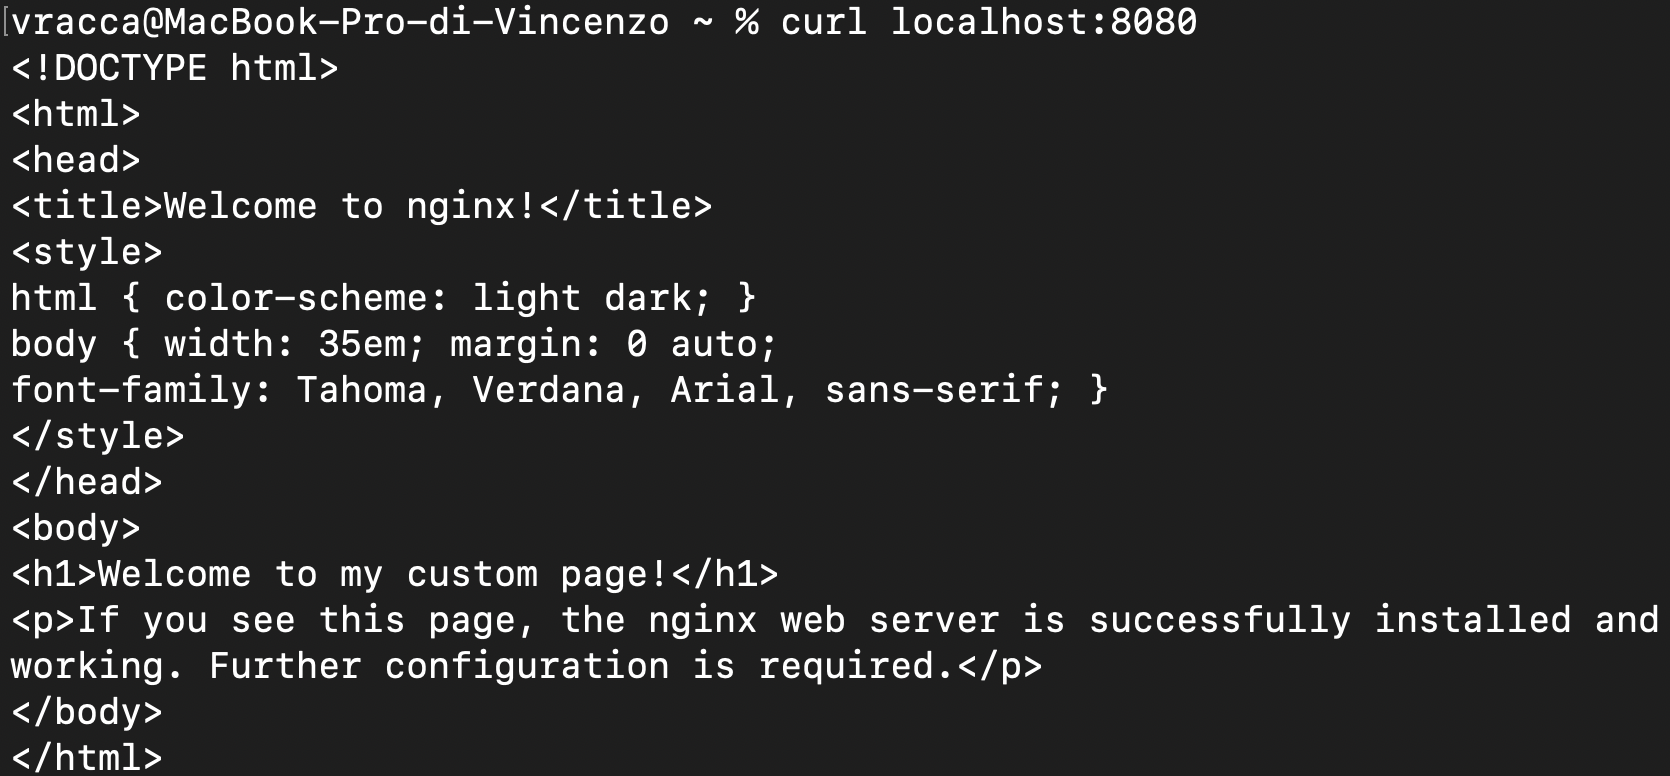
For example create an html page called index.html on our machine:
<!DOCTYPE html>
<html>
    <head>
        <title>Welcome to nginx!</title>
        <style>
            html { color-scheme: light dark; }
            body { width: 35em; margin: 0 auto;
                font-family: Tahoma, Verdana, Arial, sans-serif; }
        </style>
    </head>
    <body>
        <h1>Welcome to my custom page!</h1>
        <p>If you see this page, the nginx web server is successfully installed and
            working. Further configuration is required.</p>
    </body>
</html>
Now create an NGINX container that uses the html page you just created, using the bind mount technique: docker run --name=nginx -d -p 8080:80 -v /Users/share/nginx/html nginx
Let's analyze the command we just executed:
- With --name you indicate to Docker what is the name we assign to the container.
- With -d start the container in detached mode, so in the background.
- With -p 8080:80 we create a network tunnel by mapping port 80 of the container to port 8080 of our host.
- With -v /Users/share/nginx/html:/usr/share/nginx/html you indicate to Docker that we want to create a persistence layer, by mounting the contents of our host's directory (path before the colon), on the container's filesystem (path after the colon). We're basically saying, "in the container's html directory, put the contents of the host's html directory".
- Finally, nginx is the name of the image on which we want to create the container. Not indicating a tag, the image with tag latest will be taken by default.
Running a cURL, we can see that the default NGINX page is the one actually created on our host:
Volumes
Let's assume now that you want a containerized postgres database.
Run the following command that downloads version 13.5 of the official postgres image and creates a container
of the latter: docker run --name postgres -e POSTGRES_USER=user -e POSTGRES_PASSWORD=password -e POSTGRES_DB=mydb -p 5432:5432 -d postgres:13.5
It also creates a container of the pgAdmin tool, which is a frontend of postgres: docker run --name=pgadmin -e PGADMIN_DEFAULT_PASSWORD=user -e PGADMIN_DEFAULT_EMAIL=admin@admin.com -p 5050:80 -d dpage/pgadmin4
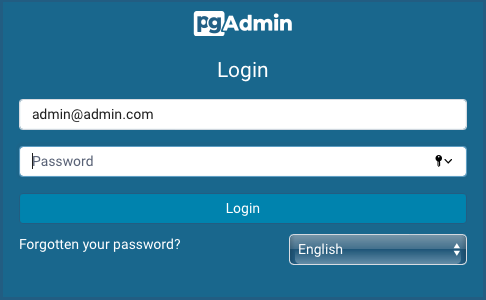
From the browser, go to localhost:5050 to access pgAdmin, and log in with your email and password set during the creation of the pgAdmin container:
Now connect pgAdmin with the container postgres database. Go to Servers, right click and go to Create. From here enter the db name, host, user and password of the postgres database set when creating of the postgres container:

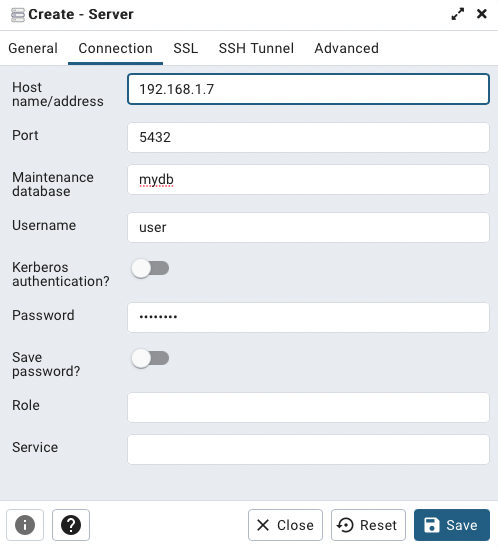
Finally, click on Save.
Now go to your database and create a table (right click on public and click on CREATE Script):
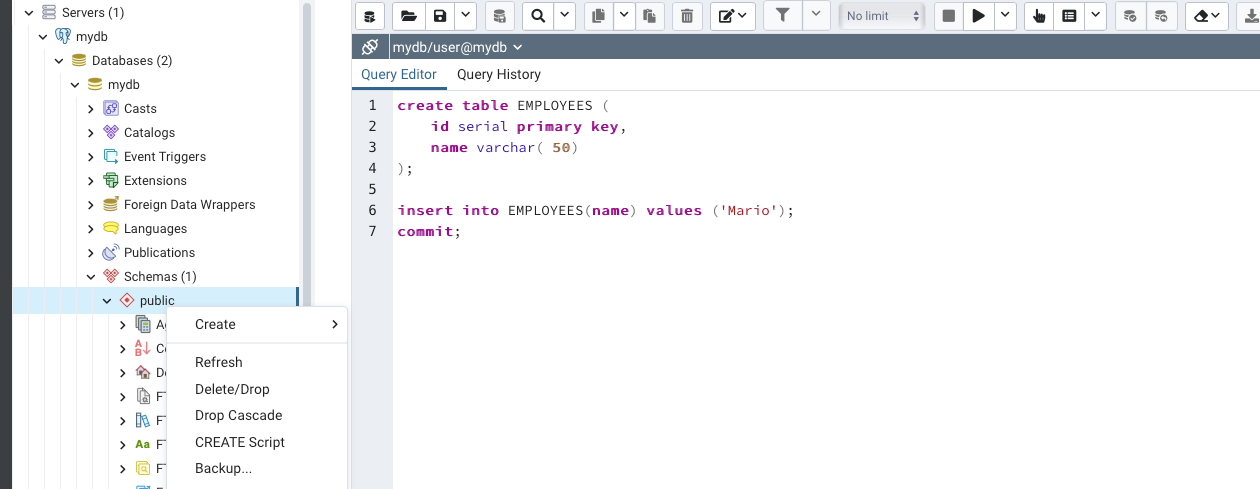
create table EMPLOYEES (
	id serial primary key,
	name varchar( 50)
);

insert into EMPLOYEES(name) values ('Mario');
commit;
You have created the EMPLOYEES table with one row. By running a select query, you can verify that the row has been correctly inserted:
select * from employees;
Well, now let's apply a common use case: suppose you want to upgrade your version of postgres to 14.1.
Stop and delete the postgres container: docker stop postgres && docker rm postgres
Now create the postgres container again but with the image version 14.1: docker run --name postgres -e POSTGRES_USER=user -e POSTGRES_PASSWORD=password -e POSTGRES_DB=mydb -p 5432:5432 -d postgres:14.1
Note that the command to use a volume during container creation is the same as the bind mount command. The difference is that the first parameter before the colon is the volume name instead of a path.
Log in to the database again from pgAdmin; going to the public section, you won't find your database anymore!
This is the expected behavior: you have deleted a container, so you have deleted its filesystem.
Let's use Docker volumes then! We delete the postgres container as we did before.
Now create a volume: docker volume create pgdata
It then creates the postgres container again, indicating this time that the pgdata volume is to be used: docker run --name postgres -e POSTGRES_USER=user -e POSTGRES_PASSWORD=password -e POSTGRES_DB=mydb -p 5432:5432 -v pgdata:/var/lib/postgresql/data -d postgres:14.1
Log back into pgadmin and create the table with a row, as you did before.
To check for persistence, delete the container and recreate it. You can see, by logging into pgAdmin, that the database, with its data, is still present.
How do I know which host directory the volume is mounted in?
Easy, with the docker inspect command on the newly created volume!
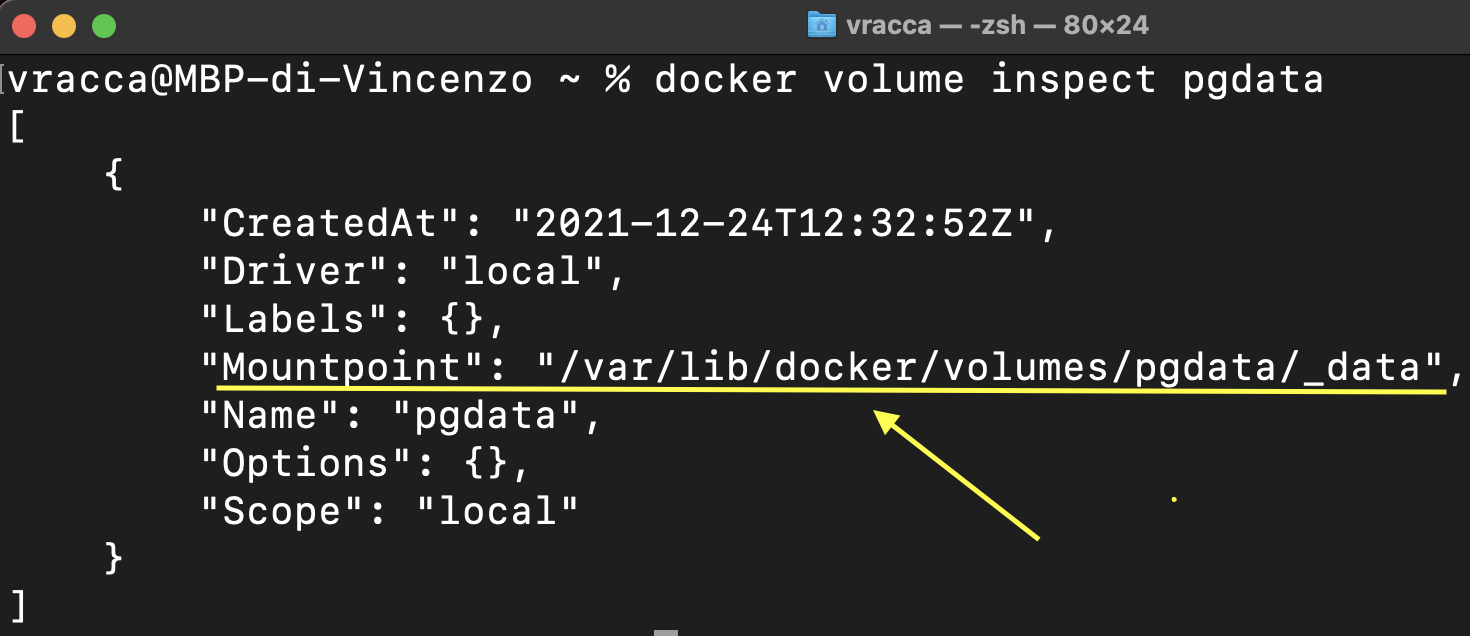
As we can see from the figure, the inspect on the volume allows you to view information about the volume,
including the path where it has been mounted on the host.
This is very useful when for example you want to transfer the container and its volume to another host:
you just need to copy the folder pgdata on the new Docker host to have all the data of the volume.
Conclusions
In this article you saw how to make a Docker container persistent with the volume and bind technique mount. As mentioned above, it is preferable to use the first method, as it is more portable. By making containers persistent, you can also containerize stateful applications and tools such as databases, messaging brokers.
Articles about Docker: Docker