After
OpenID Connect, OAuth2 e authorization code con Spring
Cloud Gateway e WSO2 Identity Server article,
some of you have asked me how to use another WSO2 product, namely WSO2 API Manager, instead of Spring Cloud
Gateway.
Although the official WSO2 doc explains the procedure to make this integration, I find this last one not easy
so I decided to write an article about it.
Why integrate WSO2IS into WSO2AM
Although WSO2AM can manage security with OAuth2 (but not only), delegating to an Identity Server this aspect can
bring some advantages.
First of all, an Identity Server can handle more security aspects, being created for that purpose.
Also, if one day we wanted to use for example Spring Cloud Gateway instead of WSO2AM, the switch would be much more
lighter, as we are going to replace only the technology that deals with aspects on the Gateway, keeping the component unchanged
that handles security.
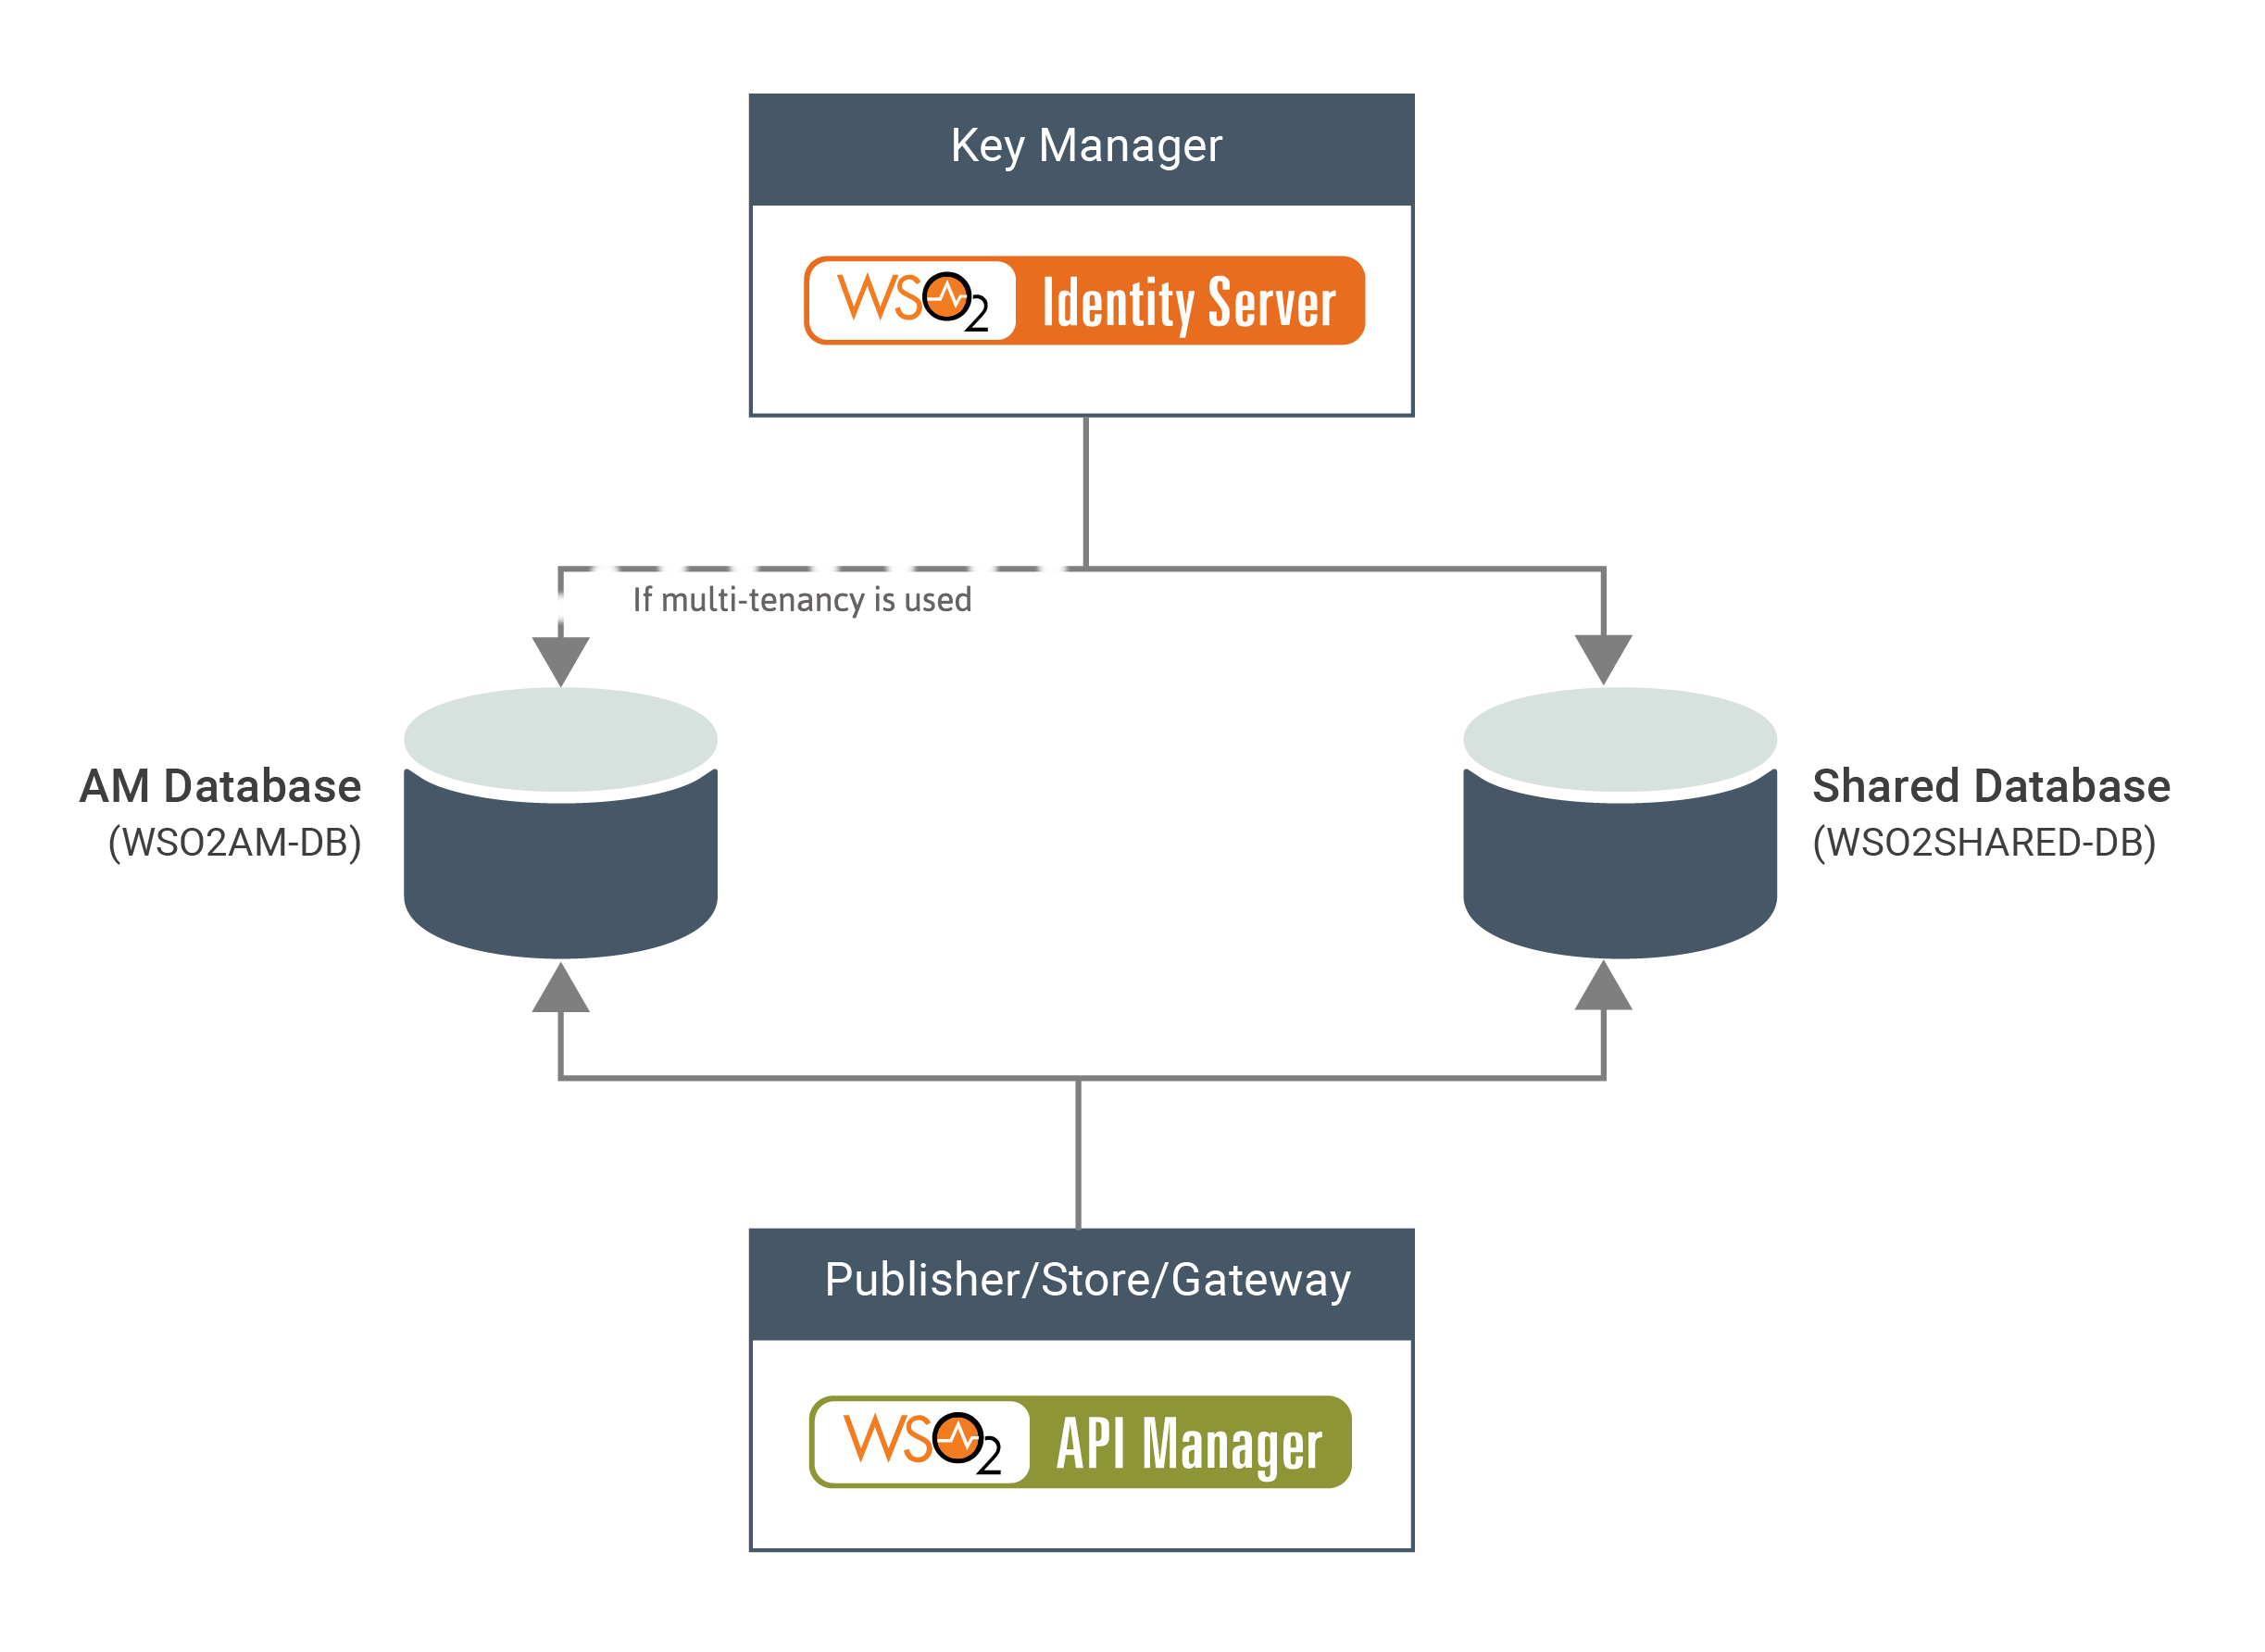
WSO2IS as Key Manager of WSO2AM
To have WSO2IS handle security, you need to tell WSO2AM that you want to use the Identity Server as the Key
Manager.
The official doc is this:
https://apim.docs.wso2.com/en/latest/administer/key-managers/configure-wso2is-connector/.
You need, in short, to create a shared database between the two WSO2 products, and change some settings on the deployment.toml of both products.
However, I'll show you a faster procedure!
Use the official docker-compose
WSO2 also provides a docker-compose that allows you to automatically create three containers:
- a container of MySQL, which will contain the databases of WSO2IS, WSO2AM, including the shared one, with attached SQL scripts to create tables and users
- a container for WSO2IS, with the deployment.toml file already modified
- a container for WSO2AM, with the deployment.toml file already modified to assign WSO2IS as Key Manager.
You can download the docker-compose, with config files, from the official repo:
https://github.com/wso2/docker-apim.git.
Specifically, you are interested in the docker-compose located at path:
docker-apim/docker-compose/apim-is-as-km-with-analytics.
However, there are some minor tweaks that need to be made that I will list below.
Change the images of WSO2IS and WSO2AM
Go to the path docker-apim/docker-compose/apim-is-as-km-with-analytics/dockerfiles/apim_.
You will find the following Dockerfile:
FROM docker.wso2.com/wso2am:4.0.0.0
LABEL maintainer="WSO2 Docker Maintainers <dev@wso2.org>"

# build arguments for external artifacts
ARG MYSQL_CONNECTOR_VERSION=8.0.17

# add MySQL JDBC connector to server home as a third party library
ADD --chown=wso2carbon:wso2 https://repo1.maven.org/maven2/mysql/mysql-connector-java/${MYSQL_CONNECTOR_VERSION}/mysql-connector-java-${MYSQL_CONNECTOR_VERSION}.jar ${WSO2_SERVER_HOME}/repository/components/dropins/
You need to replace the name of the image from docker.wso2.com/wso2am:4.0.0.0 to wso2/wso2am:4.0.0 (WSO2AM community version).
Do the same with WSO2IS. Go to the path docker-apim/docker-compose/apim-is-as-km-with-analytics/dockerfiles/is-as-km/, where you have the follow Dockerfile:
FROM docker.wso2.com/wso2is:5.11.0.0
LABEL maintainer="WSO2 Docker Maintainers <dev@wso2.org>"

# build arguments for external artifacts
ARG MYSQL_CONNECTOR_VERSION=8.0.17

# add MySQL JDBC connector to server home as a third party library
ADD --chown=wso2carbon:wso2 https://repo1.maven.org/maven2/mysql/mysql-connector-java/${MYSQL_CONNECTOR_VERSION}/mysql-connector-java-${MYSQL_CONNECTOR_VERSION}.jar ${WSO2_SERVER_HOME}/repository/components/dropins/

# copy extensions to the identity server home
COPY dropins ${WSO2_SERVER_HOME}/repository/components/dropins/
# copy customized webapps to the identity server home
COPY webapps ${WSO2_SERVER_HOME}/repository/deployment/server/webapps/
Replace the image name from docker.wso2.com/wso2is:5.11.0.0 to wso2/wso2is:5.11.0.
Edit the WSO2AM deployment.toml file
Edit the file:
docker-apim/docker-compose/apim-is-as-km-with-analytics/conf/apim/repository/conf/deployment.toml.
You need to delete (or comment on) the following lines:
[apim.analytics]
enable = true
config_endpoint = "https://analytics-event-auth.choreo.dev/auth/v1"
auth_token = "<on-prem-key>"
This allows you to not enable the analytics product, since you are not interested in it in this article.
You also need to uncomment the line:
#[apim.oauth_config]
and add this property to the apim.oauth_config section:
enable_outbound_auth_header = true
This property allows to transfer the Authorization Header also to downstream services, like the microservice
spring-resource-server microservice from the Spring Cloud Gateway article (this property is a bit like the TokenRelay
filter of Spring Cloud Gateway).
Avremo quindi in definitiva:
[apim.oauth_config]
enable_outbound_auth_header = true
#auth_header = "Authorization"
#revoke_endpoint = "https://localhost:${https.nio.port}/revoke"
#enable_token_encryption = false
#enable_token_hashing = false
Publish the spring-resource-server app
First, start docker-compose by going to the path docker-apim\docker-compose\apim-is-as-km-with-analytics
and running the command docker-compose up --build.
Then, start the spring-resource-server application. Compared to the previous article, I've integrated OpenAPI on this one
in order to import the OpenAPI yaml file on WSO2AM.
Download the openAPI file by going to the following url:
http://localhost:8080/spring-resource-server/v3/API-docs.yaml.
Change the server URL by entering your local IP, for example to me it is 192.168.1.9.
You need to do this because by entering localhost, WSO2AM would resolve this to the IP of its container.
This is for example my final openAPI file:
openAPI: 3.0.1
info:
  title: SpringOAuth2
  version: v1
servers:
- url: http://192.168.1.9:8080/spring-resource-server
paths:
  /:
    get:
      tags:
      - hello-word-API
      operationId: welcome
      responses:
        "200":
          description: OK
          content:
            '*/*':
              schema:
                type: string
      security:
      - bearerAuth: []
components:
  securitySchemes:
    bearerAuth:
      type: http
      scheme: bearer
      bearerFormat: JWT
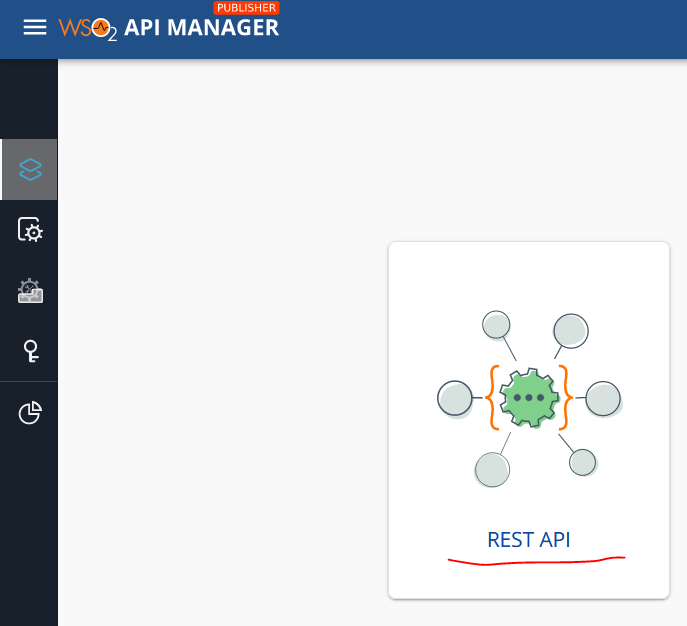
Now log in to the publisher console at::
https://localhost:9443/publisher/.
Click on REST API:
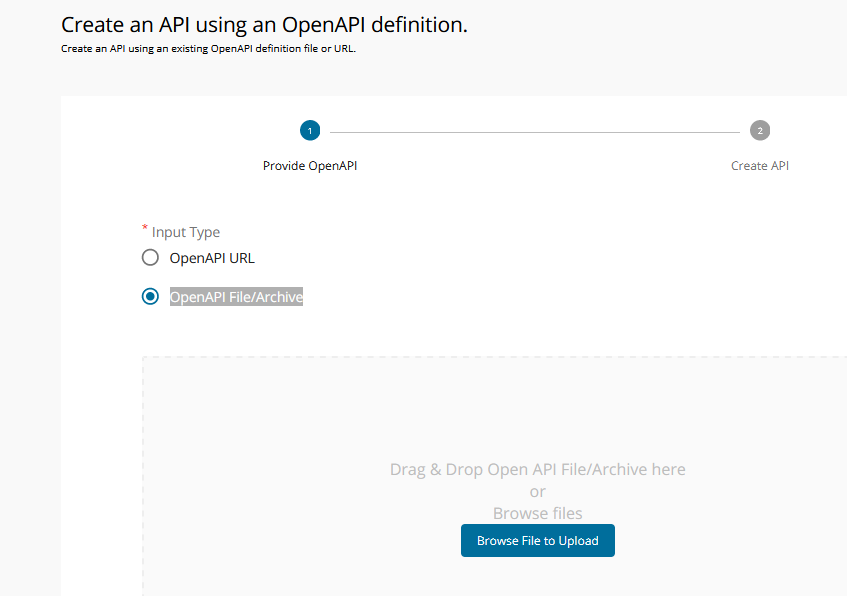
Then click on Import Open API, choose OpenAPI File/Archive and then click on Browse File to Upload to upload the yaml file:
Click Next, type /spring-resource-server in the Context text field:
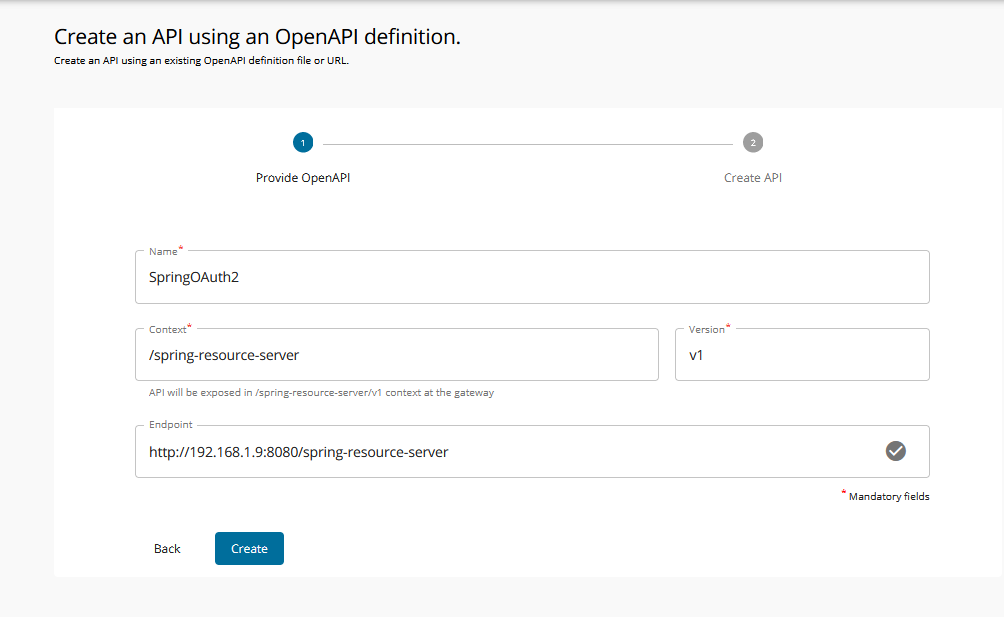
Finally, click on Create.
To publish the API, you must choose a Business Plain and you must deploy a Revision.
Click on Business Plain, on the Overview screen:
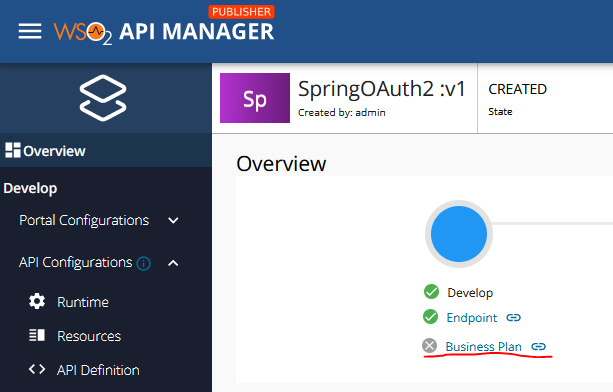
Choose any option, such as Unlimited and finally click Save.
Go to the Deployments screen on the left and then click on Deploy:
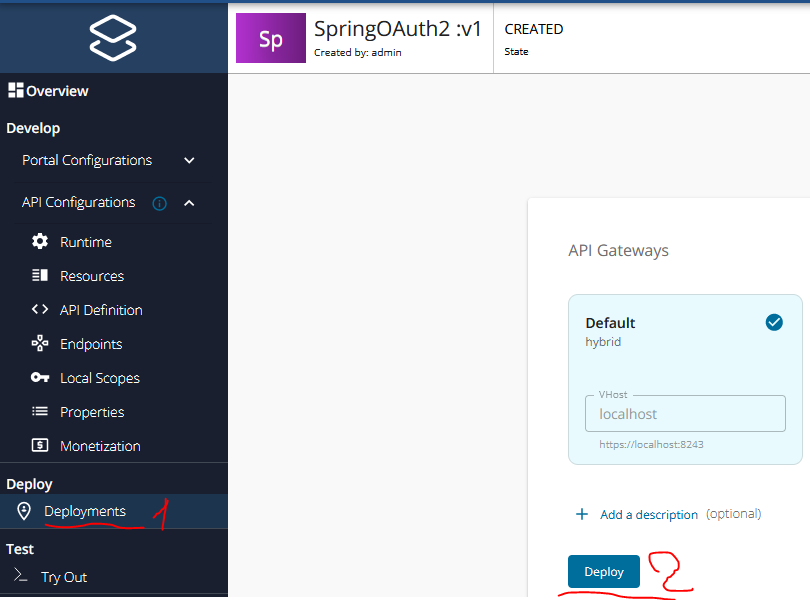
Go to the Overview screen and click on Publish:

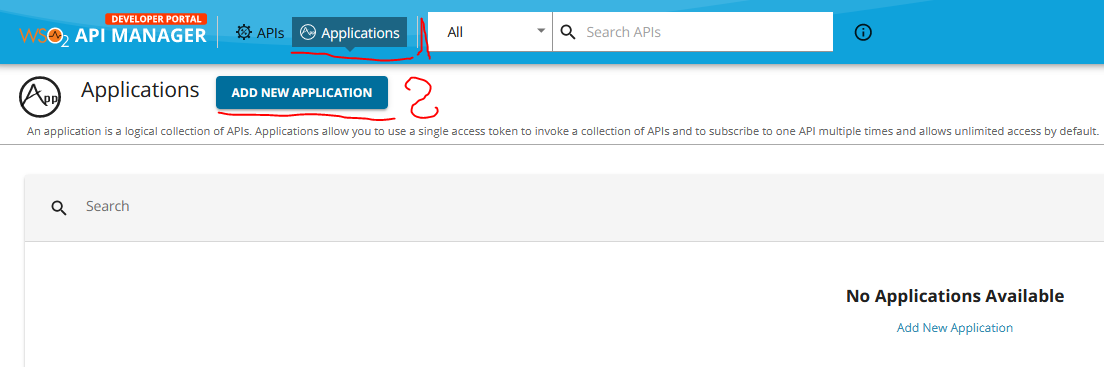
Create an Application in Developer Portal
From your browser, go to https://localhost:9443/devportal/, click on Applications at the top and then Add New Application:
Here you are basically creating the Service Provider in WSO2IS. Give the application a name and click Save:

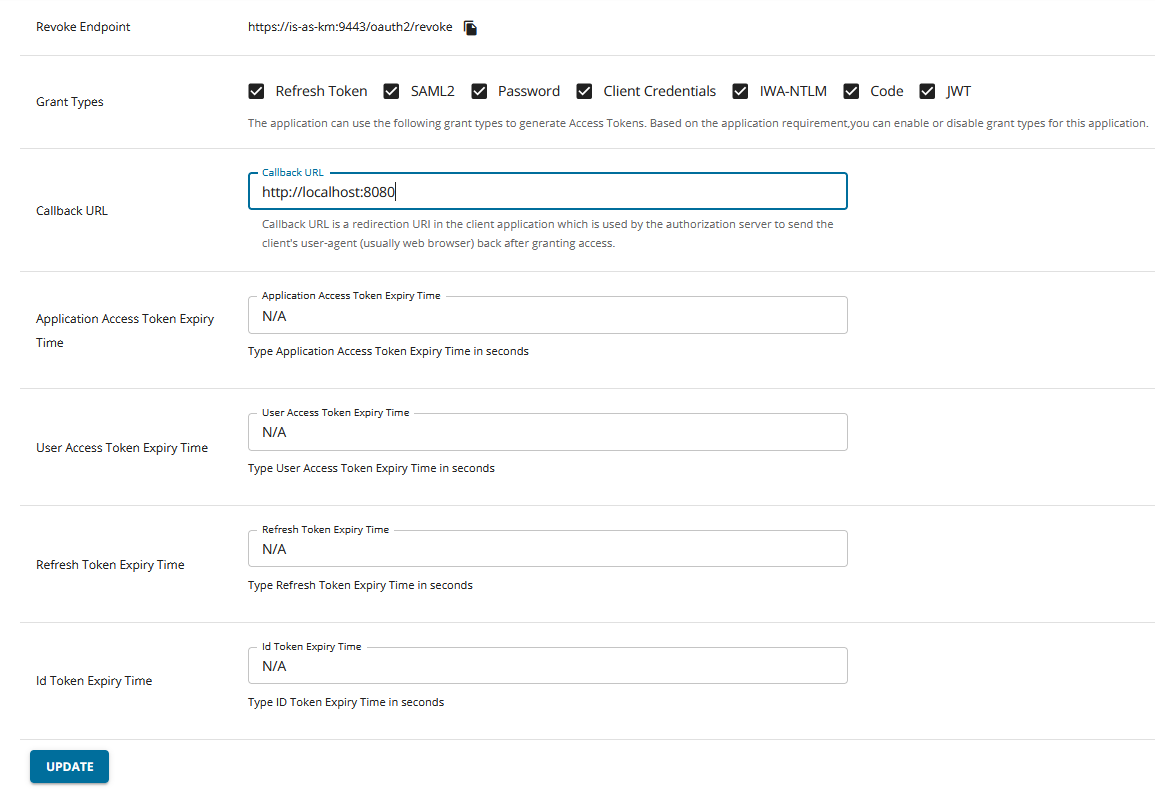
Now go to the OAuth2 Tokens screen in the Production Keys section and click on GENERATE KEYS.
Enable also Code among the Grant Type, enter a Callback URL and finally click on UPDATE.
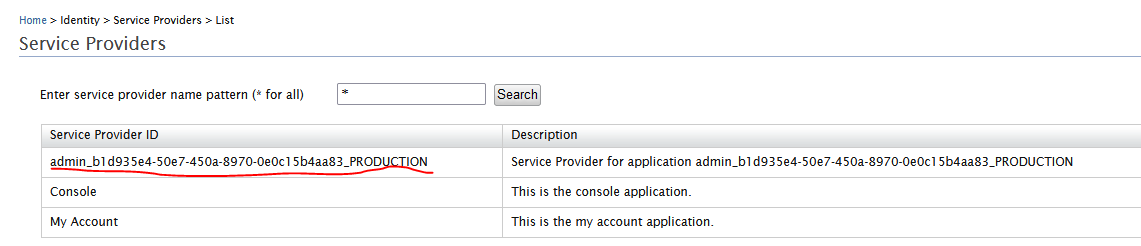
The creation of an Application and the association of WSO2IS as Key Manager, will cause the creation of a Service Provider in WSO2IS. If in fact you go to the WSO2IS carbon console (https://localhost:9444/carbon/), at the Service Providers screen you will see:
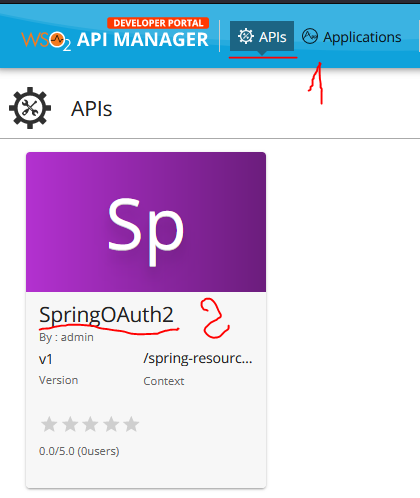
Subscribe spring-resource-server APIs to the created application
Click on APIs at the top and then on SpringOAuth2.
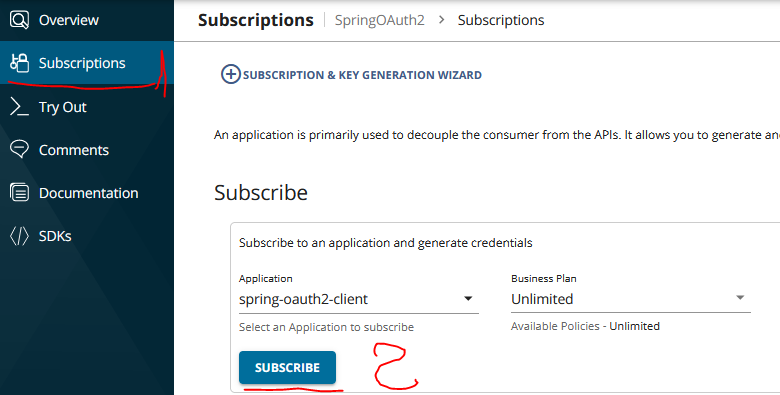
Then go to the Subscriptions screen and subscribe to the APIs by clicking the SUBSCRIBE button.
Try the spring-resource-server app
In this example, you will use the OAuth2 stream with grant type password.
In production, avoid using this grant type (read more:
https://oauth.net/2/grant-types/password/).
Use this flow because the redirects in this example would not work well, since you are accessing WSO2IS
via tunnelling (localhost:4444 -> is-as-km:9443).
To test with a REST Client the authorization code flow, after having set the WSO2IS endpoints in the right way,
you can use this guide:
https://apim.docs.wso2.com/en/latest/design/API-security/oauth2/grant-types/authorization-code-grant/.
Back to us! Do the call
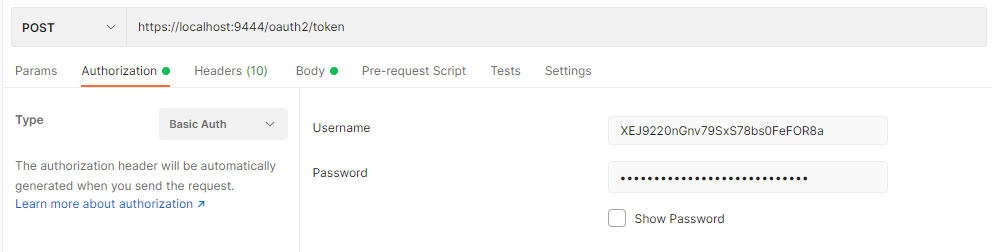
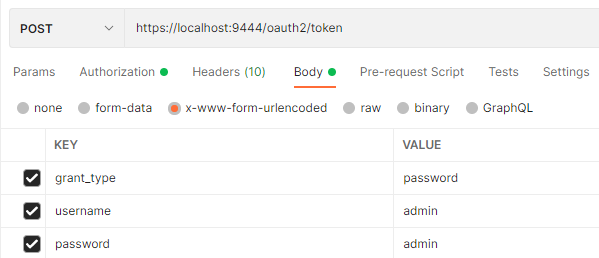
https://localhost:9444/oauth2/token.
You use the basic authentication passing as username the clientId and as password the clientSecret:
In the Request Body, set the parameters: grant_type=password, username=admin and password=admin:
Do the call, you should get a similar response:

The cURL related to the previous request, is as follows: curl --location --request POST 'https://localhost:9444/oauth2/token' \ --header 'Authorization: Basic WEVKOTIyMG5HbnY3OVN4Uzc4YnMwRmVGT1I4YTp6dW1nRzJqQUlQMVpQUHdzYjU1S0V0aWJrMGNh' \ --header 'Content-Type: application/x-www-form-urlencoded' \ --data-urlencode 'grant_type=password' \ --data-urlencode 'username=admin' \ --data-urlencode 'password=admin'
You can take the received access token and make the following call:
http://localhost:8280/spring-resource-server/v1
putting in the Header the Bearer token. Here is a cURL example of the request:
curl --location --request GET 'http://localhost:8280/spring-resource-server/v1' \
--header 'Authorization: Bearer eyJ4NXQiOiJNell4TW1Ga09HWXdNV0kwWldObU5EY3hOR1l3WW1NNFpUQTNNV0kyTkRBelpHUXpOR00wWkdSbE5qSmtPREZrWkRSaU9URmtNV0ZoTXpVMlpHVmxOZyIsImtpZCI6Ik16WXhNbUZrT0dZd01XSTBaV05tTkRjeE5HWXdZbU00WlRBM01XSTJOREF6WkdRek5HTTBaR1JsTmpKa09ERmtaRFJpT1RGa01XRmhNelUyWkdWbE5nX1JTMjU2IiwiYWxnIjoiUlMyNTYifQ.eyJzdWIiOiJhZG1pbiIsImF1dCI6IkFQUExJQ0FUSU9OX1VTRVIiLCJhdWQiOiJ3cHI5VEJYczdBaWVHcTcxdWYxVDY4WndyOFlhIiwibmJmIjoxNjQ2NDgxNTIxLCJhenAiOiJ3cHI5VEJYczdBaWVHcTcxdWYxVDY4WndyOFlhIiwiaXNzIjoiaHR0cHM6XC9cL2xvY2FsaG9zdDo5NDQzXC9vYXV0aDJcL3Rva2VuIiwiZXhwIjoxNjQ2NDg1MTIxLCJpYXQiOjE2NDY0ODE1MjEsImp0aSI6IjFmODQxNzUwLThkMzgtNGRmNC04YjRkLTI0M2YyODJlYThkZCJ9.Igjo5V8efBY6qLiXtJNNwX2a5qb3d4miUi5jvOQZWjCubCLQ1nxBDNR6tVugB-DIgGagtssBPPaudh2PL1aWTiSC3vDzWR9PTIm99BEYrXGUmtgoEmdOIr65wfyT7t2eGrg2pEKbpbdK4lmFLkKAW9H3Wo6O-qFmKbdTIS0NaZ8knDwM3i_Bim4LjfSTZ9vJzuLjudPCBAqivd6W23UjnMS5eyg6x8eg6W2LWRFYEJE5f0JgiryasyPHCTF5si3LwNJ6EK_WJhH_k6sJ5Jx2ukR-fdI5hh2w1nxFVx9ywEbaNipPuOAppY_EIrE4vtOJR3kDo4BGDBYdFwYx2pgKfg'
The service should respond with 200 OK and the message Hello World and admin.
Conclusions and considerations
In this article you saw how to use the WSO2 API Manager product instead of Spring Cloud Gateway.
However, as you may have noticed, the authentication flow is not identical. Here the OAuth2 Client is the REST client, i.e. the FE.
The FE is responsible for requesting and managing the token. With Spring Cloud Gateway, the FE is not aware of the token.
Managing the token on the backend side allows for more security since the JWT is not exposed to the outside world.
Of course, it is not always possible to avoid FE-side token management, it depends on the various use cases.
If the FE is a Single Page Application, it might be a good choice to have a backend like OAuth2 Client (see flow of the previous article).
For mobile apps, it could be a good choice to make them talk directly with the Authorization Server,
choosing the flow with Authorization Code + PKCE.
You can find the docker-compose and the WSO2 configuration files already updated as described in the article, on my
GitHub repository:
https://github.com/vincenzo-racca/wso2am-is-as-km
References
- My article on OIDC + OAuth2 flow with Spring Cloud Gateway:
https://www.vincenzoracca.com/en/blog/framework/spring/spring-oauth/. - WSO2IS as Key Manager:
https://apim.docs.wso2.com/en/latest/install-and-setup/setup/distributed-deployment/configuring-wso2-identity-server-as-a-key-manager/.